
Node.js Parsing Arguments
Understanding Command-Line Arguments
The Strings of text used to transfer extra information to a program through the command-line interface (CLI) while execution of the application, is known as Command-Line arguments. These arguments ordinarily incorporate the data used to set the configuration of an application. These arguments can be read by a user through the global instance in Node.js, i.e. process object.
The arguments are usually passed in the prompt after the program name. Here's an example of the syntax of command-line arguments:
$ [runtime] [script-name] [arg-1 arg-2 arg-3 ... arg-n]
From the above syntax, we can conclude that:
- [runtime] is a runtime environment for the program to execute. E.g., java, node, sh, and many more.
- [script-name] is the name for the program/script related to the runtime.
- [arg-1, arg-2, arg-3 ... arg-n] are the arguments passed to the program and are usually separated by a space. However, few runtimes use commas to differentiate among various arguments.
Moreover, we can pass arguments in the pairs of key-value relying on the program.
Understanding the need of Command-Line Arguments
The significant advantages of using command line arguments are as follows:
- The Command-line arguments are delivered as strings to the program. These make the arguments flexible as the string data type are easily convertible in other data types inside an application.
- We can pass information to an application before it begins. This is predominantly beneficial, if we are executing significant configuration settings.
- The arguments are utilized in aggregation with batch files and the scripts, that is incredibly convenient for automated testing.
- We can efficiently deliver unlimited arguments through the command line.
Some drawbacks of using command line arguments are as follows:
- One of the most significant drawbacks of delivering information through the command line is that interface has a steep learning curve, which makes it difficult for most users to use CLI tools.
- Command-line applications are not accessible through smaller devices like smartphones and tablets. We can only use them with desktop or laptop computers.
Parsing command line Arguments in Node.js
It is a fundamental programming activity to parse in arguments through the Command-Line, and a requisite for an individual who is practicing to create a Command-Line Interface (CLI). Handling arguments in Node.js is a bit easy process; however, we will explore some third-party packages too, that will add some beneficial features.
Let's us discuss the use of these arguments through the built-in method, as well as some of the popular packages given as below:
- Argument Vector
In Node.js, just like C and various allied environments, the shell receives all the Command-Line arguments and gives them to the process in the form of an array called argv. argv , whch is an abbreviation for Argument Vector.
We need to pass arguments to a Node.js application, and then, these arguments are processed in the form of an array, that is Argument Vector, which is accessible in Node.js script using process.argv. The process.argv is a global instance that we can utilize without downloading any other libraries for it.
Now, let's create a basic Node script that can print all the command-line arguments.
File: node_args.js
console.log('This is your array:')
console.log(process.argv)
Now, we can execute the above file by typing the following syntax, as shown below:
$ node node_args.js ONE TWO THREE FOUR FIVE
The output of the above should look something like this:
This is your array:
[
  'C:\\Program Files\\nodejs\\node.exe',
  'D:\\Nodejs\\node_args.js',
  'ONE',
  'TWO',
  'THREE',
  'FOUR',
  'FIVE'
]
Now, we can see that our first index contains the path of node executable, the second one contains the path of the JavaScript file, the third one contains our first Argument we passed, and rest follows the same in their respective order.
Just like many other languages, the array indexes used in JavaScript are zero-based, which means the first element of the array will be stored at Zeroth Index, the second one at First Index and so on. Hence, we can say that the last element of the array will be stored at the "n-1" index, where n is the total number of elements present in the array.
Let's try one more example to see what exactly the above paragraph says.
File: node_args2.js
const command = process.argv[2]
if (command === 'open') {
    console.log('Opening File!')
}
else if (command === 'remove') {
    console.log('Removing File!')
}
else {
    console.log('Creating File!')
}
In the above example, we have declared a variable 'command' which is taking the initial value from the index [2] of the array and passing the value to check if the input argument meets the requirement of the condition and print the message for the same.
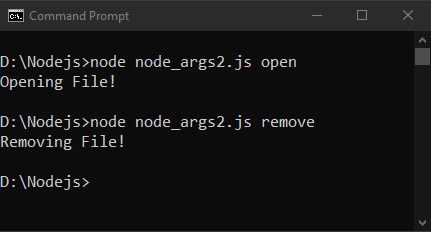
Now, we can execute these different statements to see how it will work.
$ node node_args2.js open
$ node node_args2.js remove
This statement will provide us with the output, as shown below:
The Yargs Module
Apart from the Build-in module for parsing arguments, there are various third-party modules available that help parse command-line arguments that are passed to Node.js programs, and one of them is known as the yargs module. We can pass the arguments in the pairs of key-value using this module, and the argument values can be later accessible in our program with the help of corresponding keys.
Yargs is a pirate-themed application and an incredible tool with about 47 million weekly downloads, which means it is an extensively used and well-tested utility. Since yargs is a third-party module, that is available on the npm Official website and is accessible using the link given below:
https://www.npmjs.com/package/yargs
We can easily install it by using the following command in our terminal:
$ npm i yargs@16.1.0
Now, let’s have a look at the following script:
File: yargs.js
const yargs = require('yargs')
const input = yargs.argv
console.log(yargs.argv)
console.log('Name: ' + input.name)
console.log('Age: ' + input.age)
In the following script, we have defined a constant, which takes the value from the arguments, a user enters and prints it as a string via console.log(). Moreover, we have provided the command “yargs.argv”, which provides the array of the command-line arguments provided to the system.
To run the above program, we are going to type the following command in the terminal:
$ node yargs.js --name=Suhail --age=21
Here, we are passing the values for both name and age arguments. The output of the script should look as below:
{ _: [], name: 'Suhail', age: 21, '$0': 'yargs.js' }
Name: Suhail
Age: 21
Let’s understand the fundamental difference between ‘process.argv’ and ‘yargs.argv’. For this, we are going to print our arguments using both the commands.
File: differ.js
const yargs = require('yargs')
console.log(process.argv)
console.log(yargs.argv)
Now, let’s execute the above program to see exactly how the two are going to differ.
$ node differ.js add --title=“This is my title”
After executing the above statement, we will get the output like this:
[
  'C:\\Program Files\\nodejs\\node.exe',
  'D:\\Nodejs\\differ.js',
  '--title=This is my title'
]
{ _: [], title: 'This is my title', '$0': 'differ.js' }
As we can observe, when we pass in the arguments, Yargs expects to contain the arguments after the program name only. However, process.argv generally begins with extra elements. For example, in the above output of process.argv, the array starts with the runtime application path and the script's path.
There are many features of yargs that make the parsing command-line arguments more compatible and exciting, allowing the users to focus on developing a program without worrying about the arguments. Some of them are as follows:
- Yargs provides the commands and (grouped) options (e.g., module run -n --force) to the users.
- Yargs also provides the arguments based dynamically generated help menu.
- Yargs delivers the bash-completion shortcuts for commands and options.
Among the most prevailing methods to use the Yargs libraries is the .command() option, which provides the user to create, expose and call Node.js functions through the terminal or the command-line shell. Here a simple addition program to understand this Yargs feature in action:
File: myApp.js
//A Simple addition
const { demandOption } = require('yargs')
const yargs = require('yargs')
//Customize yargs version
yargs.version('1.1.0')
//Create add command
yargs.command({
    command: 'add',                       //defining add command
    describe: 'Add two numbers',        //describing the command
    builder: {
        first: {
            describe: 'First Number',
                              //describing the first number
            demandOption: true,
                     //requires a necessary input from user
            type: 'number'
        },
        second: {
            describe: 'Second Number',
                             //describing the second number
            demandOption: true,
            type: 'number'
        }
    },
    handler: function (argv) {
        console.log(argv.first + argv.second)
                                 //printing the added value
    }
})
yargs.parse()                               //parse the arguments
In the above snippet, we have called the program with the “add” command that incites the function and prints the value on the command-line that we passed to it.
To execute the above program, let’s type the following command on the terminal:
$ node myApp.js add --first=6 --second=7
The output of the same will look like this:
13
Have a look at the elements used in the above program:
- version(): This method is used to display the version number.
- command(): This method is used to define the command displayed by the application. We can also provide the description and options for each command, like in the above code, “add” is the command.
- demandOption(): We have provided the Boolean value to demandOption, which controls whether the option is required or not, and if any of the options are missing, it will provide an output as:
Missing required arguments: first, second
- parse(): This method is used to parse the input arguments and prints to the command-line.