JavaFX CheckBox
In the JavaFX application, to get the user information in the form of choices from the user, a form is created using checkboxes that allow the user to select two or more choices for specific fields. In JavaFX application, javafx.scene.control.CheckBox class is used to include checkboxes in an application.
JavaFX CheckBox:
Example:
import javafx.application.Application;
import javafx.scene.Scene;
import javafx.scene.control.CheckBox;
import javafx.scene.control.Label;
import javafx.scene.layout.HBox;
import javafx.stage.Stage;


public class CheckboxUI extends Application {

    @Override
    public void start(Stage primaryStage) throws Exception {
    Label l = new Label(" Choose the languages you know : ");
        CheckBox newc1 = new CheckBox(" English ");
        CheckBox newc2 = new CheckBox(" Hindi ");
        CheckBox newc3 = new CheckBox(" Marathi ");
        CheckBox newc4 = new CheckBox(" Spanish ");
        HBox root = new HBox();
        root.getChildren().addAll(l,newc1,newc2,newc3,newc4);
        root.setSpacing(5);
        Scene scene=new Scene(root,600,400);
        primaryStage.setScene(scene);
        primaryStage.setTitle(" JavaFX CheckBox Example");
        primaryStage.show();      }
    public static void main(String[] args) {
        Application.launch(args);
    }
}
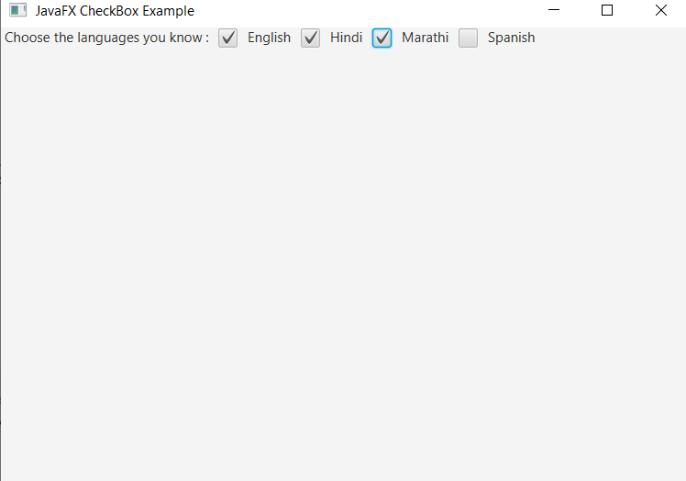
Output:
In order to create the checkbox in JavaFX, we have to import all the required libraries such as javafx.application.Application, javafx.scene.Scene, javafx.stage.Stage, javafx.scene.control.CheckBox, javafx.scene.control.Label, javafx.scene.layout.HBox;
Then we have created one class named CheckboxUI extending the Application class. Also, we have to override the start method to provide implementation details. This method creates an object of Stage as primaryStage. For the container to hold the button with Checkbox and Labels, an HBox object is created which is then passed to the Scene class object.
Label for Entering languages you know is created using the constructor with label text. Also, checkboxes are created for various languages which are then added to HBox. The stage is prepared, the title is set and the show() method is called to display output. In order to run the application, the launch(args) method is called in the main() method. In output Frame like container is displayed with the title, "JavaFX CheckBox Example". Also, it displays checkboxes for various languages like English, Marathi, Hindi, and Spanish. We can select two or more languages.
Retrieving the data in the CheckBoxes:
In the JavaFX application, all the data entered in the checkboxes can be retrieved using the isSelected() method.
Example:
import javafx.application.Application;
import javafx.scene.Scene;
import javafx.scene.control.Button;
import javafx.scene.control.CheckBox;
import javafx.scene.control.Label;


import javafx.scene.layout.HBox;
import javafx.stage.Stage;


public class CheckboxUI extends Application
{
static  String items= "";


    @Override
    public void start(Stage primaryStage) throws Exception
   {

       Label l = new Label (" Choose the languages you know : ");
        CheckBox newc1 = new CheckBox (" English ");
        CheckBox newc2 = new CheckBox (" Hindi ");
        CheckBox newc3 = new CheckBox (" Marathi ");
        CheckBox newc4 = new CheckBox (" Spanish ");
        Button button= new Button (" Submit ");


        button.setOnAction(e ->
        {

        if (newc1.isSelected())
        {
        items += " English\n ";
        }

        if (newc2.isSelected())
        {
        items += " Hindi\n ";
        }

        if (newc3.isSelected())
        {
        items += " Marathi\n ";
        }

        if (newc4.isSelected())
        {
        items += " Spanish\n ";
        }
        System.out.println(" Languages known: "+items);


        }
        );

        HBox root = new HBox();
        root.getChildren().addAll(l,newc1,newc2,newc3,newc4,button);

        root.setSpacing(5);
        Scene scene=new Scene(root,600,400);
        primaryStage.setScene(scene);
        primaryStage.setTitle(" JavaFX CheckBox Example");
        primaryStage.show();
        }


    public static void main(String[] args)
  {
        Application.launch(args);
    }
}
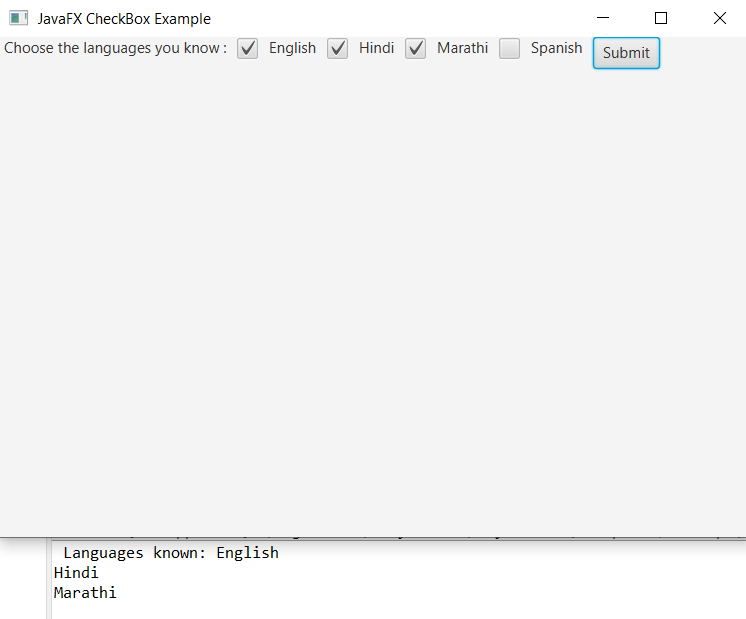
Output:
In order to create the checkbox in JavaFX, we have to import all the required libraries such as javafx.application.Application, javafx.scene.Scene, javafx.stage.Stage, javafx.scene.control.CheckBox, javafx.scene.control.Label, javafx.scene.control.Button, javafx.scene.layout.HBox.
Then we have created one class named CheckboxUI extending the Application class. Also, we have to override the start method to provide implementation details. This method creates an object of Stage as primaryStage. For the container to hold the button with Checkbox and Labels, an HBox object is created which is then passed to the Scene class object.
Label for Entering languages you know is created using the constructor with label text. Also, checkboxes are created for various languages which are then added to HBox. One submit button is created. On clicking on the button it will display all languages known. Using the isSelected() method it is checked whether the particular checkbox is clicked or not and accordingly content is displayed. The stage is prepared, the title is set and the show() method is called to display output. In order to run the application, the launch(args) method is called in the main() method. In output Frame like container is displayed with the title, "JavaFX CheckBox Example". Also, it displays checkboxes for various languages like English, Marathi, Hindi, and Spanish. We can select two or more languages. When we select English, Marathi, Hindi and click on the submit button, it will display output in console as Language known: English, Hindi, Marathi.