JavaFX ID selector
In the JavaFX application, in order to apply various css effect using the id selector, we use the various css classes available in the JavaFX. This is generally used to improve the appearance of the object. It is used to make the interface more understandable to the user. In order to design the web pages, we can use a CSS ID selector to give different colors, sizes, font style, spacings, paragraphs, and alignments for a specified object. The ID name is specified using the setId() method and in the CSS file, the # symbol is used to specify the css properties. The ID selector in CSS is nothing but a unique string which is assigned to scene node. The ID styles provide the facilities to assign unique CSS styles to nodes on scene graph.
Syntax:
#node {
//CSS properties for node
}
E.g. If we want to select the CSS style on the button using the ID selector to target the button instance with ID button1,
#button1 {
    -fx-background-color:White;
    -fx-text-fill:black;
    -fx-font-size:13;
    -fx-border-color: Black;
    -fx-border-radius: 9;
}
JavaFX CSS – Coding information form using CSS ID selectors:
Example:
Style.css
#label1
{
    -fx-background-color:Brown;
    -fx-text-fill:white;
    -fx-font-size:16;
    -fx-border-color: Black;
    -fx-border-radius: 7;
}
#label2
{
    -fx-background-color:Green;
    -fx-font-family:courier_new;
    -fx-text-fill:White;
    -fx-border-color: Wheat;
    -fx-border-radius: 5;
    -fx-font-size:16;
}
import javafx.application.Application;
import javafx.scene.Scene;
import javafx.scene.control.Button;
import javafx.scene.control.Label;
import javafx.scene.control.TextField;
import javafx.scene.layout.GridPane;
import javafx.stage.Stage;


public class CSSUI extends Application {
@Override
public void start(Stage primaryStage) throws Exception {
Label prog=new Label("Programming Language");
Label editor=new Label("Editor Name");
TextField tf1=new TextField();
TextField tf2=new TextField();
prog.setId("label1");
editor.setId("label2");


Button Submit=new Button ("Submit");
GridPane root=new GridPane();
root.setHgap(10);
root.setVgap(15);
Scene scene = new Scene(root,400,200);
root.addRow(0, prog,tf1);
root.addRow(1, editor,tf2);
root.addRow(2, Submit);
root.getStylesheets().add("style.css");
primaryStage.setScene(scene);
primaryStage.setTitle("Coding Information");
primaryStage.show();
}


public static void main(String[] args) {
launch(args);
}

}
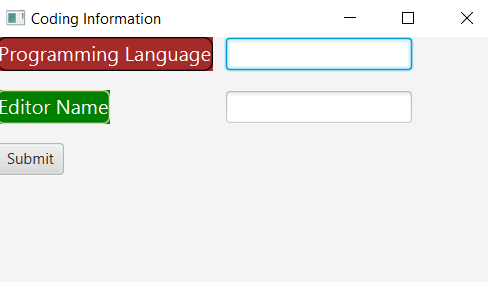
Output:
Explanation:
In order to create CSS effect on given components using ID selectors in JavaFX, we have to import all the required libraries. Then we have created one class named CSSUI extending the Application class. Also, we have to override the start method to provide implementation details. This method creates an object of Stage as primaryStage. For the container to hold the CSS effect on given components applied using the ID selector, a Group object is created which is then passed to the Scene class object.
The label is created using the constructor and various properties are set using setters. Also, a button is created using the constructor and various properties are set. The CSS effect on the label is applied by using the setId() method in the java file and # symbol with css properties in the style.css file.
The stage is prepared, the title is set and the show() method is called to display output. In order to run the application, the launch(args) method is called in the main() method. In output Frame like container is displayed with the title “ Coding Information ”. Also, it displays the label for Programming name and Editor name with submit button.
JavaFX CSS – Language information form using CSS ID selectors :
Example:
Style.css
#label1
{
    -fx-background-color:Brown;
    -fx-text-fill:white;
    -fx-font-size:16;
    -fx-border-color: Black;
    -fx-border-radius: 7;
}
#label2
{
    -fx-background-color:Green;
    -fx-font-family:courier_new;
    -fx-text-fill:White;
    -fx-border-color: Wheat;
    -fx-border-radius: 5;
    -fx-font-size:16;
}
#btn
{
    -fx-background-color:Blue;
    -fx-font-family:courier_new;
    -fx-text-fill:White;
    -fx-border-color: Wheat;
    -fx-border-radius: 5;
    -fx-font-size:16;
}
import javafx.application.Application;
import javafx.scene.Scene;
import javafx.scene.control.Button;
import javafx.scene.control.Label;
import javafx.scene.control.TextField;
import javafx.scene.layout.GridPane;
import javafx.stage.Stage;

public class CSSUI extends Application {

@Override
public void start(Stage primaryStage) throws Exception {


Label country=new Label("Country Name");
Label lang=new Label("Language Name");
TextField tf1=new TextField();
TextField tf2=new TextField();
country.setId("label1");
lang.setId("label2");


Button Submit=new Button ("Submit");
Submit.setId("btn");
GridPane root=new GridPane();
root.setHgap(10);
root.setVgap(15);
Scene scene = new Scene(root,400,200);
root.addRow(0, country,tf1);
root.addRow(1, lang,tf2);
root.addRow(2, Submit);
root.getStylesheets().add("style.css");
primaryStage.setScene(scene);
primaryStage.setTitle("Language Information");
primaryStage.show();
}


public static void main(String[] args) {
launch(args);
}

}
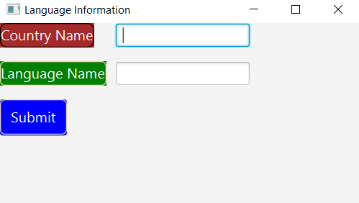
Output:
Explanation:
In order to create CSS effect on the label and button using ID selectors in JavaFX, we have to import all the required libraries. Then we have created one class named CSSUI extending the Application class. Also, we have to override the start method to provide implementation details. This method creates an object of Stage as primaryStage. For the container to hold the label and button with CSS effect, a Group object is created which is then passed to the Scene class object.
The label is created using the constructor and the name parameter is passed to it. Also, a button is created using the constructor and the name parameter is passed to it. The CSS effect on the label and button is applied by using the setId() method in the java file and # symbol with css properties in the style.css file.
The stage is prepared, the title is set and the show() method is called to display output. In order to run the application, the launch(args) method is called in the main() method. In output Frame like container is displayed with the title “ Language Information ”. Also, it displays the label for Country name and Language name with submit button.