JavaFX GridPane
In the JavaFX application, in order to set Grid Pane as a layout, the GridPane class is used. The GridPane layout allows us to arrange the components in the form of rows and columns. A table of various sales arranged in the forms of rows and columns in which the nodes can be placed is formed in the GridPane. All methods needed for this purpose are present in the javafx.scene.layout.GridPane class.
The constructor of GridPane layout:
1. GridPane():
It is used to create an empty grid pane with zero horizontal and vertical gap.
Methods to set GridPane as a layout:
1. setAlignment(Pos v)
This property of the grid pane class allows us to define the alignment of the grid mentioned in the GridPane.
2. setGridLinesVisible(Boolean v)
This property of the grid pane class allows us to show rows and columns present in the grid pane using the lines. This can be done by setting this property as true.
3. setHgap(Double v)
This property of the grid pane class allows us to define the horizontal gap between two columns of the GridPane.
4. setVgap(Double v)
This property of the grid pane class allows us to define the vertical gap between two rows of the GridPane.
5. getMargin(Node c)
This property of the stack pane class is used to get margin property of the specified node.
Layouts in JavaFX applications- Simple GridPane
Example:
import javafx.application.Application;
import javafx.geometry.Pos;
import javafx.scene.Scene;
import javafx.scene.control.Button;
import javafx.scene.control.PasswordField;
import javafx.scene.control.TextField;
import javafx.scene.layout.GridPane;
import javafx.scene.text.Text;
import javafx.stage.Stage;


public class GridPaneUI extends Application {


    @Override
    public void start(Stage primaryStage) throws Exception
    {

        Text email = new Text("Email");

        Text pwd = new Text("Password");

        TextField field1 = new TextField();

        PasswordField field2 = new PasswordField();

        Button submit = new Button("Submit");

        GridPane Pane = new GridPane();

        Pane.setMinSize(400, 200);


       Pane.setVgap(5);
       Pane.setHgap(5);

       Pane.setAlignment(Pos.CENTER);

        Pane.add(email, 0, 0);
        Pane.add(field1, 1, 0);
        Pane.add(pwd, 0, 1);
        Pane.add(field2, 1, 1);
        Pane.add(submit, 1, 2);


    Scene scene = new Scene(Pane,600,400);

           primaryStage.setScene(scene);
           primaryStage.setTitle(" JavaFX Layout -  GridPane layout Example");
           primaryStage.show();
        }


    public static void main(String[] args)
{
        Application.launch(args);
    }
}
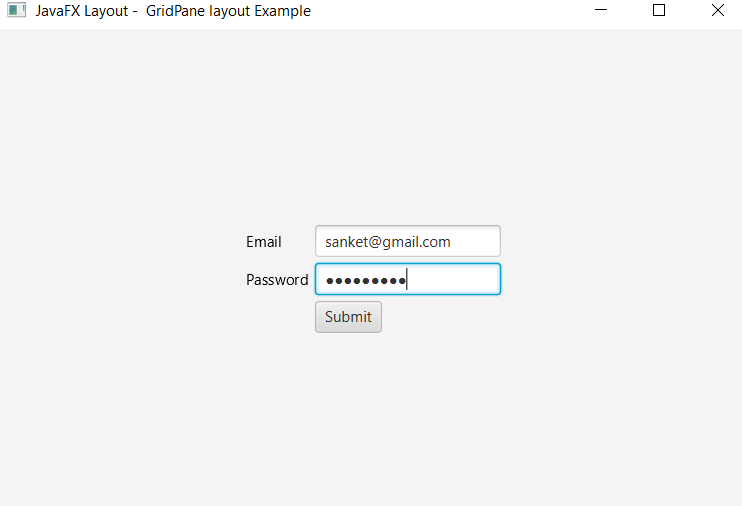
Output:
In order to create the Grid Pane in JavaFX, we have to import all the required libraries such as javafx.application.Application, javafx.stage.Stage, javafx.scene.Scene, javafx.scene.control.Button, javafx.scene.control.PasswordField, javafx.scene.control.TextField, javafx.scene.layout.GridPane.
Then we have created one class named GridPaneUI extending the Application class. Also, we have to override the start method to provide implementation details. This method creates an object of Stage as primaryStage. For the container to hold GridPane, a GridPane object is created which is then passed to the Scene class object.
Grid Pane is created with the help of its constructor and vertical, horizontal gap is set and components are added using add() method.
The stage is prepared, the title is set and the show() method is called to display output. In order to run the application, the launch(args) method is invoked. In output Frame like container is displayed with the title, " JavaFX Layout – GridPane layout Example”. Also, it displays GridPane allowing user to enter email and password and one submit button.
Layouts in JavaFX applications- Bank Application using GridPane:
Example:
import javafx.application.Application;
import javafx.geometry.Pos;
import javafx.scene.Scene;
import javafx.scene.control.Button;
import javafx.scene.layout.GridPane;
import javafx.stage.Stage;


public class GridPaneUI extends Application {


    @Override
    public void start(Stage primaryStage) throws Exception
    {
      Button button1 = new Button(" Create Account ");
          Button button2 = new Button(" Deposit amount ");
          Button button3 = new Button(" Withdraw amount ");
          Button button4 = new Button(" Fund Transfer ");

          GridPane Pane = new GridPane();

          Pane.add(button1, 0, 0);
          Pane.add(button2, 1, 0);
          Pane.add(button3, 1, 1);
          Pane.add(button4, 0, 1);

          Pane.setHgap(10);
         Pane.setVgap(10);


    Scene scene = new Scene(Pane,600,400);

           primaryStage.setScene(scene);
           primaryStage.setTitle(" JavaFX Layout -  GridPane layout Bank Application Example");
           primaryStage.show();
        }
    public static void main(String[] args) {
        Application.launch(args);
    }
}
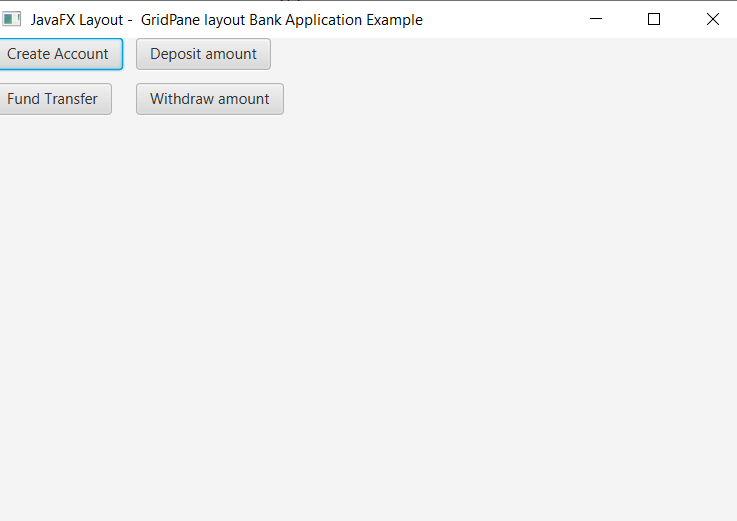
Output:
In order to create the bank application using Grid Pane in JavaFX, we have to import all the required libraries such as javafx.application.Application, javafx.stage.Stage, javafx.scene.Scene, javafx.scene.control.Button, javafx.geometry.Pos, javafx.scene.layout.GridPane.
Then we have created one class named GridPaneUI extending the Application class. Also, we have to override the start method to provide implementation details. This method creates an object of Stage as primaryStage. For the container to hold Bank application Grid Pane, a GridPane object is created which is then passed to the Scene class object.
Grid Pane is created with the help of its constructor and vertical, horizontal gap is set and 4 buttons for create account, withdraw, deposit and fund transfer is added in pane using add() method.
The stage is prepared, the title is set and the show() method is called to display output. In order to run the application, the launch(args) method is invoked. In output Frame like container is displayed with the title, "JavaFX Layout - GridPane layout Bank Application Example”. Also, it displays GridPane with 4 buttons for create account, withdraw, deposit and fund transfer.