Spring MVC Form – Radio Button
A variety of form tags are available in Spring MVC for developing web applications, <form:radiobutton> tag is one of them. The radio button tag is used to choose only one option among a group of options.
Below is given a code snippet which shows how to use the <form:radiobutton> tag:
 Java <form:radiobutton path = "planguage" value = "Java" />
 Python <form:radiobutton path = "planguage" value = "Python" />
 C++ <form:radiobutton path = "planguage" value = "C++" />
The <form:radiobutton> tag is used to create an HTML radio button field where the values are hard-coded inside the JSP pages, whereas the <form:radiobuttons> tag is used to create multiple radio buttons in which the values are generated at the runtime.
Below is given a code snippet which shows how to use the <form:radiobuttons> tag:
<form:radiobuttons path
= "planguage" items = "${student.list}"  />
Example of MVC Form Radio Button
Here, we are going to create an example of the Radio button. Below are the steps to create an example of a radio button:
- Create a request page
In this step, we are going to create a request page named index.jsp.
index.jsp
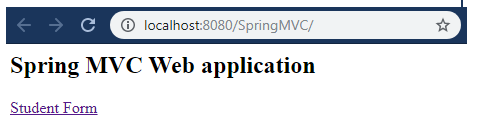
 <html>
 <body>
 <h2> Spring MVC Web application </h2>
 <a href = "student_form"> Student Form</a>
 </body>
 </html>
- Create the Model class
In this step, we are going to create a Model class named Student.java, which stores the data of the radio button.
Student.java
 import java.util.LinkedHashMap;
 public class Student {
             private String fname;
             private String lname;
             private String country;
             private LinkedHashMap<String, String> countryoptions;
             private String planguage;
                public Student() {
             countryoptions = new LinkedHashMap<String, String>();
                         countryoptions.put("IND","India");
                         countryoptions.put("FRA","France");
                         countryoptions.put("USA","America");
                         countryoptions.put("DUB","Dubai");
                         countryoptions.put("NEP", "Nepal");
                         countryoptions.put("BHU", "Bhutan");
                         countryoptions.put("UK", "United Kingdom");
             }
             public String getCountry() {
                         return country;
             }
             public LinkedHashMap<String, String> getCountryoptions() {
                         return countryoptions;
             }
             public void setCountry(String country) {
                         this.country = country;
             }
             public String getFname() {
                         return fname;
             }
             public void setFname(String fname) {
                         this.fname = fname;
             }
             public String getLname() {
                         return lname;
             }
             public void setLname(String lname) {
                         this.lname = lname;
             }
             public String getPlanguage() {
                         return planguage;
             }
             public void setPlanguage(String planguage) {
                         this.planguage = planguage;
             }
  }
- Create a Controller
In this step, we are going to create a Controller class named StudentController.java, which returns the JSP pages.
StudentController.java
 import org.springframework.stereotype.Controller;
 import org.springframework.ui.Model;
 import org.springframework.web.bind.annotation.ModelAttribute;
 import org.springframework.web.bind.annotation.RequestMapping;
 import org.springframework.web.bind.annotation.RequestParam;
 @Controller
 public class StudentController {
             @RequestMapping("/student_form")
             public String showStudentForm( Model m) {
                         Student student = new Student();
                         m.addAttribute("student", student);
                         return "studentform" ;
             }
             @RequestMapping("/studentregis")
             public String showStudentData(@ModelAttribute("student") Student student) {
                         return "student-data" ;
             }
  }
- Add the entry of Controller in web.xml
In this step, we are going to add the entry of the Controller into web.xml.
web.xml
 <?xml version = "1.0" encoding = "UTF-8"?>
 <web-app xmlns:xsi = "http://www.w3.org/2001/XMLSchema-instance"
             xmlns = "http://xmlns.jcp.org/xml/ns/javaee"
             xsi:schemaLocation = "http://xmlns.jcp.org/xml/ns/javaee http://xmlns.jcp.org/xml/ns/javaee/web-app_3_1.xsd"
             id = "WebApp_ID" version = "3.1">
             <display-name>spring-mvc-demo</display-name>
             <absolute-ordering />
             <!-- Spring MVC Configs -->
             <!-- Step 1: Configure Spring MVC Dispatcher Servlet -->
             <servlet>
                         <servlet-name>dispatcher</servlet-name>
                         <servlet-class>org.springframework.web.servlet.DispatcherServlet</servlet-class>
                         <init-param>
                                     <param-name>contextConfigLocation</param-name>
                                     <param-value>/WEB-INF/spring-servlet.xml</param-value>
                         </init-param>
                         <load-on-startup>1</load-on-startup>
             </servlet>
             <!-- Step 2: Set up URL mapping for Spring MVC Dispatcher Servlet -->
             <servlet-mapping>
                         <servlet-name>dispatcher</servlet-name>
                         <url-pattern>/</url-pattern>
             </servlet-mapping>
 </web-app>
- Add the entry of Model in another XML file
In this step, we are going to add the entry of the Model inside the spring-servlet.xml file.
spring-servlet.xml
 <?xml version = "1.0" encoding = "UTF-8"?>
 <beans xmlns = "http://www.springframework.org/schema/beans"
             xmlns:xsi = "http://www.w3.org/2001/XMLSchema-instance"
             xmlns:context = "http://www.springframework.org/schema/context"
             xmlns:mvc = "http://www.springframework.org/schema/mvc"
             xsi:schemaLocation = "  http://www.springframework.org/schema/beans
 http://www.springframework.org/schema/beans/spring-beans.xsd
 http://www.springframework.org/schema/context
 http://www.springframework.org/schema/context/spring-context.xsd
 http://www.springframework.org/schema/mvc
 http://www.springframework.org/schema/mvc/spring-mvc.xsd">
             <!-- Step 3: Add support for component scanning -->
             <context:component-scan base-package = "com.app.SpringMVCFormTag" />
             <!-- Step 4: Add support for conversion, formatting and validation support -->
             <mvc:annotation-driven/>
             <!-- Step 5: Define Spring MVC view resolver -->
             <bean
                         class = "org.springframework.web.servlet.view.InternalResourceViewResolver">
                         <property name = "prefix" value = "/WEB-INF/view/" />
                         <property name = "suffix" value = ".jsp" />
             </bean>
 </beans>
- Create all other JSP pages
In this step, we are going to create all the other view pages (JSP pages).
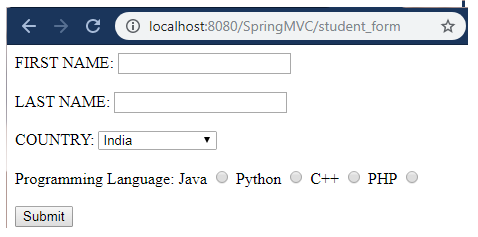
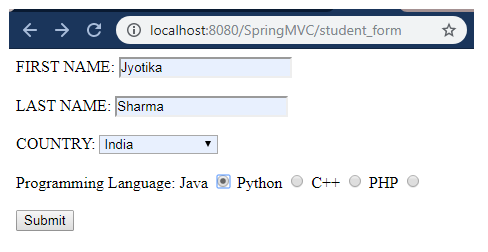
studentform.jsp
 <%@ taglib prefix = "form" uri = "http://www.springframework.org/tags/form" %>
 <html>
 <head>
 <title>Student Registration Form
 </title>
 </head>
 <body>
 <form:form action = "studentregis" modelAttribute = "student" >
 FIRST NAME: <form:input path = "fname" />
 <br> </br>
 LAST NAME: <form:input path = "lname" />
 <br> </br>
 COUNTRY: <form:select path = "country">
    <form:options items = "${student.countryoptions}">
     </form:options>
 </form:select>
 <br> </br>
 Programming Language:
 Java <form:radiobutton path = "planguage" value = "Java" />
 Python <form:radiobutton path = "planguage" value = "Python" />
 C++ <form:radiobutton path = "planguage" value = "C++" />
 PHP <form:radiobutton path = "planguage" value = "PHP" />
 <br></br>
 <input type = "submit" value = "Submit"/>
 </form:form>
 </body>
 </html>
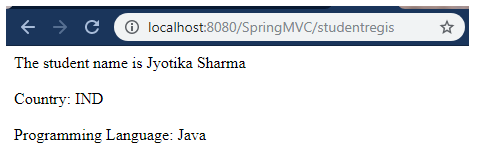
student-data.jsp
 <%@ page language = "java" contentType = "text/html; charset = ISO-8859-1"
     pageEncoding = "ISO-8859-1"%>
 <!DOCTYPE html>
 <html>
 <head>
 <meta charset = "ISO-8859-1">
 <title> Student Registration Data </title>
 </head>
 <body>
 The student name is ${student.fname} ${student.lname}
 <br></br>
 Country: ${student.country}
 <br></br>
 Programming Language: ${student.planguage}
 </body>
 </html>
Output