SQL Primary Key
A field, which contains unique data in a table, is called a PRIMARY KEY (PK). It means, a PRIMARY KEY field must contain unique data in the table.
- A PRIMARY KEY field contains values on each row.
- PRIMARY KEY field cannot contain an empty string.
- PRIMARY KEY data is never changed over time.
- A table can consist of only one PRIMARY KEY, which may consist of single or multiple fields in the table. When more than one column is used as the table's PRIMARY KEY, they are known as the Composite key in the table.
- There will be no duplicated records for a PRIMARY KEY.
- If a field is set as a PRIMARY KEY in the table, that field cannot contain the values of the same field more than once in the table.
For example, we have a Student table in the database. The table contains 4 fields Student_Id, Student_Name, Phone_Number, and Email. Student_Id and Email is the PRIMARY KEY in the Student table. There is only one PRIMARY KEY but can have single or multiple fields in the table, as we told above. One student's data is already present in the table, but the same student adds his data again with the same email ID. As the student enters details, a pop-up will display a message “Email has already existed”. It is shown because Email has already existed in the table, and the email field is the PRIMARY KEY, and the PRIMARY KEY cannot contain duplicate values.
Create PRIMARY KEY on SQL TABLE
The following SQL query creates a PRIMARY KEY on the Employee_Id field when the ‘Employee’ table is created.
CREATE TABLE Employee( Employee_Id int PRIMARY KEY, Employee_Name varchar(40) NOT NULL, Salary int NOT NULL, Department varchar(40), City varchar(40) );
The above query has defined PRIMARY KEY to the Employee_Id field. We can mention the key name after the field name and data type. The above query is the one way we can create Employee_Id as a PRIMARY KEY.
To check whether our PRIMARY KEY is successfully defined or not, we can use the DESC command followed by the Employee table name.
DESC Employee;
| Fields | Type | Null | Key | Default | Extra |
| Employee_Id | Int(11) | NO | PRI | NULL | |
| Employee_Name | Varchar(40) | NO | NULL | ||
| Salary | Int(11) | NO | NULL | ||
| Department | Varchar(40) | YES | NULL | ||
| City | Varchar(40) | YES | NULL |
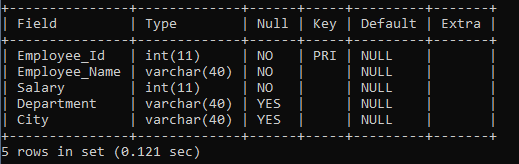
The Key field PRI is mentioned in front of the Employee_Id row, which means Employee_Id is successfully defined as the PRIMARY KEY.
Advantages of using PRIMARY KEY in the table:
- Fast Access to the data from the table.
- Duplicates values are not allowed in the PRIMARY KEY fields.
Another way to create a PRIMARY KEY
CREATE TABLE Employee( Employee_Id int NOT NULL, Employee_Name varchar(40) NOT NULL, Salary int NOT NULL, Department varchar(40), City varchar(40), PRIMARY KEY(Employee_ID) );
In the same query as above, we have to mention NOT NULL in front of the field name, which is created as the PRIMARY KEY, and at the end, we have to write the PRIMARY KEY keyword and Field name in parenthesis just like the above query.
Create a PRIMARY KEY constraint on the fields when the table already exists
Use the following query:
ALTER TABLE Employee ADD PRIMARY KEY(Employee_Id);
Using the ALTER TABLE query to define PRIMARY KEY, the PRIMARY KEY field has already been declared with NOT NULL constraint.
SQL PRIMARY KEY on Multiple Columns
The following SQL query creates a PRIMARY KEY on more than one column when the 'Student' Table is created.
CREATE TABLE Student( Student_Id int NOT NULL, Student_Name varchar(40), Department varchar(40), Phone_Number int(10), Email varchar(100) NOT NULL, PRIMARY KEY(Student_ID, Email));
Only one PRIMARY KEY is made in the example on Student_Id and Email.
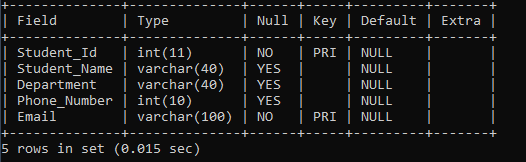
To check whether our PRIMARY KEY is successfully defined or not, we can use the DESC command followed by the Student table name.
DESC Student;
| Fields | Type | Null | Key | Default | Extra |
| Student_Id | Int(11) | NO | PRI | NULL | |
| Student_Name | Varchar(40) | YES | NULL | ||
| Department | Varchar(40) | YES | NULL | ||
| Phone_Number | Int(10) | YES | NULL | ||
| Varchar(100) | NO | PRI | NULL |
As we can see in front of the Student_Id and Email row, Key fields PRI is mentioned, which means Student_Id and Email are successfully defined as PRIMARY KEY.
We will now execute SHOW CREATE TABLE followed by Student table name, which will describe the student table.
SHOW CREATE TABLE Student;
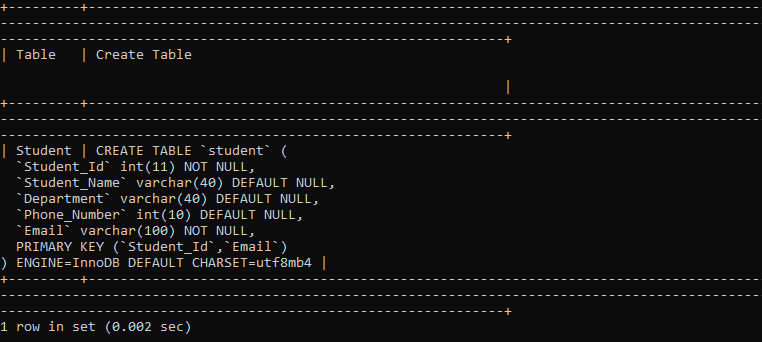
In the above output, we can see that only one PRIMARY KEY is created, and in parenthesis, the fields name is mentioned, which is created as a PRIMARY KEY while creating the table.
Suppose we want to remove the PRIMARY KEY constraint from the student table. We will use the following query to drop the PRIMARY KEY constraint:
ALTER TABLE Student DROP PRIMARY KEY;
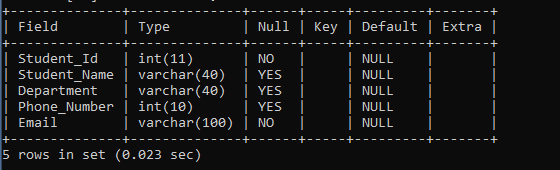
To check whether our PRIMARY KEY is successfully removed or not, we will use the DESC command followed by the Student table name.
DESC Student;
| Fields | Type | Null | Key | Default | Extra |
| Student_Id | Int(11) | NO | NULL | ||
| Student_Name | Varchar(40) | YES | NULL | ||
| Department | Varchar(40) | YES | NULL | ||
| Phone_Number | Int(10) | YES | NULL | ||
| Varchar(100) | NO | NULL |