TCL Commands in SQL
In Structured Query Language, TCL is an abbreviation for Transaction Control Language. A single unit of work in a database is formed after the consecutive execution of commands is known as a transaction.
There are some commands in the Structured Query Language, and Transaction Control Language command is one of the SQL commands. TCL commands handle the transactions in a database
In Structured Query Language, Commit, Rollback, and Savepoint are the Transaction Control Language commands widely used in SQL.
Now let’s understand and learn how the Transaction Control Language commands work in the Structured Query language with the help of a few examples. Transaction Control Language commands are:
- COMMIT Command
- ROLLBACK Command
- SAVEPOINT Command
COMMIT Command
Commit Command in SQL is used to save all the transactions which change permanently to the disk. Whenever we perform the operation on Data Definition Language commands (DDL) such as INSERT command, UPDATE command, and DELETE command, whatever modifications made by these commands are permanent but before closing the current session or till the end of the session. We can easily undo the operation we performed using the Data Definition Language before the session gets shut down. Commit command is used to save the modification permanently to the storage without session ends.
Syntax:
COMMIT;
If you have an existing database in the system, use that existing database or create a new database. We will use the existing database Company.
USE Company
Consider the already existing employees' tables which have the certain data:
| EMPLOYEEID | FIRST_NAME | LAST_NAME | SALARY | CITY | DEPARTMENT | MANAGERID |
| 1001 | VAIBHAVI | MISHRA | 65000 | PUNE | ORACLE | 1 |
| 1002 | VAIBHAV | SHARMA | 60000 | NOIDA | ORACLE | 1 |
| 1003 | NIKHIL | VANI | 50000 | JAIPUR | FMW | 2 |
| 2001 | PRACHI | SHARMA | 55500 | CHANDIGARH | ORACLE | 1 |
| 2002 | BHAVESH | JAIN | 65500 | PUNE | FMW | 2 |
| 2003 | RUCHIKA | JAIN | 50000 | MUMBAI | TESTING | 4 |
| 3001 | PRANOTI | SHENDE | 55500 | PUNE | JAVA | 3 |
| 3002 | ANUJA | WANRE | 50500 | JAIPUR | FMW | 2 |
| 3003 | DEEPAM | JAUHARI | 58500 | MUMBAI | JAVA | 3 |
| 4001 | RAJESH | GOUD | 60500 | MUMBAI | TESTING | 4 |
In SQL, the START TRANSACTION query is used to begin the transaction.
START TRANSACTION;

Now, we will insert two records into the existing Employees table. To insert multiple records, we will use the below statement:
INSERT INTO EMPLOYEES (EMPLOYEEID, FIRST_NAME, LAST_NAME, SALARY, CITY, DEPARTMENT, MANAGERID) VALUES (4002, 'ASHWINI', 'BAGHAT', 54500, 'JAIPUR', 'JAVA', 3), (4003, 'PURVA', 'DHANDEKAR', 57000, 'PUNE', 'TESTING', 4);
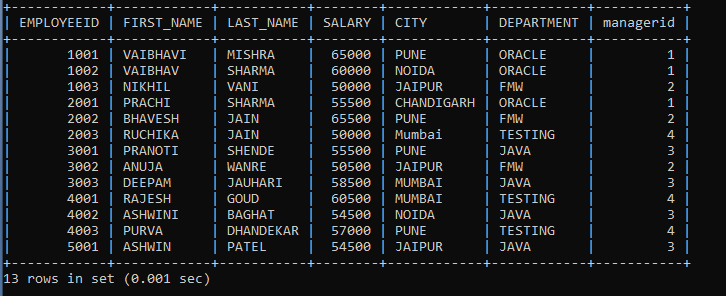
We will now use the SELECT query to verify whether the records are inserted successfully or not in the table.
SELECT * FROM EMPLOYEES;
Output on the above query:
| EMPLOYEEID | FIRST_NAME | LAST_NAME | SALARY | CITY | DEPARTMENT | MANAGERID |
| 1001 | VAIBHAVI | MISHRA | 65000 | PUNE | ORACLE | 1 |
| 1002 | VAIBHAV | SHARMA | 60000 | NOIDA | ORACLE | 1 |
| 1003 | NIKHIL | VANI | 50000 | JAIPUR | FMW | 2 |
| 2001 | PRACHI | SHARMA | 55500 | CHANDIGARH | ORACLE | 1 |
| 2002 | BHAVESH | JAIN | 65500 | PUNE | FMW | 2 |
| 2003 | RUCHIKA | JAIN | 50000 | MUMBAI | TESTING | 4 |
| 3001 | PRANOTI | SHENDE | 55500 | PUNE | JAVA | 3 |
| 3002 | ANUJA | WANRE | 50500 | JAIPUR | FMW | 2 |
| 3003 | DEEPAM | JAUHARI | 58500 | MUMBAI | JAVA | 3 |
| 4001 | RAJESH | GOUD | 60500 | MUMBAI | TESTING | 4 |
| 4002 | ASHWINI | BAGHAT | 54500 | JAIPUR | JAVA | 3 |
| 4003 | PURVA | DHANDEKAR | 57000 | PUNE | TESTING | 4 |
The output shows all the records are inserted successfully.
To save the INSERT operation on the Employees table, we will execute the COMMIT command.
COMMIT;

In SQL, by default, auto-commit is on. To turn off the auto-commit in the SQL, set the auto-commit value to 0.
We will update the employee id 4002 and set the city as 'Noida. Use the below query to update the employee record.
UPDATE EMPLOYEES SET CITY = 'NOIDA' WHERE EMPLOYEEID = 4002;
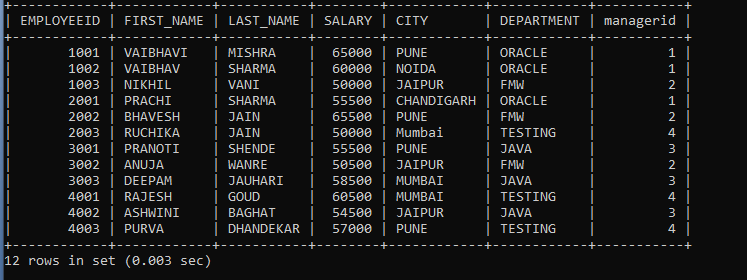
We will now use the SELECT query to verify whether the record is updated successfully or not in the table.
SELECT * FROM EMPLOYEES;
Output on the above query:
| EMPLOYEEID | FIRST_NAME | LAST_NAME | SALARY | CITY | DEPARTMENT | MANAGERID |
| 1001 | VAIBHAVI | MISHRA | 65000 | PUNE | ORACLE | 1 |
| 1002 | VAIBHAV | SHARMA | 60000 | NOIDA | ORACLE | 1 |
| 1003 | NIKHIL | VANI | 50000 | JAIPUR | FMW | 2 |
| 2001 | PRACHI | SHARMA | 55500 | CHANDIGARH | ORACLE | 1 |
| 2002 | BHAVESH | JAIN | 65500 | PUNE | FMW | 2 |
| 2003 | RUCHIKA | JAIN | 50000 | MUMBAI | TESTING | 4 |
| 3001 | PRANOTI | SHENDE | 55500 | PUNE | JAVA | 3 |
| 3002 | ANUJA | WANRE | 50500 | JAIPUR | FMW | 2 |
| 3003 | DEEPAM | JAUHARI | 58500 | MUMBAI | JAVA | 3 |
| 4001 | RAJESH | GOUD | 60500 | MUMBAI | TESTING | 4 |
| 4002 | ASHWINI | BAGHAT | 54500 | NOIDA | JAVA | 3 |
| 4003 | PURVA | DHANDEKAR | 57000 | PUNE | TESTING | 4 |
As we can see in the output, employee Id 4002 city was modified.
To save the changes on the employees’ table, we will write a COMMIT command.
COMMIT;

Now, we will delete the employee id 4003 from the Employees table. Use the below query to delete the employee record.
DELETE FROM EMPLOYEES WHERE EMPLOYEEID = 4003;
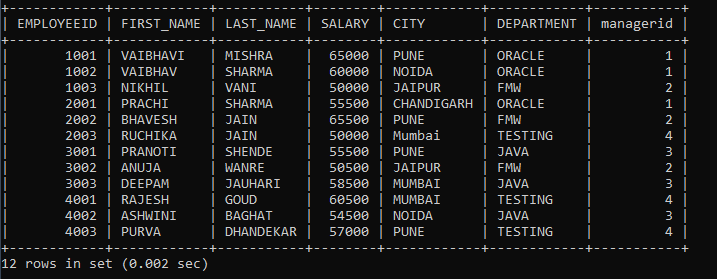
We will now use the SELECT query to verify whether the record is deleted successfully or not in the table.
SELECT * FROM EMPLOYEES;
Output on the above query:
| EMPLOYEEID | FIRST_NAME | LAST_NAME | SALARY | CITY | DEPARTMENT | MANAGERID |
| 1001 | VAIBHAVI | MISHRA | 65000 | PUNE | ORACLE | 1 |
| 1002 | VAIBHAV | SHARMA | 60000 | NOIDA | ORACLE | 1 |
| 1003 | NIKHIL | VANI | 50000 | JAIPUR | FMW | 2 |
| 2001 | PRACHI | SHARMA | 55500 | CHANDIGARH | ORACLE | 1 |
| 2002 | BHAVESH | JAIN | 65500 | PUNE | FMW | 2 |
| 2003 | RUCHIKA | JAIN | 50000 | MUMBAI | TESTING | 4 |
| 3001 | PRANOTI | SHENDE | 55500 | PUNE | JAVA | 3 |
| 3002 | ANUJA | WANRE | 50500 | JAIPUR | FMW | 2 |
| 3003 | DEEPAM | JAUHARI | 58500 | MUMBAI | JAVA | 3 |
| 4001 | RAJESH | GOUD | 60500 | MUMBAI | TESTING | 4 |
| 4002 | ASHWINI | BAGHAT | 54500 | NOIDA | JAVA | 3 |
The output confirms we deleted the employee id 4003 details.
To save the changes on the employees’ table, we will write a COMMIT command.
COMMIT;

SAVEPOINT command
Database operations performed can be divided into two parts. For example, consider all the delete statements we performed as one segment of the transaction and the update statement as one segment of the transaction. To save insert queries into the insert part and delete queries into the delete part of the same transaction, we use the SAVEPOINT command in SQL. Suppose we want to save all the delete-related queries with the savepoint named delete. To save all the delete-related operations in one savepoint, we have to perform the SAVEPOINT command followed by the savepoint name after performing the delete query.
Syntax:
SAVEPOINT savepoint name;
ROLLBACK command
While carrying out a transaction, we built the savepoints to save the different segments of the transaction. As the User's requirements changes, the User can undo the transaction to different savepoints. Consider a scenario: We have initiated a transaction followed by the table creation and record insertion into the table. We built the INS named savepoint after adding records to the table. After Insertion, we performed the delete operation, and later we remembered mistakenly deleted the wrong records. We will undo our transaction to reach the savepoint INS. To undo the transaction, use the ROLLBACK command.
We can roll back the operation we performed or roll back the entire savepoint transaction.
Syntax to Rollback the operation:
ROLLBACK;
Syntax to Rollback the transaction:
ROLLBACK TO savepoint;
Examples of the SAVEPOINT and ROLLBACK commands:
If you have an existing database in the system, use that existing database or create a new database. We will select the already existing database named Company.
USE Company
Consider the existing employee's tables which have the following records:
| EMPLOYEEID | FIRST_NAME | LAST_NAME | SALARY | CITY | DEPARTMENT | MANAGERID |
| 1001 | VAIBHAVI | MISHRA | 65000 | PUNE | ORACLE | 1 |
| 1002 | VAIBHAV | SHARMA | 60000 | NOIDA | ORACLE | 1 |
| 1003 | NIKHIL | VANI | 50000 | JAIPUR | FMW | 2 |
| 2001 | PRACHI | SHARMA | 55500 | CHANDIGARH | ORACLE | 1 |
| 2002 | BHAVESH | JAIN | 65500 | PUNE | FMW | 2 |
| 2003 | RUCHIKA | JAIN | 50000 | MUMBAI | TESTING | 4 |
| 3001 | PRANOTI | SHENDE | 55500 | PUNE | JAVA | 3 |
| 3002 | ANUJA | WANRE | 50500 | JAIPUR | FMW | 2 |
| 3003 | DEEPAM | JAUHARI | 58500 | MUMBAI | JAVA | 3 |
| 4001 | RAJESH | GOUD | 60500 | MUMBAI | TESTING | 4 |
| 4002 | ASHWINI | BAGHAT | 54500 | NOIDA | JAVA | 3 |
In SQL, the START TRANSACTION query is used to begin the transaction.
START TRANSACTION;

Now, we will insert two records in the existing Employees table. To insert multiple records we will use below statement:
INSERT INTO EMPLOYEES (EMPLOYEEID, FIRST_NAME, LAST_NAME, SALARY, CITY, DEPARTMENT, MANAGERID) VALUES (4003, 'PURVA', 'DHANDEKAR', 57000, 'PUNE', 'TESTING', 4), (5001, 'ASHWIN', 'PATEL', 54500, 'JAIPUR', 'JAVA', 3);
We will now use the SELECT query to verify whether the records are inserted successfully or not in the table.
SELECT * FROM EMPLOYEES;
Output on the above query:
| EMPLOYEEID | FIRST_NAME | LAST_NAME | SALARY | CITY | DEPARTMENT | MANAGERID |
| 1001 | VAIBHAVI | MISHRA | 65000 | PUNE | ORACLE | 1 |
| 1002 | VAIBHAV | SHARMA | 60000 | NOIDA | ORACLE | 1 |
| 1003 | NIKHIL | VANI | 50000 | JAIPUR | FMW | 2 |
| 2001 | PRACHI | SHARMA | 55500 | CHANDIGARH | ORACLE | 1 |
| 2002 | BHAVESH | JAIN | 65500 | PUNE | FMW | 2 |
| 2003 | RUCHIKA | JAIN | 50000 | MUMBAI | TESTING | 4 |
| 3001 | PRANOTI | SHENDE | 55500 | PUNE | JAVA | 3 |
| 3002 | ANUJA | WANRE | 50500 | JAIPUR | FMW | 2 |
| 3003 | DEEPAM | JAUHARI | 58500 | MUMBAI | JAVA | 3 |
| 4001 | RAJESH | GOUD | 60500 | MUMBAI | TESTING | 4 |
| 4002 | ASHWINI | BAGHAT | 54500 | NOIDA | JAVA | 3 |
| 4003 | PURVA | DHANDEKAR | 57000 | PUNE | TESTING | 4 |
| 5001 | ASHWIN | PATEL | 54500 | JAIPUR | JAVA | 3 |
As we all know, the SAVEPOINT command in SQL is used to save different parts of the same transaction. Assume, Insertion is one segment of our transaction. Use savepoint to save this insertion segment as Insertion.
SAVEPOINT Insertion;

Now, we will perform the UPDATE operation on the Employee tables, and we will update employee salary by 1.2 for the employee id 2003.
UPDATE EMPLOYEES SET SALARY = SALARY * 1.2 WHERE EMPLOYEEID = 2003;
We will cross-check the update operation by executing the SELECT query on the Employees table:
SELECT * FROM EMPLOYEES WHERE EMPLOYEEID = 2003;
| EMPLOYEEID | FIRST_NAME | LAST_NAME | SALARY | CITY | DEPARTMENT | MANAGERID |
| 2003 | RUCHIKA | JAIN | 60000 | MUMBAI | TESTING | 4 |

The above query results show that the employee id 2003 record is updated successfully.
Consider the updation query as one segment of our transaction. We will save the update operation part using a SAVEPOINT named an Updation.
SAVEPOINT Updation;

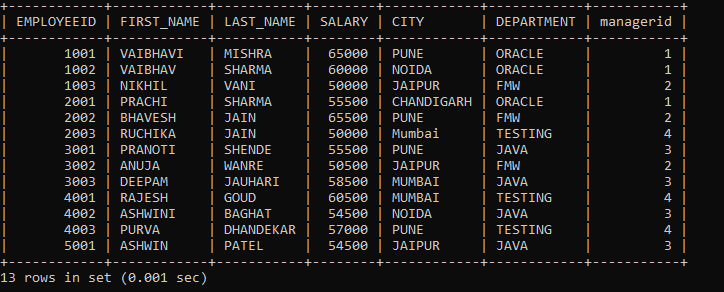
Now, we will perform a delete operation on the Employees table. We will perform delete operation on employees table where employee salary is greater than 60000.
DELETE FROM EMPLOYEES WHERE SALARY > 60000;
We will cross-check the delete operation by executing the SELECT query on the Employees table:
SELECT * FROM EMPLOYEES;
Output on the above query:
| EMPLOYEEID | FIRST_NAME | LAST_NAME | SALARY | CITY | DEPARTMENT | MANAGERID |
| 1002 | VAIBHAV | SHARMA | 60000 | NOIDA | ORACLE | 1 |
| 1003 | NIKHIL | VANI | 50000 | JAIPUR | FMW | 2 |
| 2001 | PRACHI | SHARMA | 55500 | CHANDIGARH | ORACLE | 1 |
| 2003 | RUCHIKA | JAIN | 60000 | MUMBAI | TESTING | 4 |
| 3001 | PRANOTI | SHENDE | 55500 | PUNE | JAVA | 3 |
| 3002 | ANUJA | WANRE | 50500 | JAIPUR | FMW | 2 |
| 3003 | DEEPAM | JAUHARI | 58500 | MUMBAI | JAVA | 3 |
| 4002 | ASHWINI | BAGHAT | 54500 | NOIDA | JAVA | 3 |
| 4003 | PURVA | DHANDEKAR | 57000 | PUNE | TESTING | 4 |
| 5001 | ASHWIN | PATEL | 54500 | JAIPUR | JAVA | 3 |
The above query shows that deleting the employee records was successful.
Consider the delete queries as one segment of our transaction. We will save the update operation part using a SAVEPOINT named a Deletion.
SAVEPOINT Deletion;

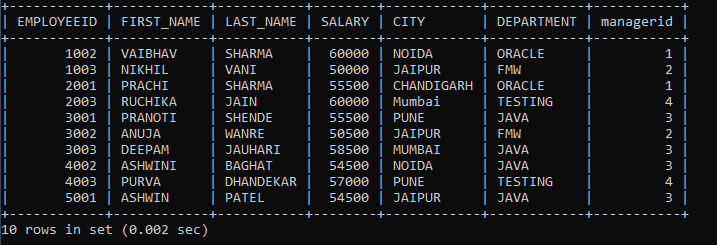
Suddenly User realized the query we wanted to perform on the deletion operation was not supposed to be that query. In such a situation, users will roll back to the entire transaction to the SAVEPOINT; the User can roll back to any SAVEPOINT he wants to roll back like Insertion, Updation SAVEPOINT.
ROLLBACK TO Insertion;
If the user don' want to remove the records. Hence, the User will be rollbacked to the Insertion SAVEPOINT.
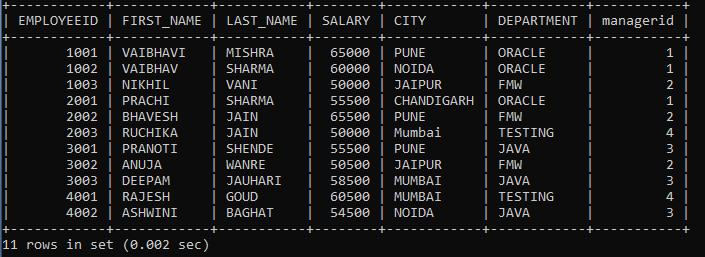
To cross-check that we have got the same employee table we had before performing the updation and deletion operations. To retrieve the employees' details perform the SELECT operation on the employees' table.
SELECT * FROM EMPLOYEES;
| EMPLOYEEID | FIRST_NAME | LAST_NAME | SALARY | CITY | DEPARTMENT | MANAGERID |
| 1001 | VAIBHAVI | MISHRA | 65000 | PUNE | ORACLE | 1 |
| 1002 | VAIBHAV | SHARMA | 60000 | NOIDA | ORACLE | 1 |
| 1003 | NIKHIL | VANI | 50000 | JAIPUR | FMW | 2 |
| 2001 | PRACHI | SHARMA | 55500 | CHANDIGARH | ORACLE | 1 |
| 2002 | BHAVESH | JAIN | 65500 | PUNE | FMW | 2 |
| 2003 | RUCHIKA | JAIN | 50000 | MUMBAI | TESTING | 4 |
| 3001 | PRANOTI | SHENDE | 55500 | PUNE | JAVA | 3 |
| 3002 | ANUJA | WANRE | 50500 | JAIPUR | FMW | 2 |
| 3003 | DEEPAM | JAUHARI | 58500 | MUMBAI | JAVA | 3 |
| 4001 | RAJESH | GOUD | 60500 | MUMBAI | TESTING | 4 |
| 4002 | ASHWINI | BAGHAT | 54500 | NOIDA | JAVA | 3 |
| 4003 | PURVA | DHANDEKAR | 57000 | PUNE | TESTING | 4 |
| 5001 | ASHWIN | PATEL | 54500 | JAIPUR | JAVA | 3 |