SQL VIEW
The SQL VIEW concept helps to hide the difficulty of the records and provides limitations to access to the database.
The SQL view is similar to the SQL tables. In SQL Tables, we store entire data in rows and columns. In the same way, SQL View is also used to store records in rows and columns, but only those data which the user wants, not unnecessary data.
SQL VIEW is a virtual table. SQL View allows accessing only specific columns records rather than the entire table data.
We can easily create a view by selecting one or more tables using CREATE VIEW keyword. We can also update and delete the view.
In this entire article, we will understand the concept of view about how to create a view, delete a view, and update a view.
1 CREATE SQL VIEW: -
In SQL, we can easily create a view by using CREATE VIEW keyword. We can create a View for the single table and multiples table.
The syntax for CREATE VIEW (Single Table)
CREATE VIEW VIEW_NAME AS SELECT COLUMN_NAME1, COLUMN_NAME2 FROM TABLE_NAME WHERE CONDITION; The above syntax is for creating a view from a single table. In the above syntax, VIEW_NAME is the name of the view to create a view in SQL. Table_name is the table's name from where we will select specific records, WHERE clause is optional in the SQL query.
The syntax for CREATE VIEW (Multiple Table)
CREATE VIEW VIEW_NAME AS SELECT T1.COLUMN_NAME, T1.COLUMN_NAME2, T2.COLUMN_NAME1, T2.COLUMN_NAME2 FROM T1, T2 WHERE CONDITION;The above syntax is for creating a view from multiple tables. In the above syntax, VIEW_NAME is the name of the view to create a view in SQL. T1, T2 is the name of tables from where we will select specific records, WHERE clause is optional in the SQL query.
Consider the following tables along with the given records.
Table 1: Emp
| EMPLOYEEID | FIRST_NAME | LAST_NAME | SALARY | CITY | DEPARTMENT | MANAGERID |
| 1001 | VAIBHAVI | MISHRA | 65000 | PUNE | ORACLE | 1 |
| 1002 | VAIBHAV | SHARMA | 60000 | NOIDA | ORACLE | 1 |
| 1003 | NIKHIL | VANI | 50000 | JAIPUR | FMW | 2 |
| 2001 | PRACHI | SHARMA | 55500 | CHANDIGARH | ORACLE | 1 |
| 2002 | BHAVESH | JAIN | 65500 | PUNE | FMW | 2 |
| 2003 | RUCHIKA | JAIN | 50000 | MUMBAI | TESTING | 4 |
| 3001 | PRANOTI | SHENDE | 55500 | PUNE | JAVA | 3 |
| 3002 | ANUJA | WHERE | 50500 | JAIPUR | FMW | 2 |
| 3003 | DEEPAM | JAUHARI | 58500 | MUMBAI | JAVA | 3 |
| 4001 | RAJESH | GOUD | 60500 | MUMBAI | TESTING | 4 |
Table 2: Manager.
| Managerid | manager_name | manager_department |
| 1 | Snehdeep Kaur | ORACLE |
| 2 | Kirti Kirtane | FMW |
| 3 | Abhishek Manish | JAVA |
| 4 | Anupam Mishra | TESTING |
Examples to CREATE VIEW from a single table.
Example 1: Write a query to create a view with Employee Id, First name, Last name, Salary from Emp table.
CREATE VIEW EMPLOYEE_VIEW AS SELECT EMPLOYEEID, CONCAT (FIRST_NAME, CONCAT (“ ”, LAST_NAME)) AS NAME, SALARY FROM EMP;In the above query, we created a view name EMPLOYEE_VIEW with Employee Id, concatenate first name and last name as Name, Salary from Emp Table.
Whenever we want to look at the records in the table, we use the SELECT * FROM query; in the same manner we will do for view, instead of the table name, we will use view name.
SELECT * FROM EMPLOYEE_VIEW;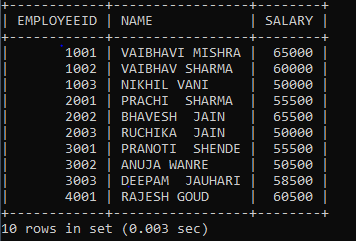
Example 2: Write a query to create a view with Manager Id, Manager Name, and Department from Manager Table.
CREATE VIEW MANAGER_VIEW AS SELECT MANAGERID, MANAGER_NAME, MANAGER_DEPARTMENT FROM MANAGER;In the above query, we created a view name MANAGER_VIEW with Manager Id, Manager Name, and Department from Manager Table.
Whenever we want to look at the records in the table, we use the SELECT * FROM query. We will use the view name. Similarly, we will do for view instead of the table name.
SELECT * FROM MANAGER_VIEW;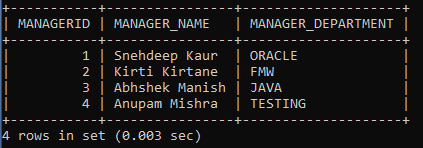
Example 3: Write a query to create a view with Employee Id, First name, Last name, Salary, City of those employees whose salary is greater than 54000 and City include Pune and Mumbai from Emp table.
CREATE VIEW EMPLOYEE_VIEW1 AS SELECT EMPLOYEEID, CONCAT (FIRST_NAME, CONCAT (“ ”, LAST_NAME)) AS NAME, SALARY, CITY FROM EMP WHERE SALARY > 54000 AND CITY IN (‘PUNE’, ‘MUMBAI’);In the above query, we created a view name EMPLOYEE_VIEW1 with Employee Id, concatenate first name and last name as Name, Salary, City of those employees whose salary is greater than 54000 and we used AND operator with City include Pune and Mumbai from Emp Table.
Whenever we want to look at the records in the table, we use the SELECT * FROM query. We will use the view name. Similarly, we will do for view instead of the table name.
SELECT * FROM EMPLOYEE_VIEW1;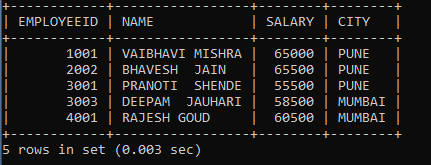
Example 4: Write a query to create a view with Manager Id, Manager Name, and Department of those managers whose department is 'Oracle' and 'Java' from Manager Table.
CREATE VIEW MANAGER_VIEW1 AS SELECT MANAGERID, MANAGER_NAME, MANAGER_DEPARTMENT FROM MANAGER; WHERE MANAGER_DEPARTMENT IN (‘ORACLE’, ‘JAVA’);In the above query, we created a view name MANAGER_VIEW with Manager Id, Manager Name, and Department of those managers whose department is ‘Oracle’, and ‘Java’ from Manager Table.
Whenever we want to look at the records in the table, we use the SELECT * FROM query. We will use the view name. Similarly, we will do for view instead of the table name.
SELECT * FROM MANAGER_VIEW1;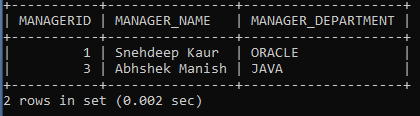
All the above examples of CREATE VIEW are from single tables. The next example of CREATE VIEW is from multiple tables.
Consider the following tables along with the given records.
Table 1: Emp
| EMPLOYEEID | FIRST_NAME | LAST_NAME | SALARY | CITY | DEPARTMENT | MANAGERID |
| 1001 | VAIBHAVI | MISHRA | 65000 | PUNE | ORACLE | 1 |
| 1002 | VAIBHAV | SHARMA | 60000 | NOIDA | ORACLE | 1 |
| 1003 | NIKHIL | VANI | 50000 | JAIPUR | FMW | 2 |
| 2001 | PRACHI | SHARMA | 55500 | CHANDIGARH | ORACLE | 1 |
| 2002 | BHAVESH | JAIN | 65500 | PUNE | FMW | 2 |
| 2003 | RUCHIKA | JAIN | 50000 | MUMBAI | TESTING | 4 |
| 3001 | PRANOTI | SHENDE | 55500 | PUNE | JAVA | 3 |
| 3002 | ANUJA | WHERE | 50500 | JAIPUR | FMW | 2 |
| 3003 | DEEPAM | JAUHARI | 58500 | MUMBAI | JAVA | 3 |
| 4001 | RAJESH | GOUD | 60500 | MUMBAI | TESTING | 4 |
Table 2: Manager.
| Managerid | manager_name | manager_department |
| 1 | Snehdeep Kaur | ORACLE |
| 2 | Kirti Kirtane | FMW |
| 3 | Abhishek Manish | JAVA |
| 4 | Anupam Mishra | TESTING |
Example 1: Write a query to create View with Employee id, Name, City, Manager Id, and Manager Name from Emp Table and Manager Table.
CREATE VIEW EMP_MAN_VIEW AS SELECT EMP.EMPLOYEEID, CONCAT(EMP.FIRST_NAME, CONCAT(“ ”, EMP.LAST_NAME)) AS NAME, CITY, MANAGER.MANAGERID, MANAGER.MANAGER_NAME FROM EMP, MANAGER WHERE EMP.MANAGERID = MANAGER.MANAGERID; In the above query, we created a view with Employee id, Name, City, Manager Id, and Manager Name from Emp Table and Manager Table.
Whenever we want to look at the records in the table, we use the SELECT * FROM query. We will use the view name. Similarly, we will do for view instead of the table name.
SELECT * FROM EMP_MAN_VIEW;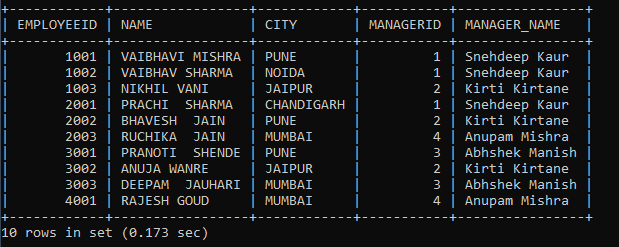
2 UPDATE SQL VIEW: -
The update statement modifies the existing table and existing view in the SQL. We can also insert new data into the existing view in the SQL. In SQL, a view is modified only when the below-given conditions are met. If one of the given conditions is not met, we will not be able to modify the view.
- DISTINCT keyword shouldn’t be used in the SELECT statement.
- The view should not have all NOT NULL values.
- Shouldn’t use ORDER BY clause and GROUP BY clause while creating a view in the SELECT statement.
- If the created view contains columns from the single table, then we are allowed to modify the view. i.e., the use of multiple tables in view is not allowed.
- The view shouldn't be created using a subquery or include complex queries
- The view contains any SQL aggregate functions; we are not allowed to modify the existing view.
CREATE OR REPLACE VIEW statement is used to add new fields or drop fields from the view.
Syntax:
CREATE OR REPLACE VIEW VIEW_NAME AS SELECT COLUMN_NAME1, COLUMN_NAME2 FROM TABLE_NAME WHERE CONDITION; Example 1: Write a query to update the Employee_View and add the Manager Id column from the Emp table in the view.
CREATE OR REPLACE VIEW EMPLOYEE_VIEW AS SELECT EMPLOYEEID, CONCAT(FIRST_NAME,CONCAT(" ", LAST_NAME)) AS NAME, SALARY, MANAGERID FROM EMP WHERE DEPARTMENT IN ('ORACLE', 'FMW');The above query modifies the existing Employee_view and modifies the records based on the given SELECT query.
Whenever we want to look at the records in the table, we use the SELECT * FROM query. We will use the view name. Similarly, we will do for view instead of the table name.
SELECT * FROM EMPLOYEE_VIEW;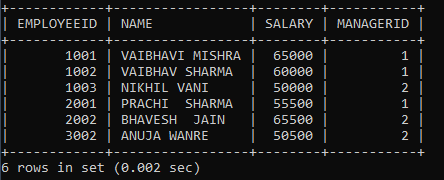
Example 2: Write a query to update the Manager_View.
CREATE OR REPLACE VIEW MANAGER_VIEW AS SELECT MANAGERID, MANAGER_NAME FROM MANAGER WHERE MANAGER_NAME LIKE ‘A%’;The above query modifies the existing Employee_view and modifies the records based on the given SELECT query.
Whenever we want to look at the records in the table, we use the SELECT * FROM query. We will use the view name. Similarly, we will do for view instead of the table name.
SELECT * FROM MANAGER_VIEW;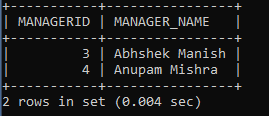
Inserting new record into the existing view
We insert the new records into the table. In the same way, we can also insert it into view.
Syntax
INSERT INTO VIEW_NAME VALUES(VALUE1, VALUE2);Example: write a query to insert a new record into the Manager_view.
INSERT INTO MANAGER_VIEW VALUES (5, ‘Akash Kadam’);As we insert new records into Manager_View. To check that new data is inserted or not, we will use the SELECT query:
SELECT * FROM MANAGER_VIEW; 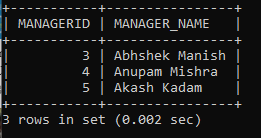
3 DROP VIEW: -
We drop the table. In the same way, we can also drop view.
Syntax:
DROP VIEW VIEW_NAME;Example: Write a query to drop the EMP_MAN_VIEW.
DROP VIEW EMP_MAN_VIEW; If we want to check whether a view is deleted or not, we will use the SHOW TABLES query.
SHOW TABLES;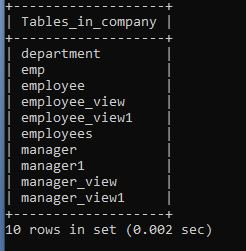
View name EMP_MAN_VIEW is not in the database, which means we successfully drop the view.