Deployment of an Angular 8 app
Deploying an Angular 8 app
To implement our application, we have to compile it and then host the JavaScript, CSS, and HTML on a web server. Build an Angular application which is very portable and can live in any environment or served by any technology such as Node, java, .net, PHP, and many others.
When we are ready to deploy our angular application to a remote server, we have various option for deployment.

Simple Deployment Options
Before fully deploying our application, we can test the process, build configuration, and deployed behavior by using one of these techniques:
Building and serving from the disk
During development, we typically use the ng serve command to build, watch, and serve the application from local memory, using webpack dev server. When we are ready to deploy; however, we must use the ngmodule command to build the app and deploy the build, we must generate the system originated in the methodology.
Both ng build, and ng serve clear the output folder before it creates a project. But only the ng build command is used to build the app and deploy the build artifacts anywhere.
NOTE: The output folder is dist/project name by default. To output, a different folder, change the output path in angular JSON.
We will need two terminal to get the live-reload experience.
- On the first terminal, run the ng build command in watch mode to compile the application to the dist folder.
ng build --watch
Like the ng serve command, this regenerates output files when source files change.
- On the second terminal, install a web server, and run it against the output folder. For example:
lite-server –baseDir=”dist”
The server will automatically reload our browser when new files are output.
NOTE: This method is for development and testing only, and is not supported or secure way of deploying an application.
Requesting services from a different server (CORS)
Angular developers may encounter a cross-origin resource sharing error when making a service request ( a data service request) to a server other than the application's host server. Browser forbids such claims unless the server permits them explicitly.
There is not anything the client application can do about these errors. The server must be configured to accept the application’s requests.
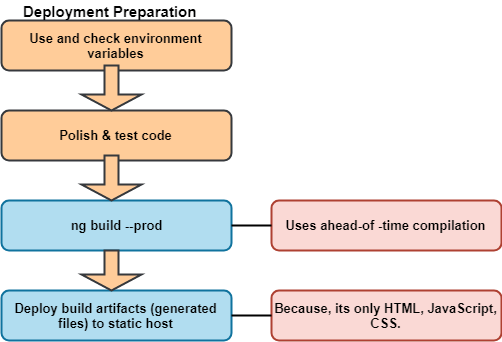
Production optimizations
The –prod meta-flag engages the following build optimization features.
- Ahead-of-time (AOT) compilation: AOT compilation ispre-combines Angular component templates.
- Production mode: deploys the production environment, which enables the production mode.
- Bundling: Itconcatenates our many application and library files into a few bundles.
- Minification: It is used to removes excess whitespace, comments, and optional tokens.
- Uglification: It rewrites code to use short, cryptic variable, and function names.
- Dead code elimination: removes unreferenced modules and much-unused code.
Measure performance
We can make better decisions about what to optimize and how when we have a clear and accurate understanding of making the application slow.
We waste a lot of time and money optimizing something that has no tangible benefit or even makes the app slower. We should measure the app's actual behavior when running in an environment that is important to us.
The WebChromeTest tool is another good choice that can also help verify that our deployment was successful.
Inspect the bundles
The source-map-explorer tool is a great way to inspect the generated JavaScript bundles after a production build.
Install source-map-explorer:
npm install source-map-explorer –save-dev
Build our app for production including the source maps
ng build –prod –source-map
List the created bundles in the dist/folder.
ls dist/*.bundle.js
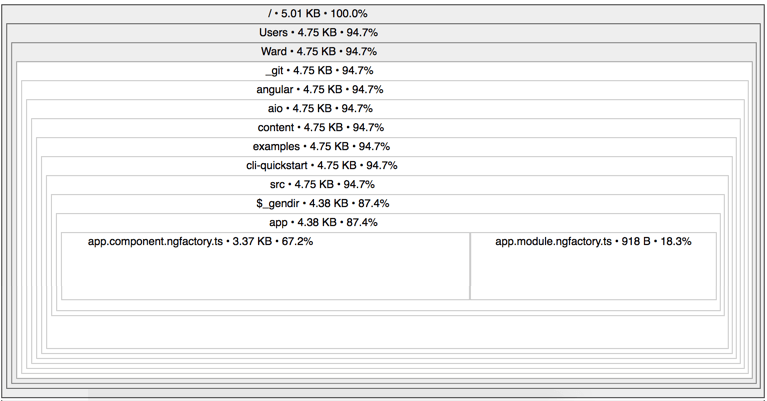
Run the explorer to generate a graphical representation of one of the bundles. The following example displays the graph for the main bundle.
node_module/bin/source-map-explorer dist/.main.*.bundle.js
The source-map-explorer analyze the source map generated with the bundle and draws the map of all dependencies, showing which class is included in the package.
The output for the main bundle is called cli-quick start.
Differential loading
When we are building web applications, making sure that our app is compatible with the majority of browsers in a goal. Even JavaScript continues to evolve, with new features introduced, not all browsers are updated with support of these new features at the same pace.
The code we write in development using TypeScript is compiled and bundled into ES2015, the JavaScript syntax that is compatible with most browsers.
To maximize compatibility, we could ship a single bundle that includes all our compiled code, any polyfills that may be needed. Users with modern browsers should not have to pay the price of increased bundle size that comes with polyfills which can bridge the gap to providing functionality that doesn't exist in older versions of JavaScript supported by the browser.
To maximize compatibility, you could ship a single bundle that includes all your compiled code, plus any polyfills that may be needed.
Differential loading is a strategy where CLI builds two separate bundles of the deployed apps.
- The first bundle contains modern ES2015 syntax, takes advantage of built-in support in modern browsers, ships fewer polyfills, and results in smaller bundle size.
- The second bundle contains code in the old ES5 syntax, along with all necessary polyfills. This results in a large bundle size but supports older browsers.
This strategy allows us to continue to build our web application supporting multiple browsers, but only load the necessary code that the browser needs.