JavaFX Bloom
In the JavaFX application, in order to apply various bloom effect, we use the Bloom class. It has the ability to bloom the colors of the shape. All methods needed for this purpose are present in the javafx.scene.effect.Bloom class.
Properties and corresponding methods to create Bloom Effect :
1. input
This property is of Effect type. It is used to represent the input required for the glow effect and the setInput( Effect value ) method is used to set it.
2. threshold
This property is of double type. It is used to represent the minimum value for glowness and the setThreshold( Double value) method is used to set it.
JavaFX Effect – Bloom
Example:
import javafx.application.Application;
import javafx.scene.Group;
import javafx.scene.Scene;
import javafx.scene.effect.Bloom;
import javafx.scene.effect.ColorInput;
import javafx.scene.paint.Color;
import javafx.scene.shape.Rectangle;
import javafx.scene.text.Text;
import javafx.stage.Stage;


public class EffectUI extends Application {


    @Override
    public void start(Stage stage) throws Exception
    {

    Rectangle rect1= new Rectangle(60,50,200,200);
        Rectangle rect2 = new Rectangle(325,50,200,200);
        rect1.setFill(Color.BROWN);
        rect1.setStroke(Color.BLACK);
        rect1.setStrokeWidth(5);
        rect2.setFill(Color.BROWN);
        rect2.setStroke(Color.BLACK);
        rect2.setStrokeWidth(5);
        Text text1 = new Text();
        Text text2 = new Text();
        text1.setText(" Shape with Bloom Effect ");
        text2.setText(" Shape without Bloom Effect ");
        text1.setX(65);
        text1.setY(300);
        text2.setX(335);
        text2.setY(300);

        text1.setFill(Color.RED);
        text2.setFill(Color.RED);
        text1.setStroke(Color.BLACK);
        text2.setStroke(Color.BLACK);
        text1.setStrokeWidth(0.2);
        text2.setStrokeWidth(0.2);
        Bloom bloom = new Bloom();
        bloom.setThreshold(0.1);
        rect1.setEffect(bloom);
        Group root = new Group();
        root.getChildren().addAll(rect1,rect2,text1,text2);
        Scene scene = new Scene(root,600,500);
         stage.setScene(scene);
        stage.setTitle(" JavaFx Bloom Effect example ");
         stage.show();
     }

    public static void main(String[] args) {
        launch(args);
    }
}
Output:
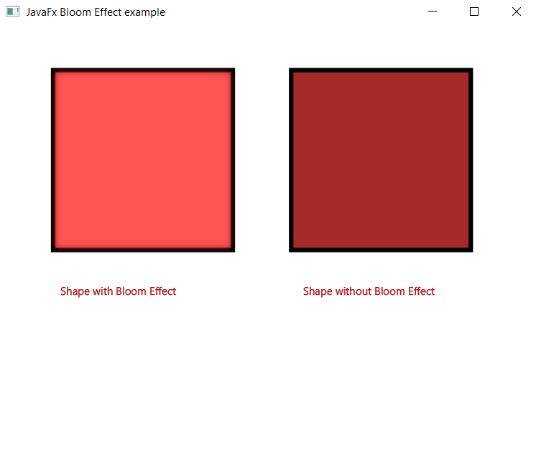
In order to create Bloom Effect in JavaFX, we have to import all the required libraries such as javafx.application.Application, javafx.scene.Group, javafx.scene.Scene, javafx.scene.effect.ColorInput, javafx.scene.paint.Color, javafx.scene.shape.Rectangle, javafx.scene.image.Bloom, javafx.stage.Stage.
Then we have created one class named EffectUI extending the Application class. Also, we have to override the start method to provide implementation details. This method creates an object of Stage as primaryStage. For the container to hold two rectangles with and without bloom effect, a Group object is created which is then passed to the Scene class object.
The rectangle is created with the help of the constructor having the size parameter passed to it. The color, brown is filled in both the rectangle then the bloom constructor is created and it is applied to the first rectangle.
The stage is prepared, the title is set and the show() method is called to display output. In order to run the application, the launch(args) method is called in the main() method. In output Frame like container is displayed with the title, " JavaFX Bloom Effect example”. Also, it displays the two rectangle with and without bloom effect.
JavaFX Effect – Blend Darken mode Example :
Example:
import javafx.application.Application;
import javafx.scene.Group;
import javafx.scene.Scene;
import javafx.scene.effect.Blend;
import javafx.scene.effect.BlendMode;
import javafx.scene.effect.Bloom;
import javafx.scene.effect.ColorInput;


import javafx.scene.paint.Color;
import javafx.scene.shape.Circle;
import javafx.scene.shape.Rectangle;
import javafx.scene.text.Text;
import javafx.stage.Stage;


public class SliderUI extends Application {


    @Override
    public void start(Stage stage) throws Exception
    {

    Circle circle1 = new Circle(120,120,60);
    circle1.setFill(Color.LIMEGREEN);
    Circle circle2 = new Circle(360,120,60);
    circle2.setFill(Color.LIMEGREEN);
        Text text1 = new Text();
        Text text2 = new Text();
        text1.setText(" Shape with Bloom Effect ");
        text2.setText(" Shape without Bloom Effect ");
        text1.setX(45);
        text1.setY(200);
        text2.setX(295);
        text2.setY(200);

        text1.setFill(Color.RED);
        text2.setFill(Color.RED);
        text1.setStroke(Color.BLACK);
        text2.setStroke(Color.BLACK);
        text1.setStrokeWidth(0.2);
        text2.setStrokeWidth(0.2);
        Bloom bloom = new Bloom();
        bloom.setThreshold(0.1);
        circle1.setEffect(bloom);
        Group root = new Group();
        root.getChildren().addAll(circle1,circle2,text1,text2);
        Scene scene = new Scene(root,600,500);
         stage.setScene(scene);
        stage.setTitle(" JavaFx Bloom Effect example ");
         stage.show();
     }

    public static void main(String[] args) {
        launch(args);
    }
}
Output:
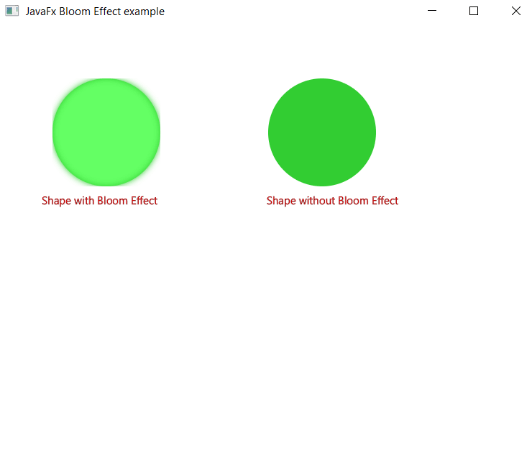
In order to create Bloom Effect on circle in JavaFX, we have to import all the required libraries such as javafx.application.Application, javafx.scene.Group, javafx.scene.Scene, javafx.scene.effect.ColorInput, javafx.scene.paint.Color, javafx.scene.shape.Circle, javafx.scene.image.Bloom, javafx.stage.Stage.
Then we have created one class named EffectUI extending the Application class. Also, we have to override the start method to provide implementation details. This method creates an object of Stage as primaryStage. For the container to hold two circles with and without bloom effect, a Group object is created which is then passed to the Scene class object.
The circle is created with the help of the constructor having the size parameter passed to it. The color, limegreen is filled in both the circle then the bloom constructor is created and it is applied to the first circle.
The stage is prepared, the title is set and the show() method is called to display output. In order to run the application, the launch(args) method is called in the main() method. In output Frame like container is displayed with the title, " JavaFX Bloom Effect example”. Also, it displays the two circle with and without bloom effect.