
Ionic Camera
Hybrid mobile applications can make very quickly, but sometimes it becomes a challenge to get the features that access the hardware such as GPS, storage, file storage, cameras, and networks. Cordova offers plugins to build relationships to use them with java libraries.
The ionic native camera plugin allows the user to click the image by using the device camera. In this topic, we are going to use the ionic camera feature in the ionic application by using the Cordova and ionic native plugin.
Now, you will see step by step all the processes of the ionic camera in the ionic application.
Step 1: Firstly, you create a new project in the ionic application. You also make sure that you have installed the latest version of the ionic framework.
Step 2: After installation of the latest version of ionic, you are required to select a blank template from the various templates. After this process, you run the following commands to install the Cordova camera plugin in the ionic application.
$ cd myapp
 $ ionic cordova plugin add cordova-plugin-camera
 $ npm install @ionic-native/camera
Step 3: In this step, you are required to import camera plugin in the app.module.ts file, as shown below:
app.module.ts
import { NgModule } from '@angular/core';
 import { BrowserModule } from '@angular/platform-browser';
 import { RouteReuseStrategy } from '@angular/router';
 import { IonicModule, IonicRouteStrategy } from '@ionic/angular';
 import { SplashScreen } from '@ionic-native/splash-screen/ngx';
 import { StatusBar } from '@ionic-native/status-bar/ngx';
 import { AppComponent } from './app.component';
 import { AppRoutingModule } from './app-routing.module';
 import { Camera } from '@ionic-native/camera/ngx';
 @NgModule({
   declarations: [AppComponent],
   entryComponents: [],
   imports: [BrowserModule, IonicModule.forRoot(), AppRoutingModule],
   providers: [
     StatusBar,
     SplashScreen,
     Camera,
     { provide: RouteReuseStrategy, useClass: IonicRouteStrategy }
   ],
   bootstrap: [AppComponent]
 })
 export class AppModule { }
Step 4: In this step, you also required to import the camera plugin in the home.page.ts file. Here, you create a function to click the photo, as shown below:
Home.page.ts
import { Component } from '@angular/core';
 import { Camera, CameraOptions } from '@ionic-native/camera/ngx';
 @Component({
   selector: 'app-home',
   templateUrl: 'home.page.html',
   styleUrls: ['home.page.scss'],
 })
   constructor(private camera: Camera) { }
   takeSnap() {
     this.camera.getPicture(this.cameraOptions).then((imageData) => {
       // this.camera.DestinationType.FILE_URI gives file URI saved in local
       // this.camera.DestinationType.DATA_URL gives base64 URI
       let base64Image = 'data:image/jpeg;base64,' + imageData;
       this.capturedSnapURL = base64Image;
     }, (err) => {
       console.log(err);
       // Handle error
     });
   }
 }
Step 5: In this step, you write the code in the Home.page.html file and create a button to click the photo. Here, we have created a click function to click the image, as shown below:
Home.page.html
<ion-header>
   <ion-toolbar color="success">
     <ion-title>Ionic Camera Example</ion-title>
   </ion-toolbar>
 </ion-header>
 <ion-content>
   <div class="padding">
 <ion-button shape="round" color="danger" (click)="takeSnap()">
       Click Image
     </ion-button>
     <img [src]="capturedSnapURL" />
   </div>
 </ion-content>
Step 6: In this step, you can use your android device to run the app. Before testing the app, it is required to add the platform to the app. The following command helps to install the platform with android:
$ ionic cordova platform add android
 $ ionic cordova run android –aot
If you want to run and test the app in the browser, execute the below command:
$ ionic cordova run browser
Output:
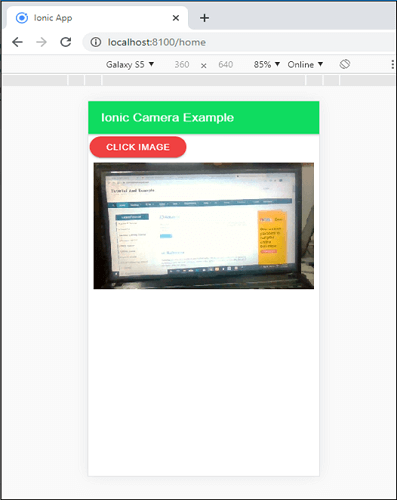
After executing the above code, you will get the output. When you click on the Click Image button, it takes the image from the device as shown below:
Camera Option
Different options are available in the ionic camera that is used in the ionic application, as shown in the following table:
| S.No | Parameter | Type | Description |
| 1. | allowEdit | Boolean | It allows the user to edit the image before selection. |
| 2. | cameraDirection | number | It is used to choose the camera direction. By default, camera is back and back = 0, front = 1. |
| 3. | destinationType | number | It is used to choose the format of the camera picture. |
| 4. | encodingType | number | It is used to choose the encoding image. |
| 5. | correctOrientatiom | boolean | It is used to rotate the image to the correct orientation of the device during the image capturing. |
| 6. | popoverOptions | string | It is used for iOS options that specify a popover location on the IPad. |
| 7. | quality | number | It is used to set the image quality in range 0 to 100. The default is 50. |
| 8. | mediaType | number | It is used to set the type of media. |
| 9. | sourceType | number | It is used to set the source of the picture. |
| 10. | saveToPhotoAlbum | boolean | It is used to save images in the photo album on the device. |
| 11. | targetHeight | number | It is used to scaling the image width in pixels. |
| 12. | targetWidth | number | It is used to scaling the image height in pixels. |