Responsive HTML5 and CSS3 Tutorial
Introduction to HTML5 Tutorial
HTML5 is the latest and upgraded version of HTML. HTML is a hypertext markup language. Technically, it is not a programming language. It is a markup language. HTML provides some brand new feature which will make it much easier. These new features make website layout clearer to website designer and users both. These elements are as <header>, <footer>, <nav>, <article> etc. When a web browser displays a web page, it reads and interprets an HTML document. This document could be short (10 lines) or long (several hundred), the browser does not care. Its work is to read your document. HTML adds semantic to your content; this means the web browser understands the type of content you have put up on your web page. Anything else you had learnt about HTML remains same when it comes to HTML5.Why HTML5?
Advantages of HTML5- HTML5 is enriched with some advanced features which make it interactive and easy for user and designer both.
- It has improved the accessibility of websites.
- Cleaner code is one of the significant improvements in this new version.
- Mobile optimization is also a significant advantage of this upgraded version. HTML5 is the most mobile-ready tool and allow you to build websites and app for various mobile devices.
- It allows the user to play a video and an audio file.
- It supports all major browsers in the world including chrome, IE, Firefox, opera, etc., and even supports their legacy versions.
- API allows you to detect the location of a user and cater content which is specific to them.
- It allows drawing on canvas.
- It facilitates us to design better forms and build web applications that work offline.
Structure of HTML5
Before starting with HTML, it is essential to understand the structure of HTML. As HTML is a markup language so, it is used to mark the different parts of your content.- HTML starts with an opening tag.
- HTML ends with closing tag.
- A tag starts like a < and ends with a > symbol.
- The letters between < and > are abbreviations.
- The content between the start tag and the end tag is everything.
- Some elements are empty in HTML.
- Empty elements are closed at the start tag.
<!DOCTYPE html>The character encoding- The charset declaration is also very simple-
<meta charset="UTF-8">Example-
<!DOCTYPE html>

<html>

<head>

<meta charset="UTF-8">

<title>Title of the document</title>

</head>

<body>

Content of the document......

</body>

</html>
New elements HTML5 is upgraded with some advance element like <header>, <footer>, <article>, and <sections>. New attribute of form elements like number, date, time, calendar and range. Some new graphic elements are <svg>, <canvas>. Some new multimedia elements are <audio> and <video>. Following table contains some new elements-
| TAG | DESCRIPTION |
| <article> | It defines an article in a document. |
| <aside> | It defines contents from the page. |
| <bdi> | It isolates a part of text that might be formatted in a different direction from other text outside it. |
| <details> | It defines additional details that the user can view or hide. |
| <dialog> | It defines a dialog box. |
| <figure> | It defines the self contained content. |
| <footer> | It defines a footer for document. |
| <header> | It defines a header for a document. |
| <main> | It defines the main content of a document. |
| <mark> | It defines highlighted text. |
| <meter> | It defines a scalar measurement within a known range. |
| <nav> | It defines navigation links. |
| <progress> | It represents the task progress. |
| <rp> | It defines what to show in browsers that do not support ruby annotation. |
| <rt> | It defines an explanation of characters. |
| <section> | It defines a section in a document. |
| <summary> | It defines a visible heading for a <detail> element. |
| <time> | It defines a date/time |
| <wbr> | It defines a possible line break. |
New API’s in HTML5 are
- HTML Geolocation
- HTML Drag and Drop
- HTML Local Storage
- HTML Application Cache
- HTML Web Workers
- HTML SSE
Removed elements in HTML5
In HTML5, some elements are removed and some are replaced. List of such elements are as following-| REMOVED ELEMENT | REPLACED BY |
| <acronym> | <abbr> |
| <applet> | <object> |
| <basefont> | CSS |
| <big> | CSS |
| <center> | CSS |
| <dir> | <ul> |
| <font> | CSS |
| <frame> | |
| <frameset> | |
| <noframes> | |
| <strike> | CSS, <s>,or <del> |
| <tt> | CSS |
HTML5 first example
<!DOCTYPE>

<html>

<body>

<h1>This is HTML5</h1>

<p>First paragraph</p>

</body>

</html>
Output:
This is HTML5First paragraph
HTML5 Coding Convention
- Always use a consistent CSS while writing HTML. It makes the code simpler and more understandable for people.
- You should declare document type at the beginning of the code.
<!DOCTYPE html>
- Use lower case element because lower case is easy to write and looks neat and clean. Developers mainly use lower case letters.
<section>

<p> This is tutorialandexample</p>

</section>
- It is recommended to close all HTML elements.
- It is not mandatory to close empty HTML tags; you can close it or let it be.
- HTML allows you to omit and tag; you can exclude both tags, and the program will work well enough.
The DOCTYPE in HTML5
All browsers read a document in two different ways – standard mode and quirks mode. If you don't tell the type of document, they will go in quirks mode. Declaring a doctype forces the browser to go into standard mode. You should follow the below points for the browsers’ better readability of HTML code:- Use the tag <head> to separate the information about your page.
- Use the tag <body> to separate the actual content of your web page.
- Using the HTML tag is a matter of style, but it makes the structure of the page clearer to you.
Block and Inline elements
There are two different types of element in HTML5 coding:- Inline elements
- Block elements
<a href="http://www.url.com"> This is my link</a>
In given example the link element consists of the opening tag <a> and the closing tag </a>. Inside the opening tag there is an attribute “href”. The href attribute always has a value.
Headings
Headings are defined with tag <h1> to <h6>. < h1> being the first and important heading.
Example-
<h1> This is first heading</h1>

<h2> This is second heading</h2>

<h3> This is third heading</h3>
Headings are important as web browser interprets the heading as the structure of web page. Bold and large texts are not considered as headings. Headings also increase the readability of the page. Headings should be in following manner-
- Introduction
- Second level headings
- Third level headings
<!DOCTYPE html>

<html>

<head>

<title>First HTML5 Document</title>

</head>

<body>

<h1>Introduction</h1>

<p> First paragraph of page.</p>

<h2>Less important heading</h2>

<p>This is the 2nd paragraph and it is right below a h2 heading</p>

<h3>3rd level heading</h3>

<p>This is the third paragraph and it is and it is right below the 3rd level heading</p>

<h2>Back to 2nd level headings</h2>

<h2>The last 2nd level heading</h2>

</body>

</html>
HTML Anchor Tag <a>
Anchor tag defines a hyperlink that redirects user one page to another page. It can create hyperlink for other web pages, files, location or any URL. We use "href" attribute for linking the destination page with URL. Address of the file or page is defined by "href" attribute. Syntax-<a href="………."> Link test </a>Ex- < a href=” first.html”> click for second page </a> Specify a location for link- We want to open link to another page, then we will use target attribute of <a> tag. Example-
<!DOCTYPE html>

<html>

<head>

<title></title>

</head>

<body>

<p>Click on <a href="https://www.tutorialandexample.com/" target="_blank"> this-link </a>to go on home page of tutorialandexample. </p>

</body>

</html>
HTML Google Maps
You can simply add a map on your page. Syntax-<!DOCTYPE html> <html> <body> <h1>First Google Map Example</h1> <div id="map">My map will go here...</div> </body> </html>Set the map size- You can set the map size by the following syntax-
<div id="map" style="width:400px;height:400px;background:grey"></div>
HTML audio Tag <audio>
HTML audio tag is used to define sounds such as audio clips and music. HTML5 supports three types of audio format.- Mp3
- Wav
- ogg
|
BROWSER |
MP3 |
WAV |
OGG |
| Internet Explorer | Yes | No | No |
| Google Chrome | Yes | Yes | Yes |
| Mozilla Firefox | Yes | Yes | Yes |
| Opera | No | Yes | Yes |
| Apple Safari | Yes | Yes | No |
<audio controls>

<source src="despacito.mp3" type="audio/mpeg">

</audio>
HTML Video Tag <video>
HTML5 supports <video> tag also. The HTML video tag is used for streaming video files such as movie clip on the web page. HTML5 supports the following three video formats.- Mp4
- webM
- ogg
| BROWSER | mp4 | webM | Ogg |
| Internet Explorer | Yes | No | No |
| Google Chrome | Yes | Yes | Yes |
| Mozilla Firefox | Yes | Yes | Yes |
| Opera | No | Yes | Yes |
| Apple Safari | Yes | No | No |
<video controls>

<source src="indianmovie.mp4" type="video/mp4">

</video>
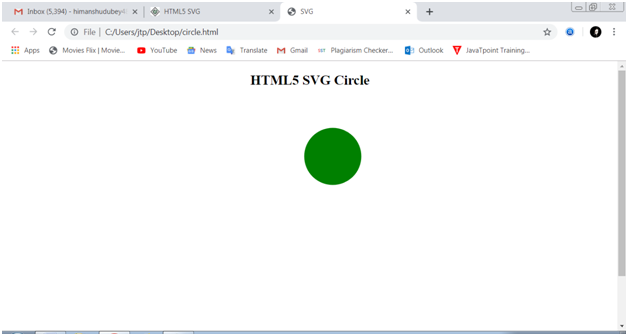
HTML5 - SVG
SVG stands for Scalable Vector Graphics. It is a tool (language) for describing 2D-graphics and graphical application in XML. These applications rendered by a SVG viewer. Mostly SVG is used for vector type diagrams like pie chart, 2D graphs in an X, Y coordinate system etc. Embedding SVG in HTML5 HTML5 allows embedding SVG directly using <svg>…..</svg> tag. Syntax-<svg xmlns="http://www.w3.org/2000/svg"> <text x="10" y="50" font-size="30">My SVG</text> </svg>Example-
<!DOCTYPE html>

<html>

<head>

<style>

#svgelem {

position: relative;

left: 50%;

-webkit-transform: translateX(-20%);

-ms-transform: translateX(-20%);

transform: translateX(-20%);

}

</style>

<title>SVG</title>

<meta charset = "utf-8" />

</head>

<body>

<h2 align = "center">HTML5 SVG Circle</h2>

<svg id = "svgelem" height = "500" xmlns = "http://www.w3.org/2000/svg">

<circle id = "redcircle" cx = "100" cy = "100" r = "50" fill = "green" />

</svg>

</body>

</html>
Output-
Introduction to CSS3 Tutorial
CSS (Cascading Style Sheet) is the key language used to describe look and formatting for web pages. CSS was introduced in 1996 by the W3C (World Wide Web Consortium). W3C maintains its standard. It was designed to enable the separation of presentation and content. It is used to design HTML tags. CSS is widely used language on the web.- CSS is the primary presentation technology used in website design
- CSS stands for Cascading Style Sheet
- It is used to design HTML tags
- We can change the look of our website by only a few changes in CSS code.
<!DOCTYPE>

<html>

<head>

<style>

h1{

color:red;

background-color:green;

padding:7px;

}

p{

color:pink;

}

</style>

</head>

<body>

<h1>Write Your First CSS Example</h1>

<p>This is Paragraph.</p>

</body>

</html>
Advantages of CSS3
CSS is a web design tool used to control the layout of the web page while HTML deals with the actual content. CSS has gone through many enhancements over the years, and the latest version is CSS3.Some benefits of CSS3 are as follows-
Consistency: It solves a big problem. Before CSS, tags like font, background style, color, border, and size had to be repeated on every web page. This process was very long. By making one change to your website’s CSS style sheet; you can automatically make it to every page of your website. Time-saving: It saves a lot of time. Provides more attribute: CSS provides more attribute than plain HTML. So, it enhances the look and feel of the website. Search engines: CSS is considered a clean coding technique that means search engines read its content easily. Browser compatibility: Today's internet user has more browser option than ever before. Browser compatibility is a major issue for your website. CSS style sheet increases the adaptability of your website. Transformation: We can quickly transform elements like scale, rotate, skew, etc. in 2D or 3D shape. We can create animation and transition effects without using JavaScript. There are many other exciting things that you can do with CSS.Getting started with CSS
Let’s see how easy it is to add style and formatting using CSS. Prerequisites- Getting started with CSS, one should be familiar with-- Basic word processing with any text editor
- Creating directories and files
- Simple web page development using HTML or XHTML.
- Inline styles
- Embedded styles
- External style sheet
Inline Styles
Inline styles are used to apply the unique styles rules to an element by putting the CSS rules. We use these rules into the start tag. We attach style attribute along with an element for implementing the CSS rules. We use the <style> tag in the <head> tag of a document. The style attribute contains many CSS properties and value pairs. A semicolon separates each pair of property and value pair (;) like “property: value;." Example-<!DOCTYPE html> <html lang="en"> <head> <meta charset="utf-8"> <title>Example of CSS Inline Styles</title> </head> <body> <h1 style="color:blue; font-size:25px;">Heading</h1> <p style="color:pink; font-size:20px;">This is a paragraph.</p> <div style="color:yellow; font-size:15px;">This is tutorial and example ( some text).</div> </body> </html>Inline styles are generally considered as a bad practice because of style rules are embedded directly inside the HTML tag. So it causes the presentation to be mixed with the content of the document. Styling pseudo-elements and classes with inline styles are impossible. Therefore you should avoid the use of style attribute in your code.
Embedded style sheets
Embedded style sheets are also called as internal style sheets. These sheets only affect the document they are embedded in. these sheets are defined in the <head> section of an HTML document using the <style>. You can define any number of <style> elements in a HTML document but they must appear within a <head> tag.<!DOCTYPE html>
<html lang="en">
<head>
<meta charset="utf-8">
<title>Example of CSS Embedded Style Sheet</title>
<style type="text/css">
body { background-color: red; }
p { color: blue; }
</style>
</head>
<body>
<h1>HEADING</h1>
<p>This is a paragraph.</p>
</body>
</html>
External Style Sheets
It is an ideal style sheet for applying style on many pages. We write all the CSS code in a CSS file and save this file with.css extension. An external sheet holds all the style formats in a separate file that you can link from an HTML file on your site. You can change the look of many pages of the website by changing just one file. An external style sheet can be attached in two ways-- Linking
- Importing
body {

    background: blue;

    font: 20px Calibri (body), sans-serif;

}

h1 {

    color: red;

}
An external style sheet can be linked an HTML document using tag <link>. The tag <link> always is inside the <head> section.
<head>

<link rel="stylesheet" type="text/css" href="style.css>
Using external style sheets is the best method for defining and applying styles to the HTML documents. By the external style sheets, the affected HTML file require minimal changes in the markup. Importing External style sheets- The @import method is another way of loading an external style sheet. It instructs the web browser to load an external sheet and use its styles. There are two ways of using @import. First and the simplest way is within the Header of the document. Since other rules, CSS rules may still be included in the <style> tag. Example-
<style type="text/css">

    @import url("css/style.css");

    p {

        color: red;

        font-size: 15px;

    }

</style>
Similarly, we can use the @import method to import a style sheet within another style sheet.
All @import rules should be at the start of the sheet. Any style rule defined in style sheet itself. Importing a style sheet within another style sheet is not recommended because it creates a performance issue.
CSS syntax
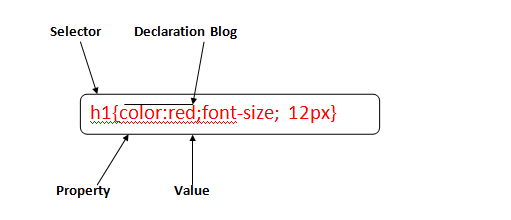 Selectors are used to declaring the markup tag. It could be any tag like <title>, <head>, etc.
The DECLARATION BLOCK can contain single or many declarations each declaration should be separated by a semicolon. For the above example, there are two declarations. Each declaration contains a property name and value. They are separated by a colon (:).
A PROPERTY is an attribute of HTML element. It could be color, text-align, border, etc.
VALUES are assigned to CSS properties. In the above example, value 'red' is assigned to the color property.
CSS selectors
CSS selectors are used to selecting the desired content for style. The selector is a part of the CSS rule set. It is a pattern to match the elements in an HTML document.
There are several types of Selectors like-
Selectors are used to declaring the markup tag. It could be any tag like <title>, <head>, etc.
The DECLARATION BLOCK can contain single or many declarations each declaration should be separated by a semicolon. For the above example, there are two declarations. Each declaration contains a property name and value. They are separated by a colon (:).
A PROPERTY is an attribute of HTML element. It could be color, text-align, border, etc.
VALUES are assigned to CSS properties. In the above example, value 'red' is assigned to the color property.
CSS selectors
CSS selectors are used to selecting the desired content for style. The selector is a part of the CSS rule set. It is a pattern to match the elements in an HTML document.
There are several types of Selectors like-
- CSS Element Selector
- CSS Id Selector
- CSS Class Selector
- CSS Universal Selector
- CSS Group Selector
P

{
color: red;

}
The style rules Inside the p selectors will be applied on every <p> element in the document and color it red, regardless of their position in the document tree.
CSS Id Selectors-
The id selector is defined by a hash (#) sign followed by the id value. It is used to define style rules for a single or unique element. It selects the id attribute of an HTML element to select a specific element.
#para1{

color: red;

font-size:15px;

}
This style rule set color red and font-size 15px for the id attributes para1.
CSS class selector-
The class selector is used to the selects HTML element with class attributes. All the elements that have class will be formatted according to the defined rule. It is used with a dot (.) symbol.
.red{

color: red;

}
The above style rules render the text in blue of every element for the document that has a class attribute set to blue.
You can make it bit more particular like-
p.red{

color: red;

}
The style color:red inside the selector p.blue renders the text blue of only for those <p> elements that have the class attribute set to blue.
CSS Universal Selector-
It selects all the elements of the page. The universal selector, written as *, i.e. star symbol. It matches every single element on the page. It is used as a wild card character.
e.g.-
*{

color:red;

font-size:15px; }
CSS Group Selector-
It is used to select all the elements with the same style definitions. It is used to minimize the code. We use commas for separating each selector in the grouping. It also prevents you from repeating the same style of rule.
e.g.-
h1 {

    font-size: 25px;

    font-weight: normal;

}

h2 {

    font-size: 22px;

    font-weight: normal;

}

h3 {

    font-size: 20px;

    font-weight: normal;

}
New features in CSS3
- CSS3 Selectors-
- E[attr^=val]
a[href^=’http://sales.’]{color: teal;}
The val matches the beginning of the attribute value.
- E[attr$=val]
a[href$=’.jsp’] {color:purple;}
The val matches the end of the attribute value.
- E[attr*=val]
img[src*=’artwork’] {border-color: #C3B087 #FFF #FFF #C3B087; }
It matches val anywhere within the attribute; it is similar to E[attr ~=val] the only difference is that the val can be part of the word.
2. Pseudo-classes
We are already familiar with some of the user interaction pseudo-classes,namely: link, :visited, :hover, :active, etc.
CSS3 comes with few more pseudo-class selectors. One is the :root selector. :root selector allows a designer to point to the root element of a document . for HTML it would be <html>. Since: root is generic. It allows the designer to select the root element of an XML document without necessarily knowing its name.
:root {overflow:auto;}
As a compliment to the: first-child, the: last-child was added to CSS3; with it, one can select the last element named of the parent element.
div.article > p: last-child { font-style: italic;}
The: target selector is a new user interaction that the pseudo-class selector was added.
3. CSS3 colors-
CSS3 comes with some exciting and new ways of describing colors. Before CSS3, we almost always declared colors using the hexadecimal format. We had also declared colors using the RGB( notation, providing integers(0-255).
The color keyword list has been extended in CSS# color module. One hundred forty-seven additional keyword colors (that are generally supported) have added. CSS3 provides other option like HSL, HSLA, and RGBA. The most exciting feature with these new color types is the ability to declare semitransparent colors.
4. Rounded Corners: border-radius
The border-radius facilitates you to create rounded corners without the need for images or additional markup. We could declare up to four unique values.
Border-radius: 5px 10px 15px 20px5. Drop Shadows- CSS3 facilitates to add drop shadows to element using the box-shadow property. By this property we specify the color, height, width, blur, etc.
box-shadow: 2px 5px 0 0 rgba (72,72,72,1);