Installation of Operating System on a New PC
You can install an operating system on a Windows machine using Windows Installation discs. The primary operating system for Macs is always preinstalled when they are first purchased, but you can reinstall it by using the macOS recovery function.
Method 1
Downloading Windows 10
1. Produce installation discs for Windows. A media for installing Windows 10 may be sent to you if you purchase it for a new Computer construction. A PC with internet connectivity and an 8 Gigabyte USB flash disc are required (16 GB recommended). You should also be aware of the Computer's design, specifically whether it is 32- or 64-bit, before installing Windows 10. To obtain a program key, Windows must also be purchased. To make Windows Installation Disk, follow these instructions:
- Connect a USB device with at least 8 GB of storage to any internet-connected machine. Any data currently on the USB device will be erased, so back up any information you want to retain.
- Open an online browser and navigate to https://www.microsoft.com/en-us/software-download/windows10.
- Select Now, Download Utility.
- Launch the "MediaCreationTool.exe" file from your downloads location or an online browser.
- Select "Yes."Click Next after choosing your language, Windows version, and Computer architecture.
- Choose your Flash device and then select Next.
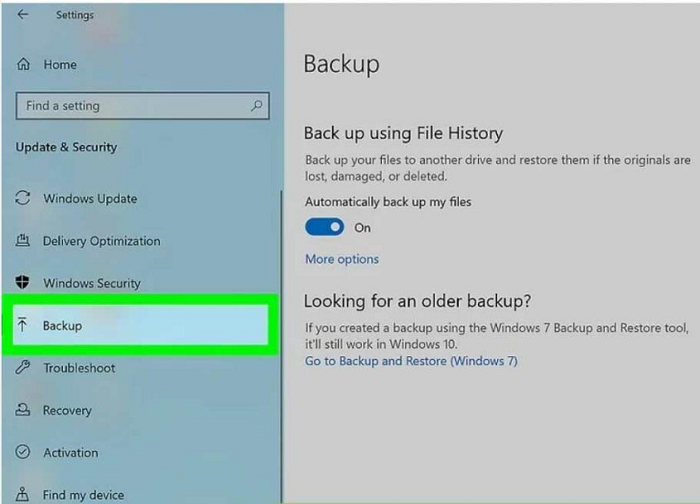
2. Back up your data (optional). Before starting a fresh Windows update, back up any information you want to retain. OneDrive, Google Drive, Dropbox, a portable hard drive, or a USB flash device are all options for file backup.
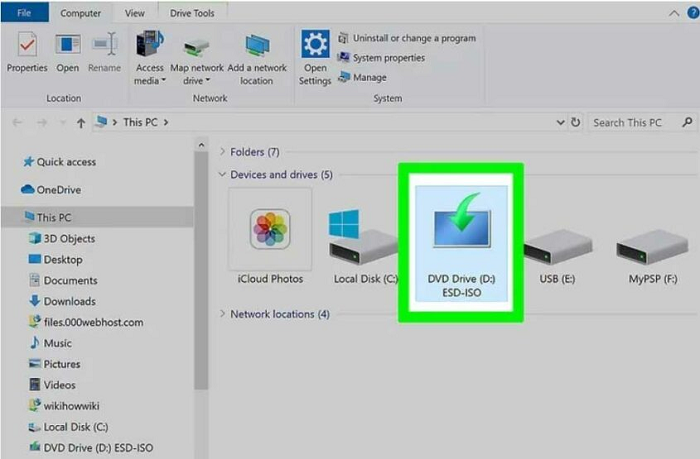
3. The machine you want to run Windows on should have Windows Installation Media. The Windows installation disc can be inserted into any accessible USB interface.
4. Start up the machine. Restart the Computer if it is turned on by following the standard reset instructions provided by the PC's running system.
5. Navigate to the Startup option. Most modern computers have a startup selection you can choose from as they start up. Depending on your motherboard, there are several various ways to access it. Pressing F10, F11, F12, F2, or Esc as the Computer starts up is the most frequent method to access the Boot menu. You can choose from a selection of drives in this startup window.
- You must enter the BIOS during bootup using an earlier computer without a Boot interface. The buttons you click to access the BIOS vary depending on the Computer maker.
- Typically, it will specify which buttons to hit as your Computer starts. To access the BIOS, you usually need to press F1, F2, F3, Esc, or Delete. You might have to act quickly.
- Additionally, you can restart your Computer into the UEFI from the Windows Settings interface.
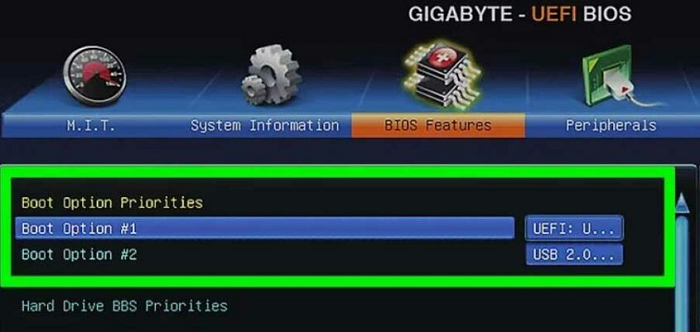
6. Identify the Flash device. The disc containing the Windows Installation Disc is this one. The Computer will then start up using the Windows Startup Disk. The Windows installation procedure can be started by pressing any key after the Computer starts from the USB device.
- if you are in the Original configurations. Find the choice that states "Boot," "Boot sequence," "Priorities," or a phrase to that effect. Next, choose the "Save and Exit" choice. Your Computer will restart using the USB device after you do this.
7. Click Next after selecting your language, time zone, money, and computer input. Select your region first using the drop-down options. Next, pick your keyboard input technique and your nation or territory. Then press Next.
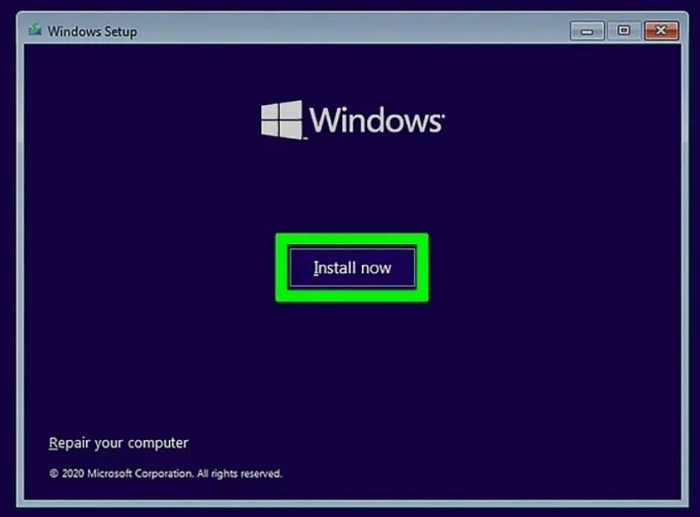
8. To install now, click. It is the icon on the screen's middle.
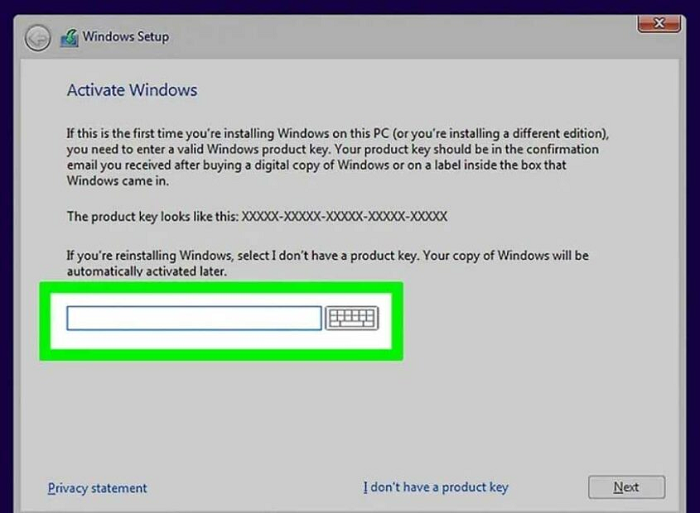
9. Click Next after entering your Windows license key. If you've already bought Windows, your license key can be found in the email you received upon receipt. Click I only have a license key if you have accepted Windows. Windows must be purchased and subsequently activated.
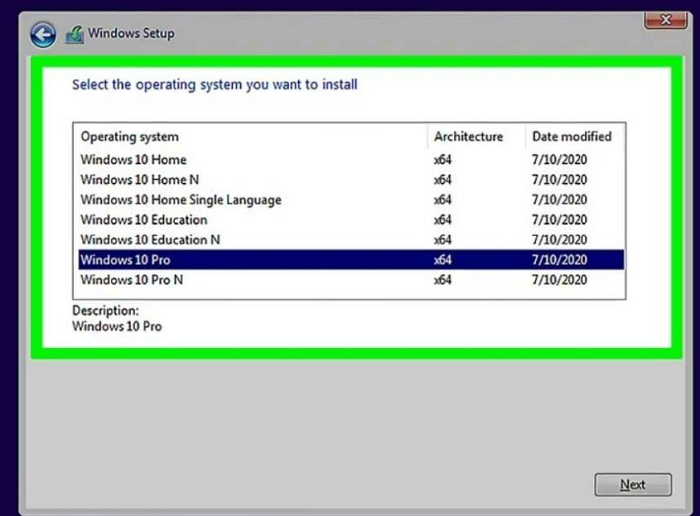
10. Click Next after selecting the Windows version you want to install. If you've already bought Windows, double-check the edition you got by clicking the appropriate link. Check which edition of Windows you want to run if you still need to do so.
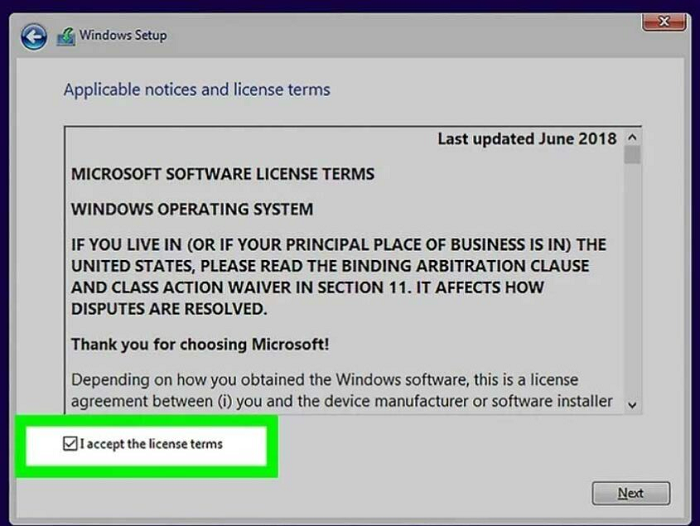
11. Select "I accept the license conditions" by checking the box next to it, then select Next.
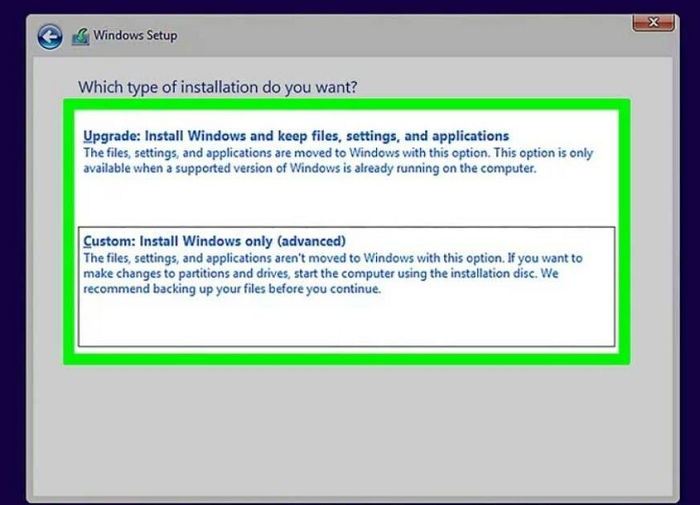
12. Click Upgrade: Install Windows and retain folders, preferences, and apps, or Custom: Install Windows only. Click Upgrade: Install Windows and maintain data, preferences, and apps if your machine already has a Windows installation. Click Custom: Install Windows only if your device doesn't already have Windows installed or if you need to restart Windows.
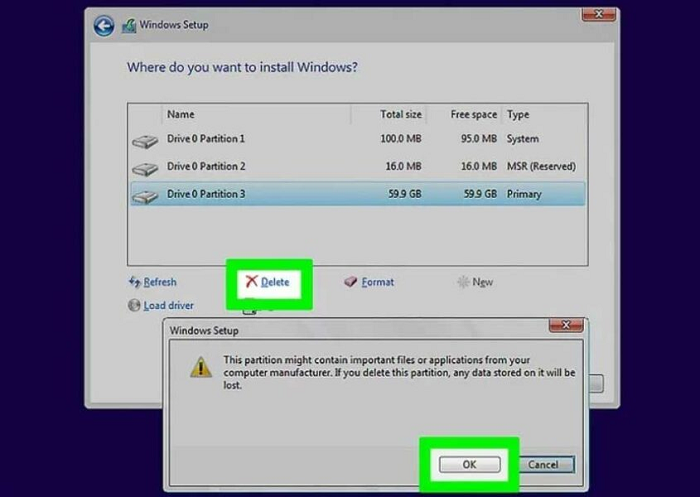
13. Click Delete after choosing the disc or partition you want to use to run Windows. If your hard drive has numerous compartments or has more than one hard drive, select the one you want to use to install Windows, then hit Delete. The disc will then have an unallocated room.
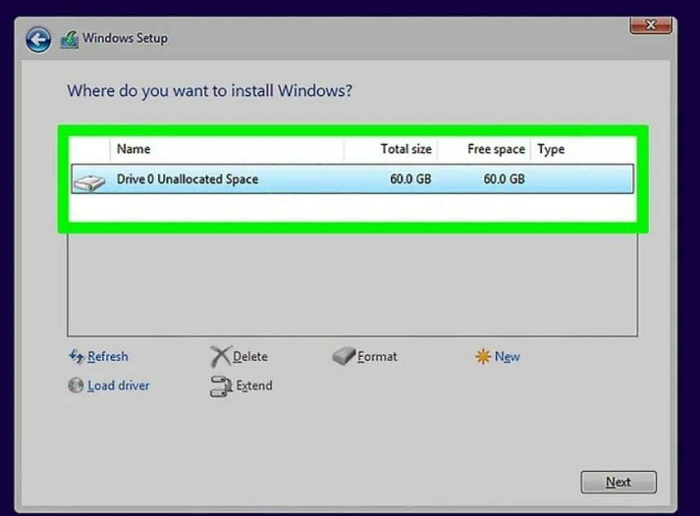
14. Choose a drive with a free room, then select Next. On the disc you chose, Windows installation will now begin. The components in your machine will determine how long it takes.
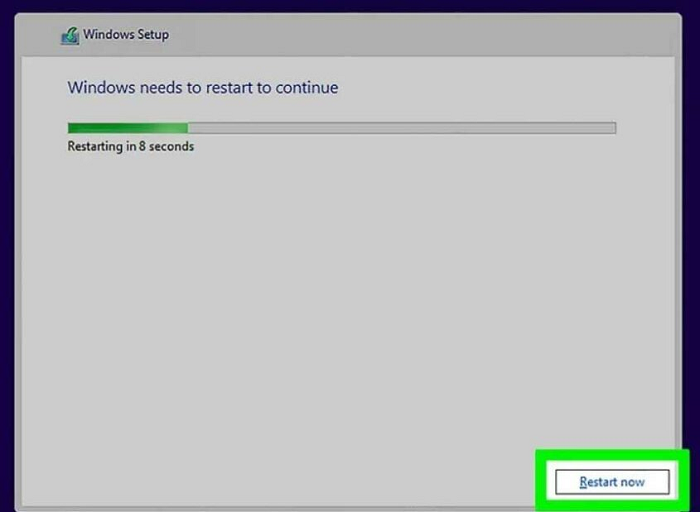
15. Your machine will continue immediately once Windows installation is complete. To prevent the Computer from attempting to start from the USB flash device once more, remove it.
Method 2
Setting up Windows 10
1. Check your keypad input and location. When it resumes, Windows will prompt you to confirm your area and keyboard input. Click Agree in the bottom-right area if these are accurate. Choose the appropriate size and computer input if you need help.
- You can choose an alternative computer interface as well. Click Append Input and choose a different keypad input to choose other information. If not, select Continue.
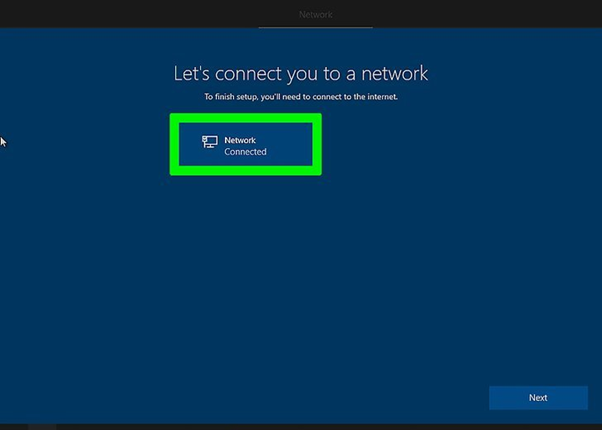
2. Access your wireless network by connecting. Then hit Connect after selecting your wifi network. Then select Next after entering your wireless passcode.
- If you have a wired internet link, confirm that an Ethernet cord is attached to your router. Windows will immediately detect your wired connection.
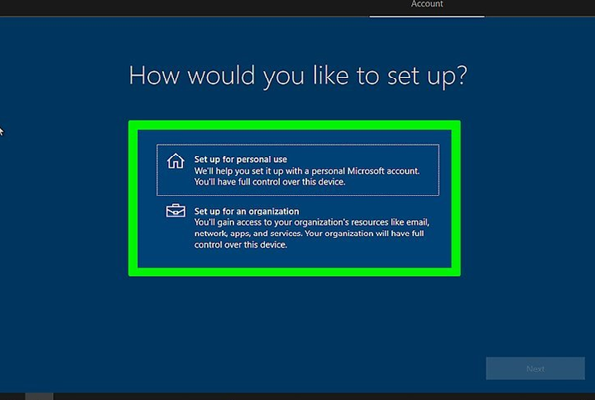
3. Click Next after selecting Set up for personal use. You can choose this choice to log in and use your Computer for personal purposes using a Microsoft account.
- Click Next after selecting Set up for a group if you are configuring your Computer for a company or organization. Your IT staff may be required to assist you in configuring Windows with a business email.
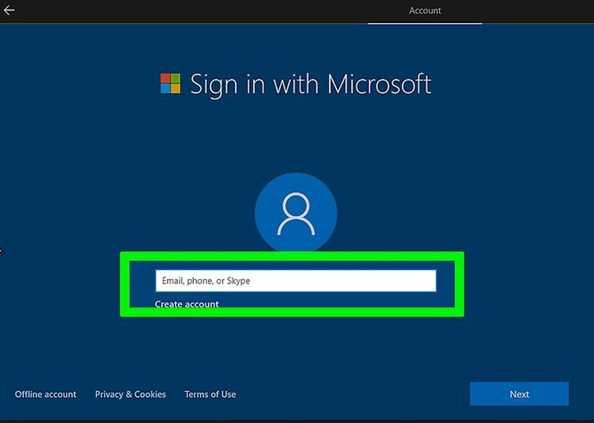
4. Register with Windows.
- To establish a new Microsoft account if you don't already have one, click Create account and follow the steps
- As an alternative, you can select Offline account in the lower-right area to establish a new Windows local user account that isn't connected to a Microsoft account.
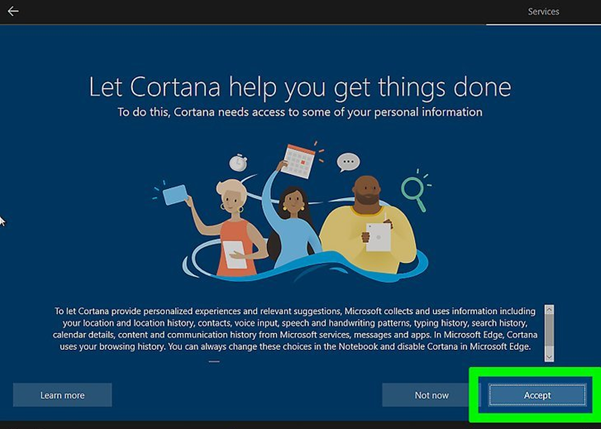
5. To configure Cortana, click Agree. Windows comes with a speech helper called Cortana. To configure Cortana, select Accept and then adhere to the directions. Click Refuse if you want to wait to do it.
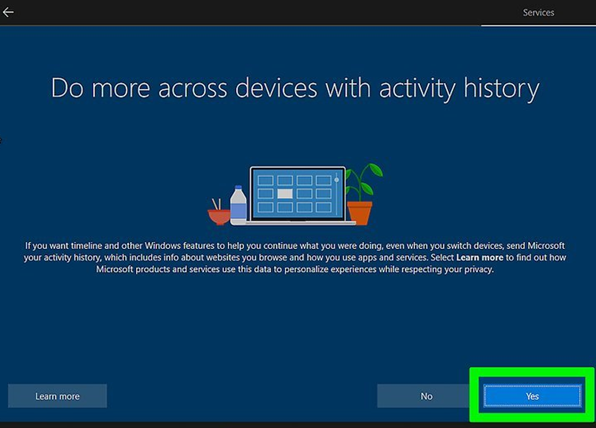
6. To configure the Windows timetable, select Agree and follow the on-screen directions. Thanks to this functionality, you can carry on your work on other Windows-based platforms. Click No to proceed to the following stage if you do not want to configure this function.
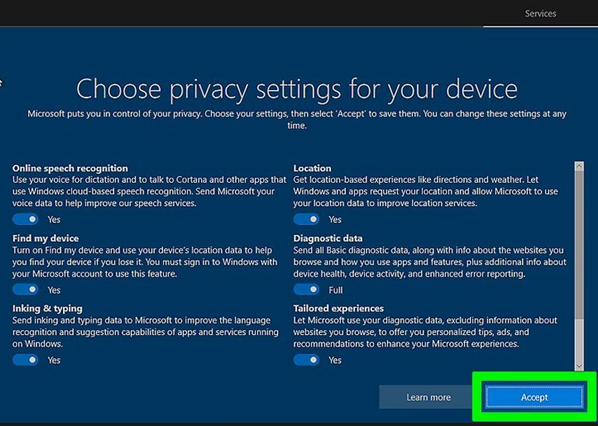
7. Select your privacy preferences, then select Agree. Windows turns on relevant advertising, diagnostics, locating my device, inking, and typing to help Microsoft better language recognition and GPS position monitoring by default. Any functions you don't want to use can be disabled by clicking the toggle button. Next, select Agree. Windows will perform some additional setups before opening your screen.
Method 3
Installing macOS
1. Do a file backup. Before downloading or reinstalling macOS on a Mac, it is advised that you make a backup of all the files and data you intend to retain. iCloud, Google Drive, Dropbox, a portable hard drive, or a Flash device are all options for data backup.
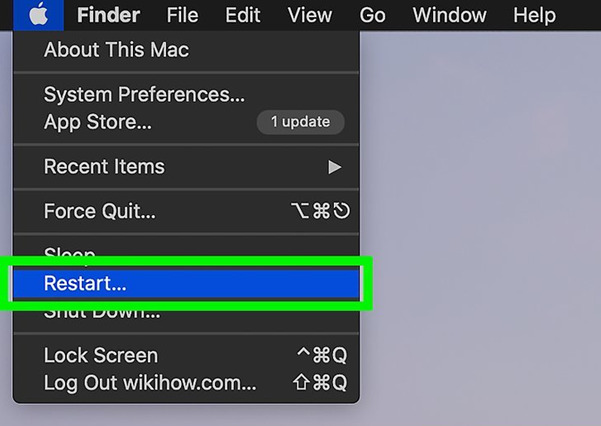
2. Start your Computer again. Click the Apple symbol in the top-right area and select Restart to restart your Computer.
- To switch on your Mac, if it is already off, hit the Power button.
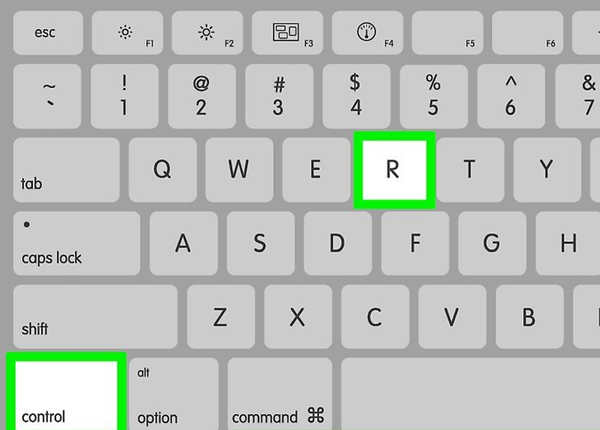
3. Immediately press and hold Command+R. This must be done before Mac's startup sound appears. Hold these keys down until the Mac recovery page shows up.
4. Access your wifi network by connecting.
Your wifi network by clicking.
- If you use a wired link, ensure you are attached to your Computer using an Ethernet cord. After that, input your wifi password and select Join.
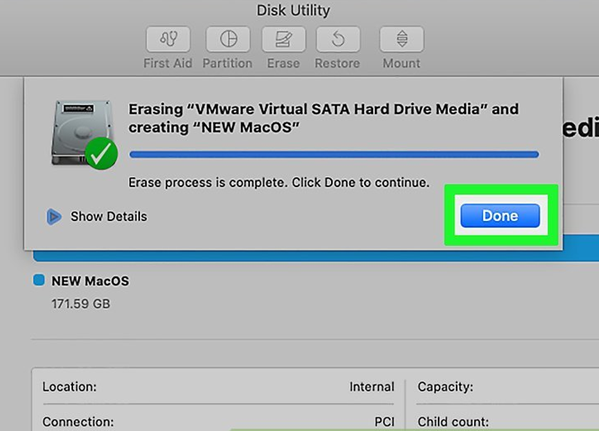
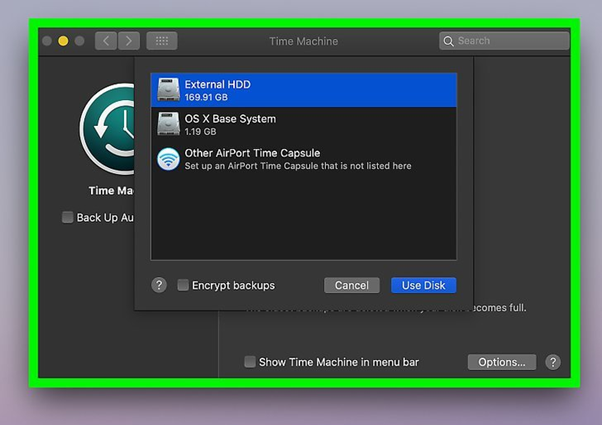
5. Hard disc reformatting (optional). You should fully delete the hard drive with macOS and begin with a new fresh install depending on your requirements. Data on your hard disc cannot be recovered once deleted. To reset the hard disc, take the next steps:
- Select Proceed after selecting Disk Utility.
- Verify that the disc is the right one.
- At the top, click Delete.
- Put a fresh name in the drive's field (optional).
- Choose "APFS" or "Mac OS Extended (Journaled)" as the option.
- Select "Erase."
- Minimize the page for Disk Utility.
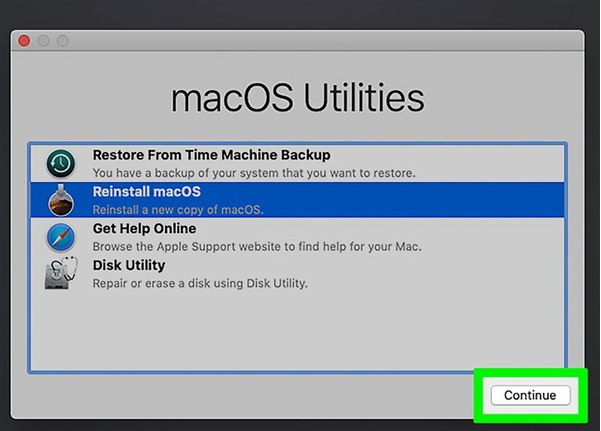
6. Choose Reinstall macOS, then press Proceed. This will begin the reinstallation of macOS.
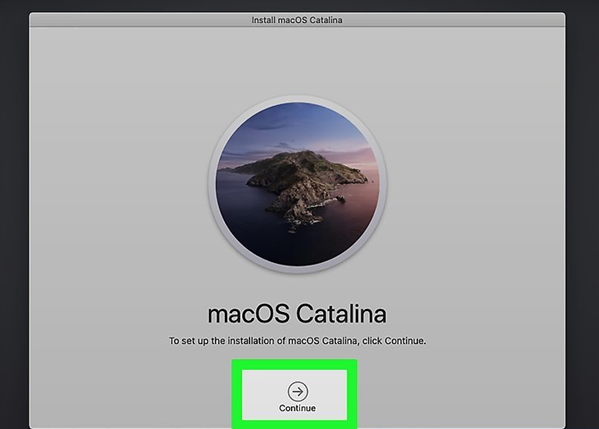
7. Then click Next. It is the arrow-shaped symbol in the bottom center of the display.
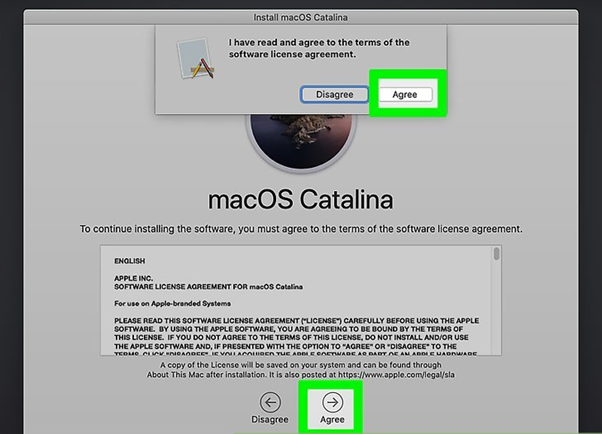
8. Accept the conditions of the license agreement. Read the content and select Agree at the bottom to accept the conditions and license agreement. Next, choose to Accept once more in the pop-up warning.
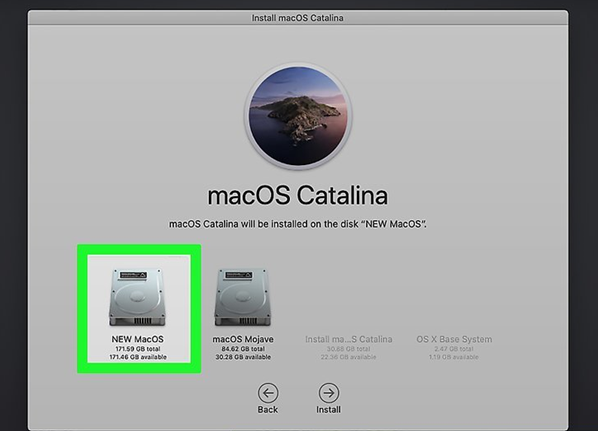
9. Click Install after selecting the hard disc you want to run macOS on. The hard drive's macOS installation will start at this point. Depending on the components in your Mac and the speed of your internet link, this procedure could take some time. When it's done, your Mac will resume.
Method 4
Setting up macOS
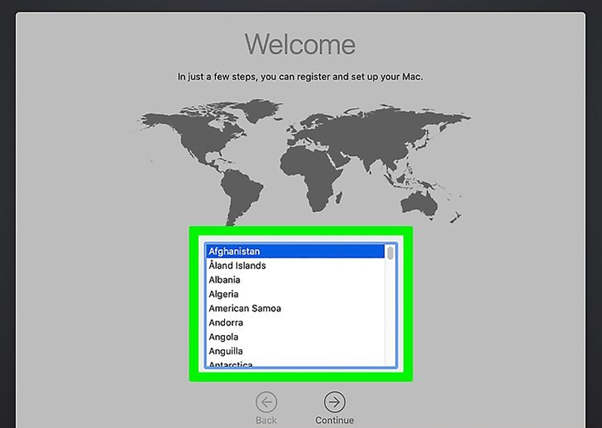
- Click Proceed after selecting your nation. Choose your language from the selection, then hit Continue at the bottom of the page.

2. Enter your wifi password. Choose your wireless network and input your passcode to log in to your wifi. Then press the bottom-of-the-screen Proceed button.
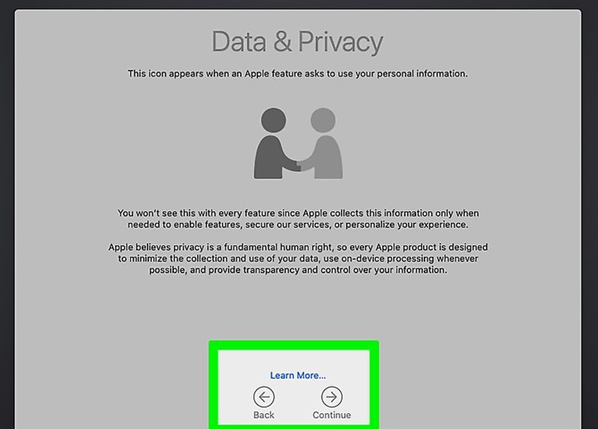
3. Then click Next. A brief explanation of data protection is provided on this page. To proceed to the next stage, either select Continue or study the text to learn more.
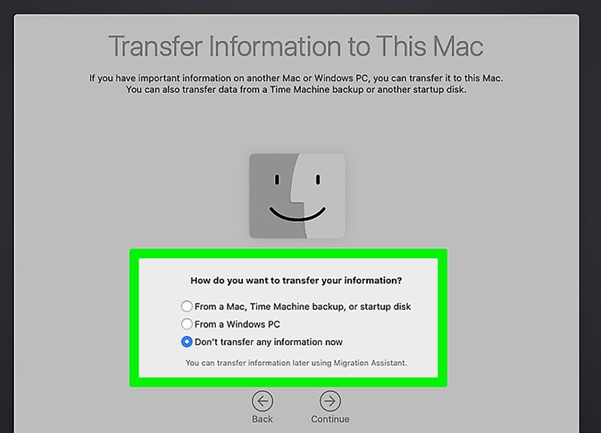
4. Click Proceed after deciding on a data move strategy for your Mac. Choose the right choice, then hit Continue if you have critical data you want to move from a Windows Computer, another Mac, or Time Machine to your Mac. If not, hit Continue after selecting "Don't transmit any details now."
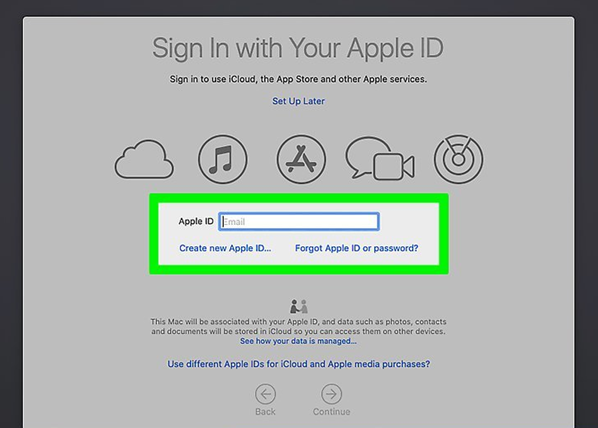
5. Utilize your Apple ID to log in. Please enter the email address linked to your Apple Account and press Continue to check in with it. Then select Continue after entering your passcode.
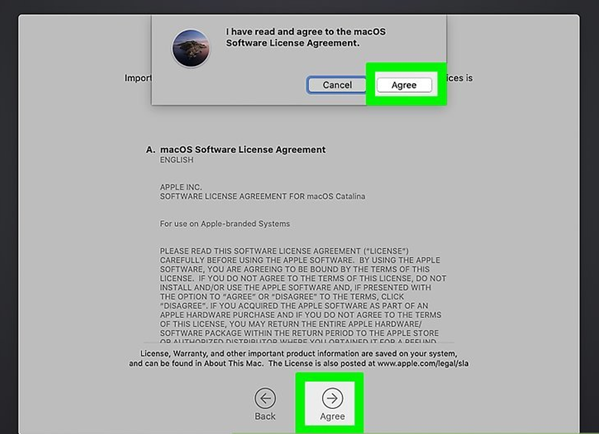
6. Accept the rules and regulations. Read the content on the screen and select Agree at the bottom to accept the terms and conditions. Then, in the pop-up alert box, select Agree once more.
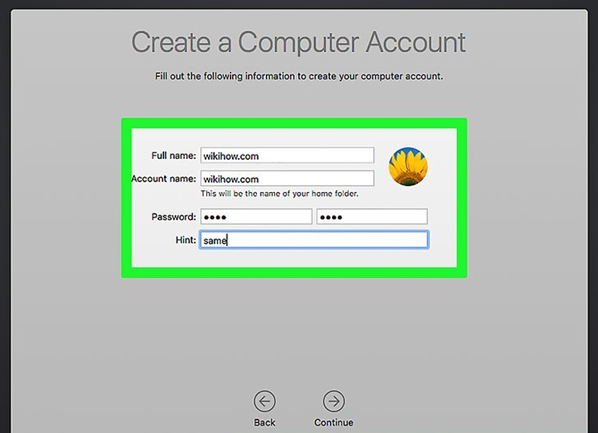
7. Make a brand-new user profile. You must first establish a user account to check in to your Mac. To set up a new user account, take these steps.
- Enter your complete name in the first two columns at the top.
- Type the name of your user account.
- In the following two lines, enter your passcode.
- Type a passcode suggestion here.
- To continue, click.
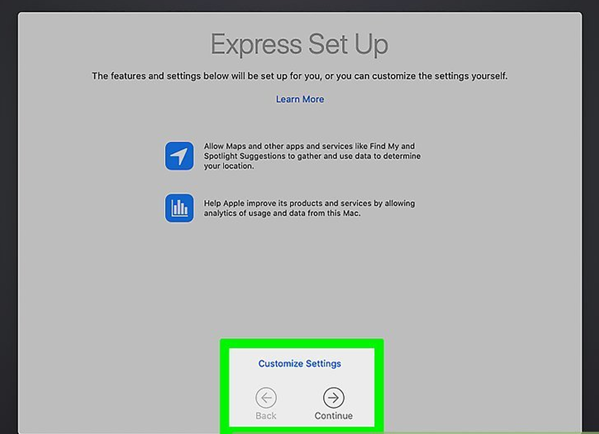
8. Click Proceed after setting everything up. Ensure the Express Setup page details sound accurate before clicking Continue to proceed to the following stage.
Click Custom Configuration at the foot of the page to perform a unique setup.
9. Click Continue after determining whether you want to share your data with app makers. Check the option next to "Share crash and utilization statistics with app developers" if you're going to provide metrics to app developers to help them better their products. Leave the checkbox empty if you'd prefer to safeguard your privacy. To advance to the following action, click Proceed.
10. Select your computer time preferences (optional). Your screen time options allow you to impose time limitations on computer users, impose content restrictions, and obtain usage statistics. Click on the available choices on the screen, then follow the on-screen directions to configure these features for viewing time. When you are prepared to proceed to the following stage, click Proceed.
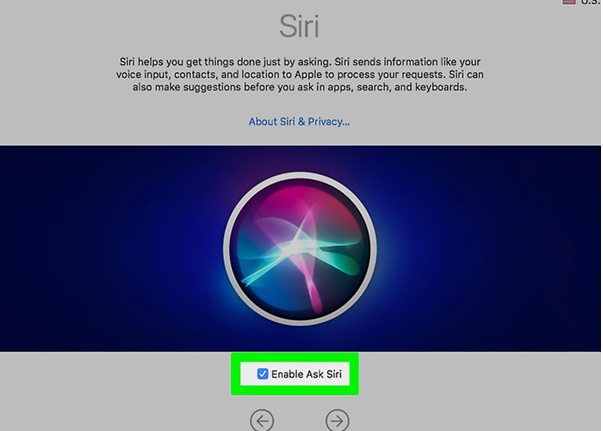
11. Activate Cortana. Apple's speech helper is called Siri. Click the option next to "Enable Ask Siri" to configure Siri, then select Proceed.
12. Aid in enhancing Siri (optional). Select the "Share audio files" choice if you have recordings of speech that you can use to help Siri improve. Otherwise, select "Not now" from the menu. To advance to the following action, click Proceed.
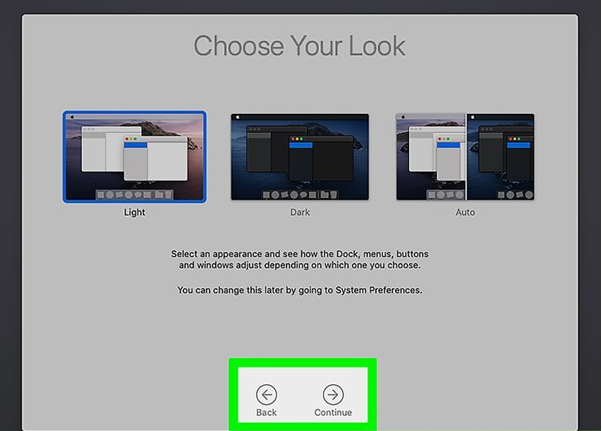
13. Select a style, then select Proceed. To choose a type, click one of the three possibilities. Click Proceed to proceed to the following stage. You will be signed in to your Computer after macOS has finished installing.