Selenium WebDriver-XPath Locator
Selenium WebDriver-XPath Locator
The locators can make the object identification of all the selenium tools.
There are eight locators available in selenium web driver, but most of the time we go for XPath locators to identify a web element.
XPath stands for XML Path. XPath is used to identify the webelement on the web page with the help of XML path expression.
In a real-time scenario, we always go for XPath because, most of the time, the web element will never find with the help of unique attributes like id and name.
Id and Name attribute will get change in every refresh of the Ajax application, like (Facebook, Flipkart).
“XPath is a way of navigating the entire HTML document and identify the web elements based on the backend attribute or visible text.”
Syntax of XPath:
XPath=//tagname[@Attribute=’value’]
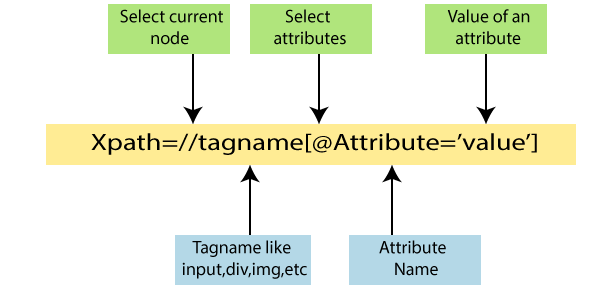
Some of the most used terms in the Selenium web driver are as follows,
| Symbol | Description |
| Double forward slash(//) | To access the entire Html document. |
| Tag Name | The tag name of the particular web element. |
| @ | Symbol of selecting the attribute. |
| Attribute | Name of the attribute. |
| Value | Attribute’s value. |
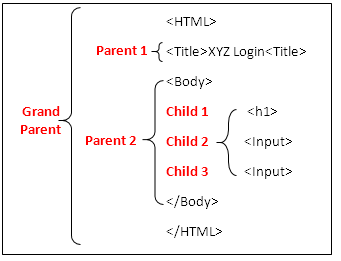
| Single forward slash(/) | Traverse from parent Html tag to child Html tag. |
| /.. | Traverse from child Html tag to parent Html tag. |
| * | Match any html tag |
Before going further to learn XPath first, we will understand that how can we identify the web element in the Browser with the help of XPath.
We have the inbuilt plugin in the Browser, which called chropath.
Now, we will see how chropath will work on the Google Chrome Browser.
ChroPath Add-on for Chrome Browser:-
The new alternative for deprecated firebug and fire path add-ons is chropath.
- Chropath add-on is used to evaluate and auto-generate the XPath and CSS selector locator for the web element on the web pages.
- It is used for both Google Chrome and Firefox browsers.
- In this section, we will go through the installation steps of chropath add-on on the Chrome browser, which helps us to identify the XPath locator and CSS selector in the Selenium web driver.
Installation steps for ChroPath add-on:
Follow the below steps for chropath add-on installation for Google Chrome browser-
Step1:
- Open Google Chrome browser and type chropath in the Google search box and click on the link.
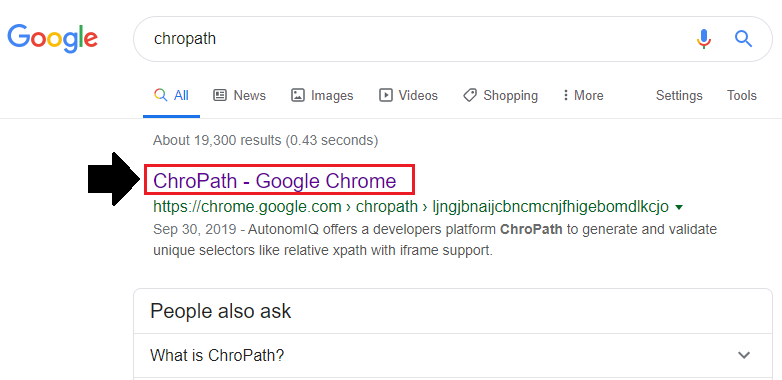
Step2:
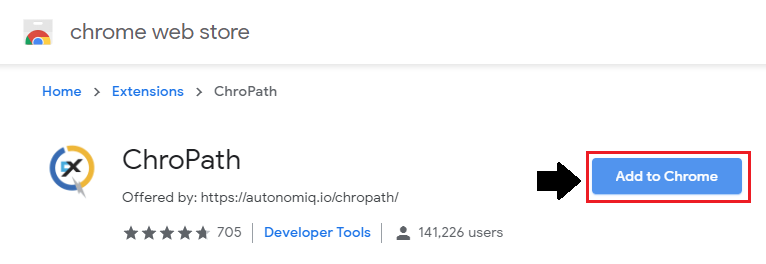
- After that, click on the first link, and it will navigate you to the Google Chrome web store page for chropath extension.
- Then, click on Add to Chrome button, which is as shown below:
Step3:
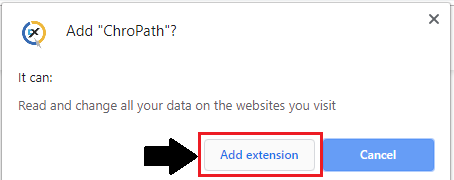
- One dialog box is displayed, click on the Add extension button as demonstrated in the below snapshot:
Step4:
- After click on the add extension button, one confirmation dialog box will come up with the message that “ChroPath has been added to chrome.”
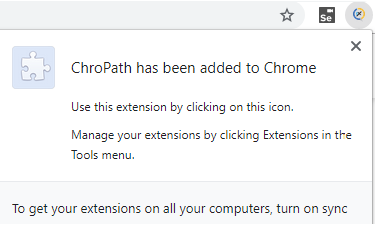
You can also see that the chropath add-on icon is added on the extreme right corner of the browser.
Hence we have successfully installed the chropath add-on for our Google Chrome browser.
Using chropath add-on in chrome browser:
Follow the below steps that how we use chropath in Chrome browser to locate the XPath:
Step1:
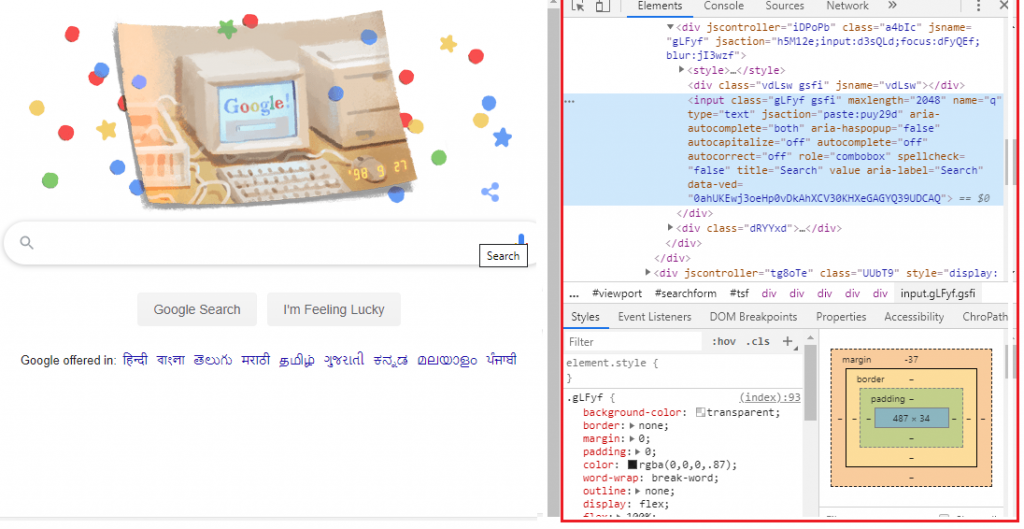
- Open your Google Chrome browser and press F12 key on your keyboard, and it will open the Google Chrome developer tool, as shown below:
Step2:
- The element tab is selected by default, click on the chropath option. After clicking on the chropath option and it will display the chropath functionality.
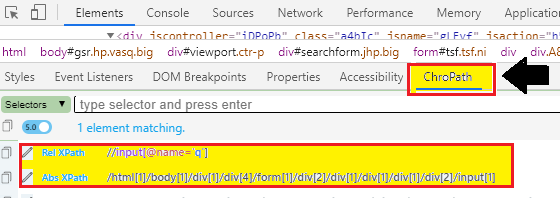
In the above snapshot, as we can see the XPath values as:
- Relative XPath:
//input[@name='q']
- Absolute XPath: /html[1]/body[1]/div[1]/div[4]/form[1]/div[2]/div[1]/div[1]/div[1]/div[2]/input[1]
For Example:
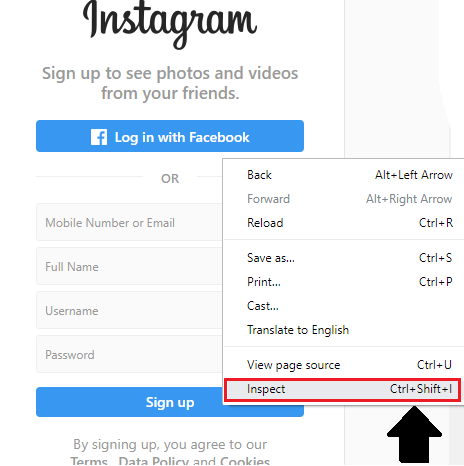
Open the Gmail application, and click on the inspect option of the Chrome developer tool.
Select username textbox on the web page and notice that the XPath expression and CSS selector for the username textbox got auto-generated in the chropath as shown below:
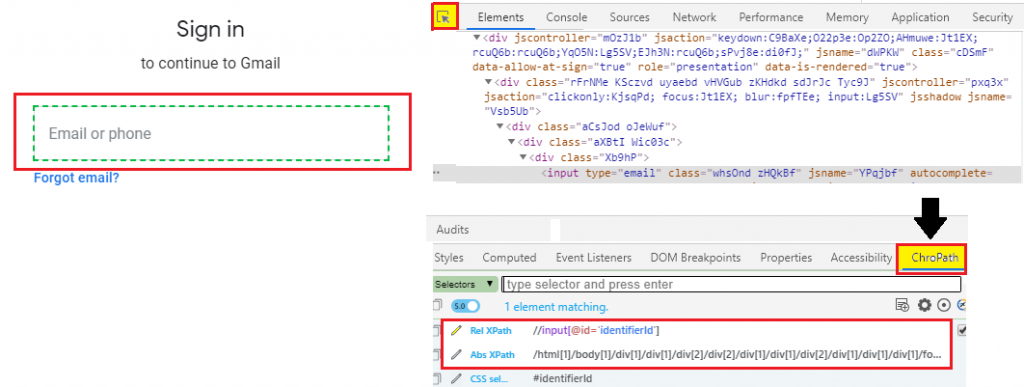
After that, copy the XPath (relative and absolute) by using copy option in the chropath functionality,
Relative XPath:
//input[@id='identifierId']
Absolute XPath : /html[1]/body[1]/div[1]/div[1]/div[2]/div[2]/div[1]/div[1]/div[2]/div[1]/div[1]/div[1]/form[1]/span[1]/section[1]/div[1]/div[1]/div[1]/div[1]/div[1]/div[1]/div[1]/input[1]
CSS Selector:
#identifierId
And paste it in your java code as shown below:
driver.findElement(By.xpath("//input[@id='identifierId']"));
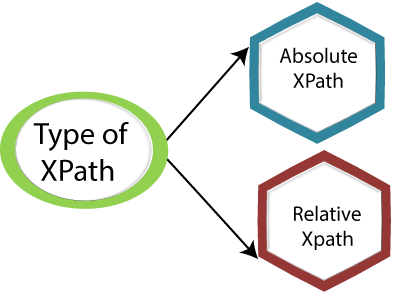
Types of XPath
There are two types of XPath available in Selenium web driver:
- Absolute XPath
- Relative XPath
Absolute XPath
Whenever XPath is returned from root Html tag to child Html tag followed by a single forward-slash (/) is called absolute XPath.
The main advantage of absolute XPath is that it identifies the web element very fast. And the disadvantage of using absolute XPath is that if any tag added or removed in between, then the absolute XPath will no longer be used.
Whenever we inspect element using chropath, it automatically generates the absolute XPath.
Note: Absolute XPath should not be used in real-time selenium test because it will fail to identify the object, whenever object location or requirements are changed.
Absolute XPath Expressions:
//html/body/input [1]
Where 1 is the index value.
Let us take one example in which we will try to locate the signup page of Instagram with the help of absolute XPath.
| Steps | Actions | Input | Expected Result |
| 1. | Open the Google Chrome browser. | The Google Chrome browser should open. | |
| 2. | Navigate to the Instagram signup page | https://www.instagram.com | The signup page of Instagram must be displayed. |
| 3. | Identify the mobile and email text box and pass the value. | Mobile and Email=1234567890 | The value should be entered. |
| 4. | Identify the full name text box and pass the value. | Full name=admin | The Full name text box value should be entered. |
| 5. | Identify the username test box and pass the value. | Username=admin11930 | Username text box value should be entered. |
| 6 | Identify the password text box and pass the value. | Password=123456@7 | Password value should be entered. |
| 7. | Identify the login button. | The login button should be clicked. | |
| 8. | Close the browser. | The Browser should be closed. |
- Firstly, we have to Launch Eclipse and open the existing test suite new_test, which we have created in earlier sessions of the tutorial.
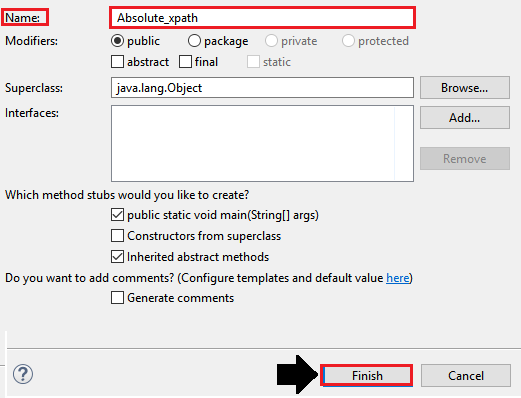
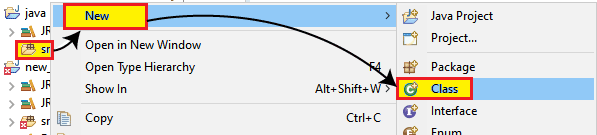
- Then right-click on the src folder and create a new Class File from New ? Class.

- And give our Class name as Absolute_xpath and click on the Finish button.
We will explain the test case step by step to give you a better understanding of how we use the absolute XPath to identify a web element in real-time scenarios.
Step1:
- To access the Google Chrome browser. First, we need to download Google Chrome driver and set the system property for Chrome driver.
- We have already discussed this in previous sessions of the tutorial.
- And you can also refer given link "Working with Chrome browser” for a complete understanding that how we download it and set System property for Chrome driver.
// set the system property for chrome browser
 System.setProperty("webdriver.chrome.driver","C:\\Users\\JTP\\Downloads\\chromedriver_win32\\chromedriver.exe");
 //create the object for chrome driver
 WebDriver driver = new ChromeDriver();
Step2:
- After that, we will write the code to automate our second step, which navigates to the given URL.
The sample code for the navigation of the desired URL:
//navigate to the URL
driver.get("https://www.instagram.com");
Step3:
Now we are trying to locate the desired web element by using the value of its attribute.
- Right-click on the mobile and email text box and clicks on Inspect Element.
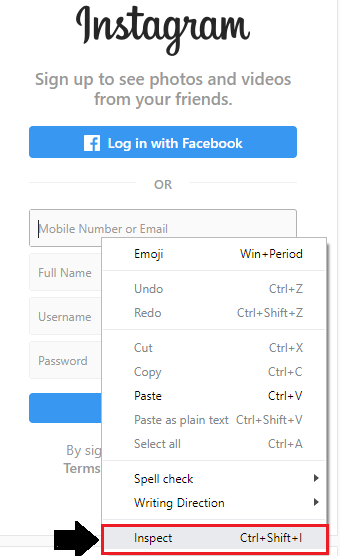
- It will launch a window which has all the specific codes involved in the development of the particular text box which is shown in the below snapshot:
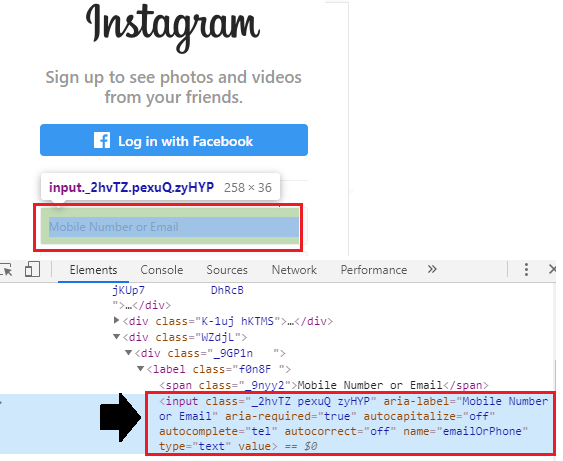
- To inspect the relative XPath of mobile and email text box, click on the chropath in your browser and copy the relative XPath of the particular Element.
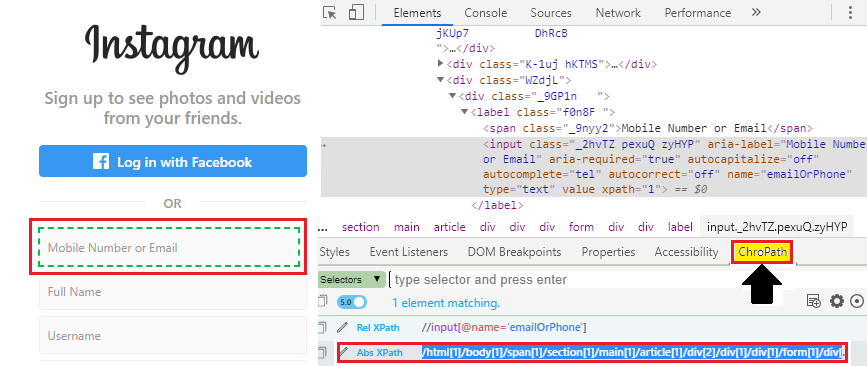
Here the sample code for relative XPath for mobile and email text box:
// identify the mobile and email text box and pass the value.
driver.findElement(By.xpath("/html[1]/body[1]/span[1]/section[1]/main[1]/article[1]/div[2]/div[1]/div[1]/form[1]/div[3]/div[1]/label[1]/input[1]")).sendKeys("1234567890");
Thread.sleep(2000);
System.out.println("moblie and email value entered successfully");
Step4:
To inspect our next web element, follow the same process as before:
- Right-click on the Full name Text box and click on the Inspect Element tab.
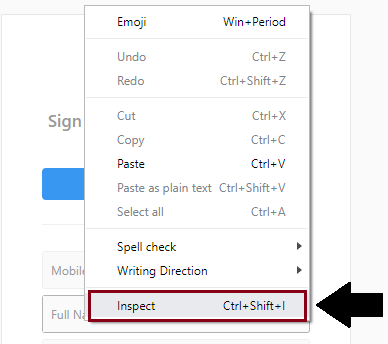
- And it will come up with a window that has all the specific codes of the particular web element.
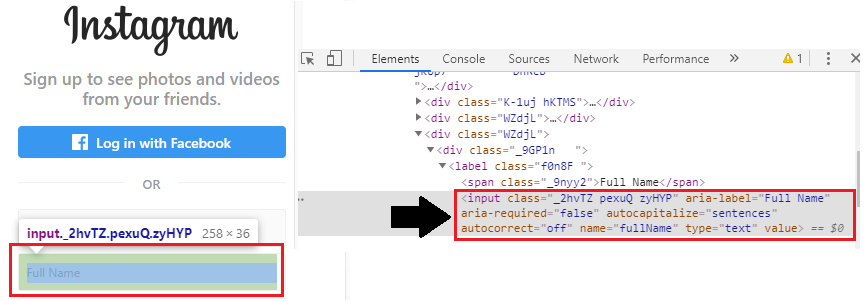
- To inspect the relative XPath of the full name text box, click on the chropath and copy the relative XPath of the related web element.
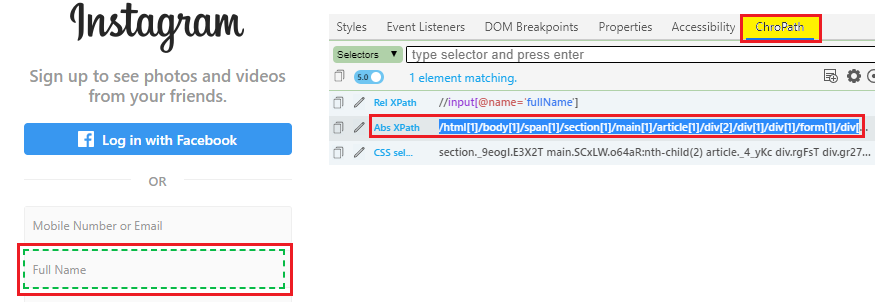
Here the sample code:
// identify the full name text box and pass the value.
driver.findElement(By.xpath("/html[1]/body[1]/span[1]/section[1]/main[1]/article[1]/div[2]/div[1]/div[1]/form[1]/div[4]/div[1]/label[1]/input[1]")).sendKeys("admin");
Thread.sleep(2000);
System.out.println("full name textbox value entered successfully ");
Step5:
- To inspect our next web element, right-click on the username Text box and click on the Inspect Element tab.
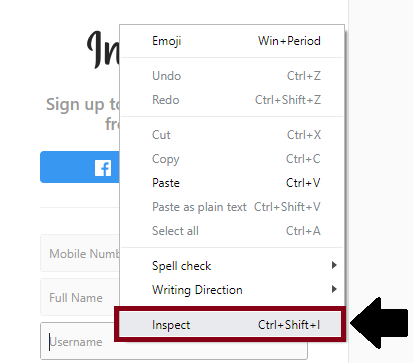
- A window will launch, having all the related code used in the development of the web element.
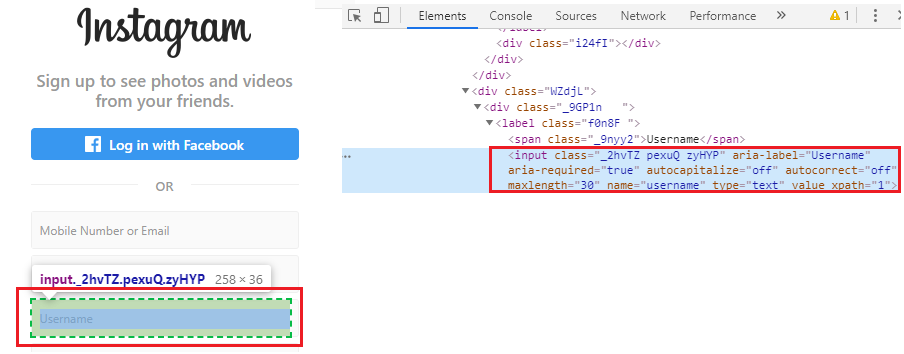
- To inspect the relative XPath of the username text box, click on the chropath and copy the relative XPath of the particular Element and pasted in your java code.

Here the sample code:
// identify the username text box and pass the value.
driver.findElement(By.xpath("/html[1]/body[1]/span[1]/section[1]/main[1]/article[1]/div[2]/div1]/div[1]/form[1]/div[5]/div[1]/label[1]/input[1]")).sendKeys("xyz11930");
Thread.sleep(2000);
System.out.println("username entered successfully ");
Step6:
To inspect our next web element, right-click on the password Text box and click on the Inspect Element tab.
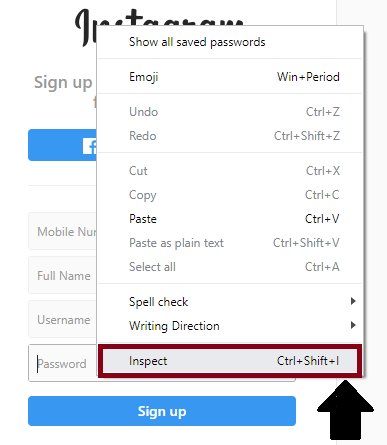
- And it will launch a window that contains all the specific codes used in the development of the particular text box.
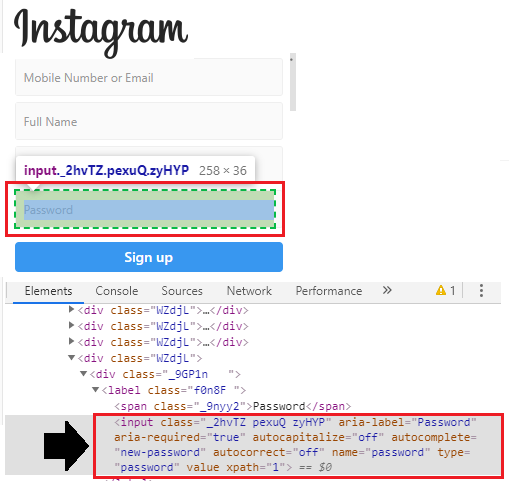
- To inspect the relative XPath of the password text box, click on the chropath and copy the relative XPath of the particular Element.
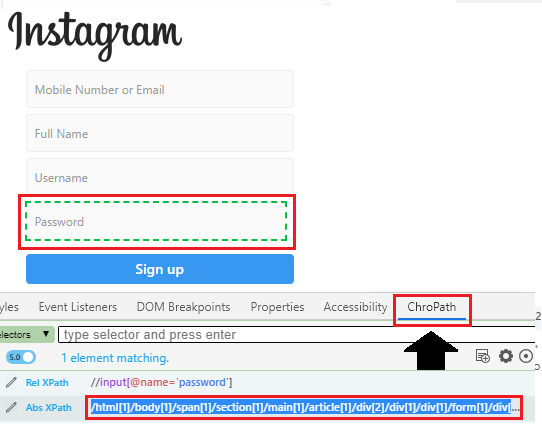
Here the sample code:
// identify the password text box and pass the value.
driver.findElement(By.xpath("/html[1]/body[1]/span[1]/section[1]/main[1]/article[1]/div[2]/div[1]/div[1]/form[1]/div[6]/div[1]/label[1]/input[1]")).sendKeys("123456@7");
Thread.sleep(2000);
System.out.println("password entered successfully ");
Step7:
In our next step, we will follow the same process as before,
- Right-click on the signup button, and click on the Inspect Element tab.
- And it will launch a window that contains all the specific codes used in the development of the particular text box as you see in the below screenshot:
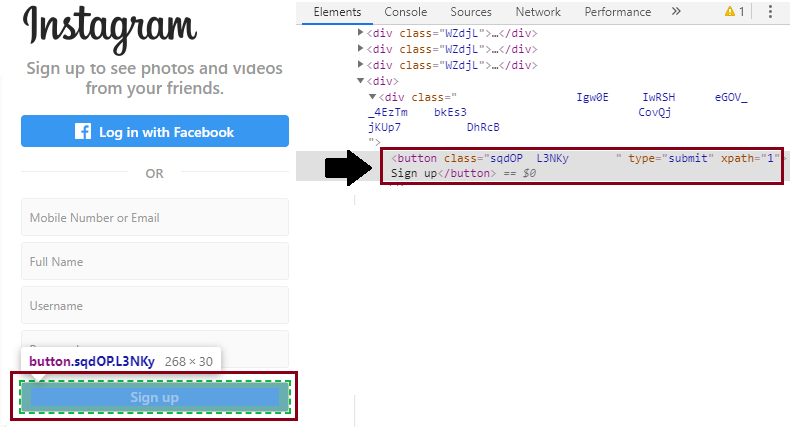
- To inspect the relative XPath of the signup button, click on the chropath and copy the relative XPath of the particular Element.
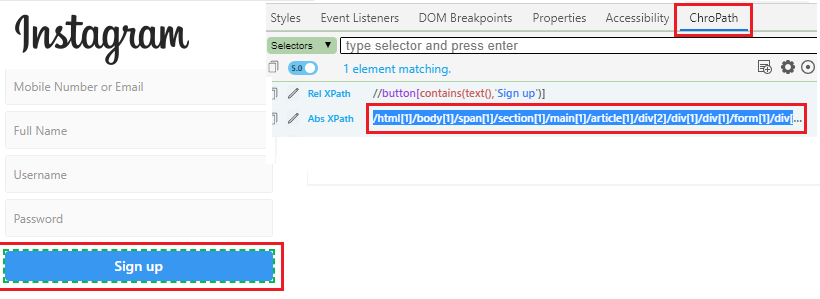
Here the sample code:
// Step7: Click on the signup button.
driver.findElement(By.xpath("/html[1]/body[1]/span[1]/section[1]/main[1]/article[1]/div[2]/div1]/div[1]/form[1]/div[7]/div[1]/button[1]")).click();
Thread.sleep(3000);
Step8:
In the last step of our sample test case, we are closing our browser.
The sample code to close the browser,
//close the browser
 driver.close();
Our final test script will look like this:
package testpackage;
import org.openqa.selenium.By;
import org.openqa.selenium.WebDriver;
import org.openqa.selenium.chrome.ChromeDriver;
public class Absolute_xpath {
public static void main(String[] args) throws InterruptedException {
//set the system property
System.setProperty("webdriver.chrome.driver","C:\\Users\\JTP\\Downloads\\chromedriver_win32\\chromedriver.exe");
//creating the object for chrome driver
WebDriver driver = new ChromeDriver();
//Navigate to the Instagram signup page.
driver.get("https://www.instagram.com");
Thread.sleep(2000);
// Pass the value in the mobile and email text box.
driver.findElement(By.xpath("/html[1]/body[1]/span[1]/section[1]/main[1]/article[1]/div[2]/div1]/div[1]/form[1]/div[3]/div[1]/label[1]/input[1]")).sendKeys("1234567890");
Thread.sleep(2000);
System.out.println("moblie and email value entered successfully");
//Pass the value in the full name text box.
driver.findElement(By.xpath("/html[1]/body[1]/span[1]/
section[1]/main[1]/article[1]/div[2]/div[1]/div[1]/form[1]/div[4]/div[1]/label[1]/input[1]")).sendKeys("admin");
Thread.sleep(2000);
System.out.println("full name text box value entered successfully ");
// Pass the value in the user name text box.
 driver.findElement(By.xpath("/html[1]/body[1]/span[1]
/section[1]/main[1]/article[1]/div[2]/div[1]/div[1]/form[1]/div[5]/div[1]/label[1]/input[1]")).sendKeys("xyz11930");
Thread.sleep(2000);
System.out.println("username entered successfully ");
// Pass the value in the password text box.
driver.findElement(By.xpath("/html[1]/body[1]/span[1]/section[1]/main[1]/article[1]/div[2]/div[1]/div[1]/form[1]/div[6]/div[1]/label[1]/input[1]")).sen
Keys("123456@7");
Thread.sleep(2000);
System.out.println("password entered successfully ");
//Click on sign up button.
driver.findElement(By.xpath("/html[1]/body[1]/span[1]/
section[1]/main[1]/article[1]/div[2]/div[1]/div[1]/form[1]/div[7]/div[1]/button[1]")).click();
Thread.sleep(3000);
// close the browser
driver.close();
}
}
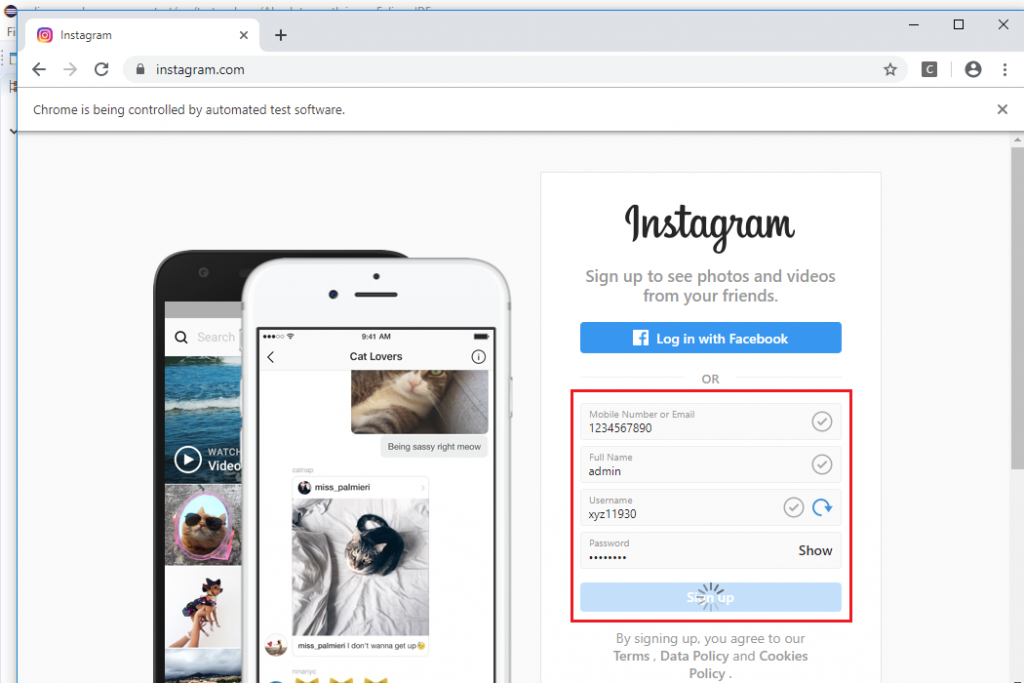
- To run the test script in Eclipse IDE, we have to right-click on the code and then select Run As → Java Application.
- The above test script will be launched in the Google Chrome browser and automate all the test scenarios which we performed above which is as shown below,
Relative XPath
Whenever XPath is returned directly to the web element using its attributed known as relative XPath.
Relative XPath always starts from double forward-slash (//), which defines that it can search the web element anywhere at web pages.
The main advantage of using relative XPath is we do not require to mention the long XPath, and we can also start writing in between or from the middle of the path.
And the disadvantage of using relative XPath is that it will take more time to identify the web element for the partial path, not the exact path, because if there are multiple elements for the same path, it will locate the first web element of the web page.
Note: Relative XPath will never be got fail even though the object location or requirements are changed.
Syntax for Relative XPath:
//Html tag[@attribute=’value’]
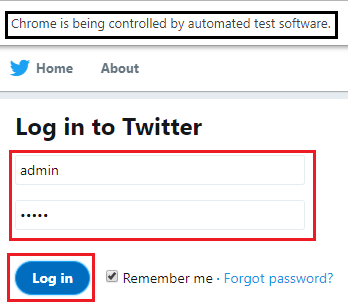
Let us take one example in which we will try to locate the Twitter login page with the help of relative XPath.
| Steps | Actions | Input | Expected Result |
| 1. | Open the Google Chrome browser. | The Google chrome browser should be opened. | |
| 2. | Navigate to the Twitter Login page. | https://twitter.com/login?lang=en | The twitter login page must be displayed. |
| 3. | Identify the username text box and pass the value. | Username=admin | The username text box should be identified, and value should be entered. |
| 4. | Identify the password text box and pass the value. | Password=admin | The password textbox should be identified, and value should be entered. |
| 5. | Identify the login button. | The login button should be clicked. | |
| 6. | Close the browser. | The browser should be closed. |
- Firstly, we have to Launch Eclipse and open the existing test suite new_test, which we have created in the previous tutorial of WebDriver.
- Then, right-click on the src folder and create a new Class File from New ? Class.
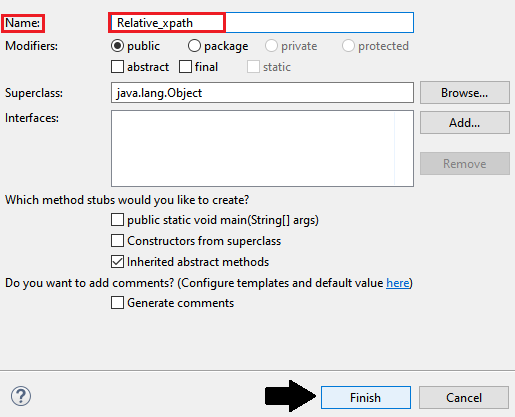
- And give your Class name as Relative_xpath and click on the Finish button.
We are creating our test case step by step to give you a complete understanding of how to use Relative XPath to identify a particular web element.
Step1:
To launch the Google Chrome browser, we need to download the ChromeDriver.exe file and set the system property to the path of ChromeDriver.exe file.
Here is the code for setting the system property for the google chrome:
//set the system property of Google Chrome
System.setProperty("webdriver.chrome.driver","C:\\Users\\JTP\\Downloads\\chromedriver_win32\\chromedriver.exe");
To initialize the Chrome driver using ChromeDriver class:
// create driver object for CHROME browser
WebDriver driver=new ChromeDriver();
Step2:
- After that, we will move to our second step, where we navigate to the given URL.
The sample code for the navigation of the desired URL:
//navigate to the URL
 driver.get("https://twitter.com/login?lang=en");
Step3:
In the next step of our test sceneries, we are trying to locate the desired web element,
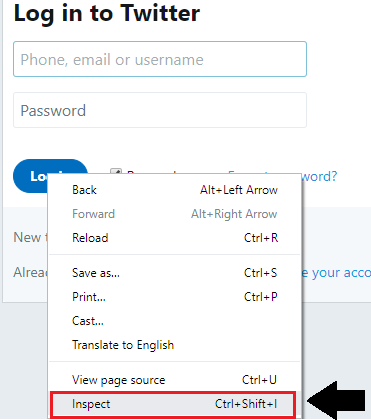
- Right-click on the username text box and clicks on the Inspect Element field.
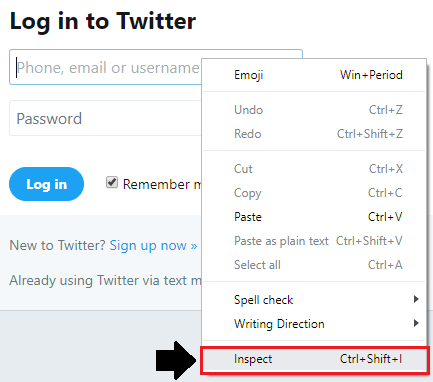
- The developer tool window will be launched, with all the specific codes used in the development of the username textbox.
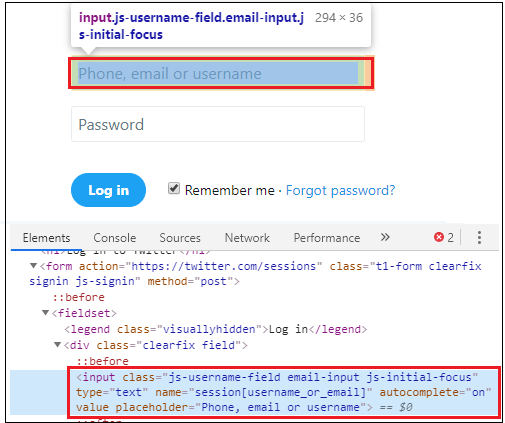
- To inspect the relative XPath of email username text box, click on the chropath which ispresentedon the developer tool window,and copy the relative XPath of the particular Element and paste in the code which is as shown below,

Here the sample code:
// identify the username text box and pass the valuedriver.findElement(By.xpath("//input[@placeholder='Phone, email or username'][1]")).sendKeys("admin");
Thread.sleep(2000);
System.out.println("user name entered successfully");
Step4:
To inspect our next web element, follows the same process as before, and right-click on the password text box and click on the Inspect Element tab.
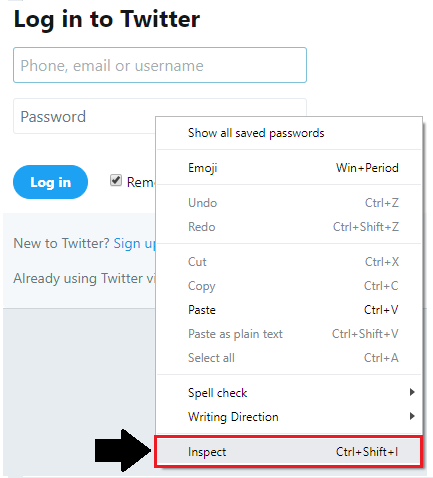
- The developer tool window will be launched, with all the specific codes used in the development of the password text box.
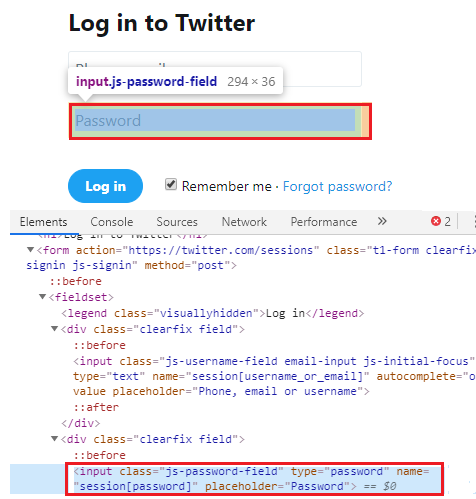
- To inspect the relative XPath of the Password text box, click on the chropath icon and copy the relative XPath of the particular Element which is as shown below,
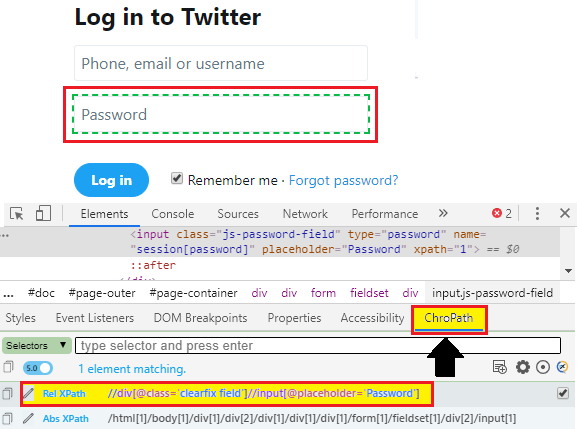
Here the sample code:
// identify the password text box and pass the value
driver.findElement(By.xpath("//div[@class='clearfix
field']//input[@placeholder='Password']")).sendKeys("admin");
Thread.sleep(2000);
System.out.println("password entered successfully ");
Step5:
- To inspect our next web element, right-click on the login button, and click on the Inspect Element tab.
- The developer tool window will be launched, with all the specific codes used in the development of the login button.
- To inspect the relative XPath of the Login button, click on the chropath and copy the relative XPath of the specific element.
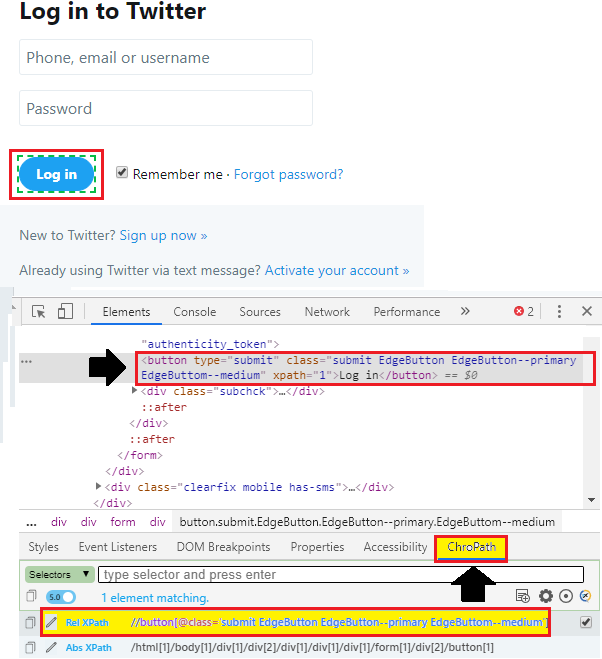
Here the sample code:
// Step5: Click on login button.
driver.findElement(By.xpath("//button[@class='submit EdgeButton EdgeButton--primary EdgeButtom--medium']")).click();
System.out.println("login successfully");
Step6:
In the last step of our sample test script, we will be closing the browser.
Here the sample code:
//close the browser
driver.close();
Our final test script will look like this:
package testpackage;
import org.openqa.selenium.By;
import org.openqa.selenium.WebDriver;
import org.openqa.selenium.chrome.ChromeDriver;
public class relative_xpath {
public static void main(String[] args) throws InterruptedException {
//set the system property
System.setProperty("webdriver.chrome.driver","C:\\Users\\JTP\\Downloads\\chromedriver_win32\\chromedriver.exe");
//creating the object for chrome driver
WebDriver driver = new ChromeDriver();
//Navigate to twitter login page.
driver.get("https://twitter.com/login?lang=en");
//Step3: Pass the value in the username text box.
driver.findElement(By.xpath("//input[@placeholder='Phone, email or username'][1]")).sendKeys("admin");
Thread.sleep(2000);
System.out.println("user name entered successfully");
// Step4: Pass the value in the password text box.
driver.findElement(By.xpath("//div[@class='clearfixfield']
//input[@placeholder='Password']")).sendKeys("admin");
Thread.sleep(2000);
System.out.println("password entered successfully ");
// Step5: Click on login button.
driver.findElement(By.xpath("//button[@class='submit EdgeButton EdgeButton--primary EdgeButtom--medium']")).click();
System.out.println("login successfully");
//step6: close the browser
driver.close();
}
}
- To run the sample code in Eclipse, we have to right-click on the code and then select Run As ? Java Application.
- The above test script will launch the Google Chrome browser and automate all the test scenarios.