Data Validation in Excel
What is Data Validation?
Data Validation is one of the features in Excel that allows user to restrict values which other people can fill in – for example, in a form, you may have options like ‘Mr’, ‘Ms’ or ‘Mrs’, for gender you may have ‘Male’ or ‘Female’, for employee contract you may have ‘Permanent’ or ‘Temporary’ – the whole idea of Data Validation is to give others a list of options to choose from so that the data when entered is consistent.
Data Validation feature improves the efficiency of data entry in excel and reduces mistakes and typing errors. You can have restricted entries as per the validation criteria or even create custom rules for what can be entered in the cell. In case of any invalid entry, it shows a message and prevents the user from entering the data based on a specified condition. For example, in gender, some users might fill M or F or Male or Female – thus, rather than having some fill M and some fill Male – it will always be better to give 1 option either a Male or M.
Similarly, for an employment contract, you may not want everyone to fill different options like ‘Permanent’ or ‘Full-time’ or ‘Contractor’ or ‘Temporary’ or ‘Part-Time’ – but you may want to limit the number of options so that it becomes easier for you to analyze the data.
How to apply data validation?
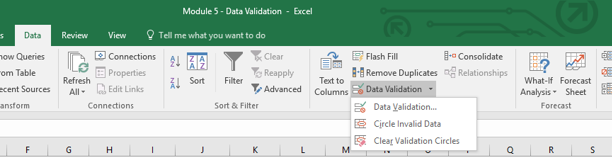
- Select the cells on which you want to apply Data Validation
- Go to Data tab and click on ‘Data Validation’.
- On the settings tab – default would be ‘Any Value’ which means that there is no limitation currently on the cells which have been selected
- Choose the relevant option
Different options for Data Validation
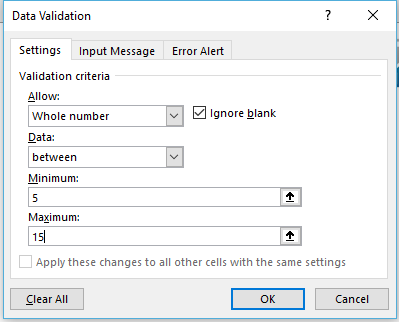
Whole Number – it will restrict users from entering a text or even numbers consisting of decimal points. You can also specify the range in which you want people to enter the numbers – for example: Age for a driving license application needs to be greater than 18 and less than 70.
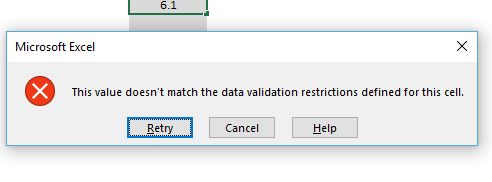
In the example below, we have taken a range between 5 and 15. The second picture shows that as soon as you add a decimal point and press enter, excel gives an error that this value doesn’t match the data validation restrictions, and we need to change the value.
Decimal - it will restrict users from entering a text. You can enter whole numbers or numbers, which consist of decimal points. You can also specify a range in which you want users to enter values, or greater than, less than functionalities can also be used using the Data field.
List – You can specify a list of items which can be entered in a cell – for ex: for an employee contract the values can be ‘Permanent’, ‘Temporary’ – for list of analytics tool courses it can be ‘MS Excel’, ‘SAS’, ‘R’, ‘Tableau’
For specifying a list, you will first need to write down the list at another location in the excel file and then give the path of the list in the Source field. In the below example, we have created a list of analytics tool courses and given the location of those cells in the ‘Source’ field. When you click on ‘OK’, these lists of courses will start appearing in the cells which we had selected for Data Validation – over here in Column J as can be seen in the second picture below.
Date - You can restrict cells such that users can enter only dates and in that too you can restrict dates by using the ‘Data’ option.
Time - You can restrict cells such that users can enter only dates and in that too you can restrict dates by using the ‘Data’ option.
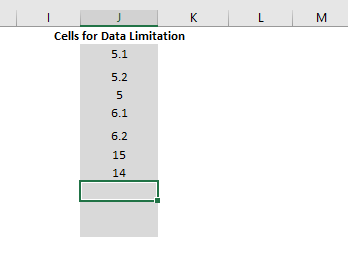
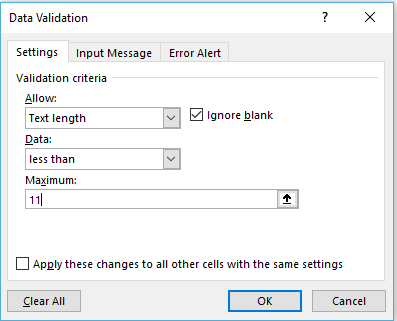
Text Length - You can restrict cells such that users can enter only text which is of/between specified length by using the ‘Data’ option
For example, if you don’t want the user to enter more than 10 characters, you can select text length, and whenever the user exceeds 10 characters, excel will throw an error
Custom – you can enter your own formula in data validation – ISODD – look for other examples
Highlight Cells Rules
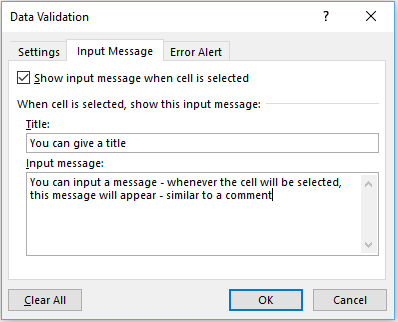
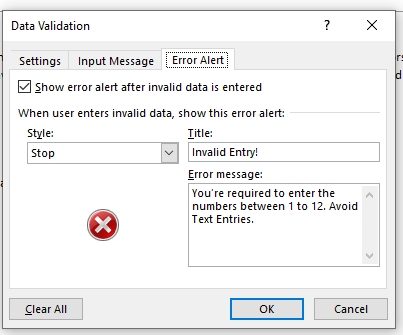
Input Message
If you want to display a message whenever a user selects the cells containing Data Validation, you can use ‘Input Message’ and write relevant information in ‘Title’ and ‘Input Message’ fields. Make sure that the ‘Show input message when the cell is selected’ checkbox is ticked.
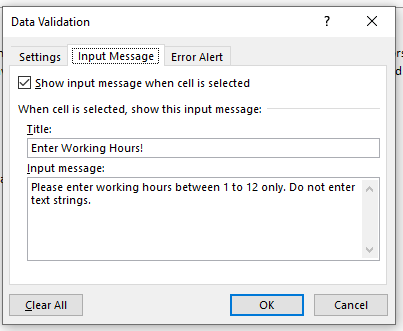
Example 1
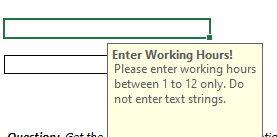
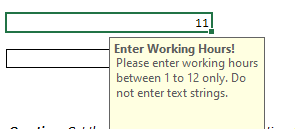
Objective: How many hours do you work per day? Enter hours between 1 and 12
The procedure of the above example is as follows:
Step 1- Click on Data --> Data Tools --> Data Validation
Step 2- In the Setting section, under Data select between and the required minimum and maximum value range.

Step 3: Type an appropriate input message.
Step 4: Create your own error alert to warn the user for wrong or invalid entry.
Result
Condition 1: When the cell is blank.
Condition 2: When you have entered the right value.
Condition 3: When you have entered a wrong value or value out of the range (1-12). Here we have put the value 18 in the cell that is out of the range (1-12).
