How to Delete Row in Microsoft Excel?
Individuals can quickly delete the respective row from the particular Microsoft Excel whenever they want, according to their needs and requirements.
In this tutorial, we will discuss the following things in brief that are as follows:
- Deletion of the respective row from Microsoft Excel with the help of the shortcuts.
- How do you delete a row in Microsoft Excel using a right-click menu without a Shortcut?
- How to delete the Excel row using the ribbon menu?
Now moving on to discussing the above concepts in detail with the help of the example respectively,
How to Delete the Particular Row from Microsoft Excel with the help of the shortcuts?
To delete the particular rows from Microsoft Excel, an individual needs to select the respective rows that they want to delete and then press Ctrl+ Minus ("-"). And doing this will remove those particular rows from the Excel Sheets. Moreover, this can also be done by selecting those rows in the Excel sheets and effectively choosing the Delete Row Option available in the right-click menu list.
Besides all these, an individual can even delete the individual cell from any particular row by just selecting the " Shift Cell Up from the Right-Click menu's Delete Option and by doing this will effectively move the respective amount of the data up by the position of the particular cell, which an individual needs to remove.
How to Delete a Row in Excel Using the Right-Click menu without Shortcut?
To delete the respective row in Microsoft excel with the help of the right-click menu without Shortcut, the following steps must be followed by the respective individual.
Step 1: First, an individual needs to select the particular rows an individual need to delete.
Step 2: Then right-click on the respective row cell.
Step 3: A dialogue box will appear on their screen.
Step 4: Click on the delete option to delete the selected row by an individual.
As shown in the below-attached screenshots.
Output:
The third selected row will be get deleted respectively,

How to delete the Microsoft Excel row with the help of the ribbon menu?
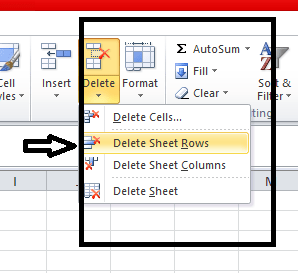
In particular Microsoft Excel, an individual can easily find the option that is the delete cells on the home menu, as depicted in the below-attached screenshots,
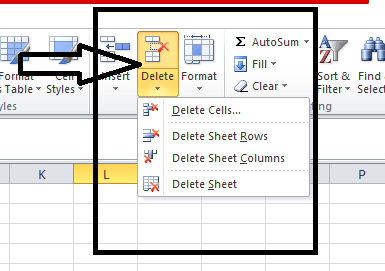
Once an individual clicks on the particular delete cells, the below-listed option appears on their screen.
- Delete cells: Delete cells options are used to delete the selected cells by an individual according to their requirements.
- Delete Sheet Rows: Delete sheets options are primarily available to delete the selected rows by an individual as per their requirements or desire.
- Delete Sheet Column: Delete Sheet Column options are purposely used by an individual to delete the selected row from the excel sheet, which is not needed for further reference in future.
- Delete Sheet: Delete An individual uses sheets to delete the entire sheet.
We will discuss the above option in detail one by one respectively,
# Example: 1 Delete the cells
We will understand the above topics by considering the example of the data related to the cells. It was known that sometimes it is mandatory or required to delete the unwanted rows and the unwanted columns in the data. So, we need to delete the individual selected cells shown below the attached screenshots.

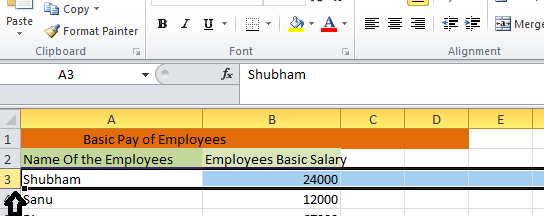
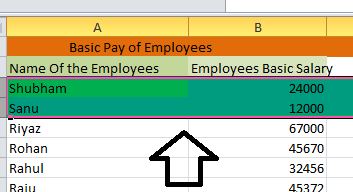
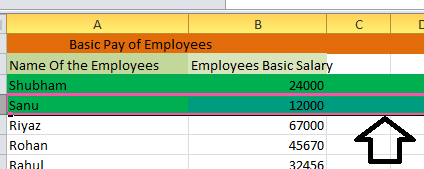
Let us assume that the individual must delete the respective row highlighted in dark green.
Step 1: Firstly, an individual needs to make the selection of the row that they strictly need to be deleted, as shown below in the attached screenshots,
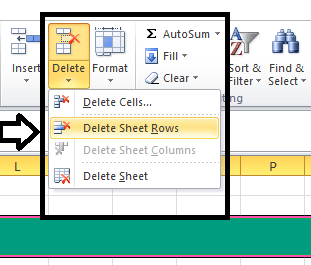
Step 2: After selecting the rows, an individual should move to the option “Delete Cells" and click on the delete cells so that an individual gets the various delete options, as depicted in the screenshot below.
Step 3: Click on the "Delete Sheet Rows" from the drop-down menu.
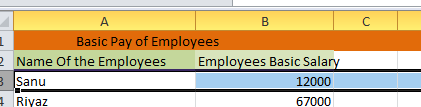
Step 4: After clicking on the "Delete Sheet Rows", the selected row will get deleted, as shown in the below-attached screenshots.
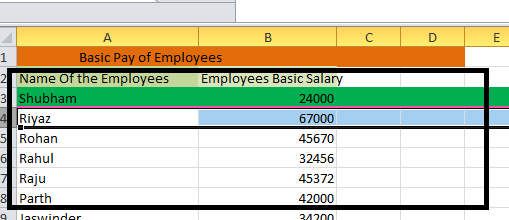
As the Audience, we can see the difference in the above-attached screenshot is that the first column named the "Name of the Employee" 3 will get deleted. The count of highlighted rows in the dark green colour will decrease from 2 to 1, respectively, which means that the selected rows have been deleted from the Microsoft Excel sheets.
# Example: 2 How to Delete the entire selected rows from the Microsoft Excel Sheets.
In this example, we will describe the steps needed to delete the entire rows from the Microsoft Excel Sheets.
Let us consider the product manufactured by the particular company. We want to delete some of the selected data from the excel sheets, as highlighted and shown in the screenshots below. And to perform this, we need to follow the various below-mentioned steps effectively.

Step 1: First, we should select the highlighted row that we need to delete from our Microsoft Excel sheet, as shown in the attached screenshot below.
Step 2: After selecting the particular row to be deleted from the excel sheet, we need to click on the delete cells option, and then a list of choice will get appears that select the second respective options that are " delete sheet rows," as shown in the below-attached screenshot.
Step 3: After performing the above operations, the selected rows will get deleted or removed from the particular prepared excel sheets, as depicted in the screenshot below.
As seen in the above screenshots, the selected rows have been deleted from the respective excel sheet and could be compared with the previously attached screenshots.
# Example: 3
1. affective Use of the Keyboard to delete the respective selected rows from the excel sheet
In Microsoft Excel, many Shortcuts are available for performing various functions such as deletion of the data, rows, columns, etc. in the Excel sheet.
Furthermore, the shortcut key to delete the row from the Excel sheets is CTRL +”-“(Minus Sign), and the shortcut key which can be used to insert the row in the excel sheet is none other than the CTRL+SHIFT+”+” (Plus Sign).
Moreover, the same Shortcut can be extensively used to perform the insertion and deletion. Besides these, an individual can also use the number pad shortcut key to delete the respective row from the excel sheets.
The steps that an individual needs to follow while deletion of the row in excel via the shortcut keys are as follows:
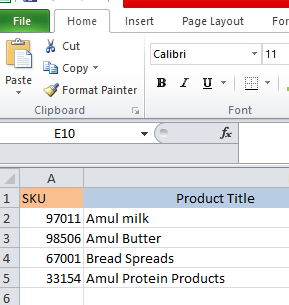
Step 1: First, we select the respective cell where we want to delete the row, as depicted in the attached screenshot below.

Step 2: Now, we should use the keyboard Shortcut Key. Hold the CTRL Key and alternatively press the "-" minus sign on the Keyboard.
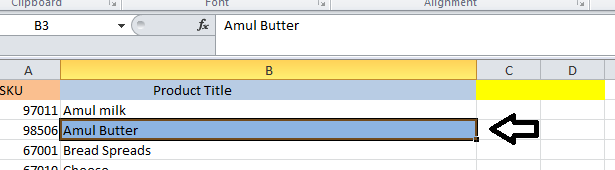
Step 3: After performing the above steps, the entire selected row will be deleted from the excel sheets. As depicted in the below-attached screenshot.
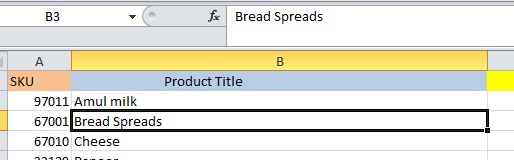
From the above screenshot, we can clearly say that the selected row, "Amul Butter" with SKU 98506, has been effectively deleted from the excel sheets.
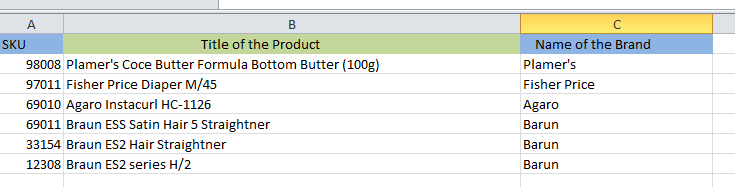
2. How to delete the entire selected rows from Excel with the help of the keyboard shortcut key
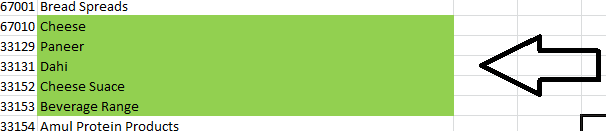
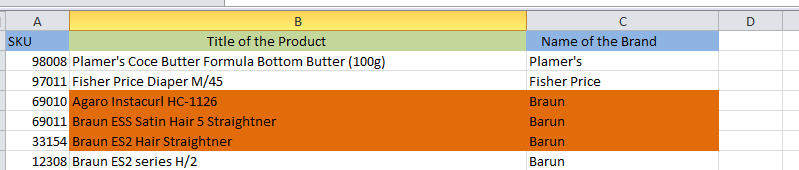
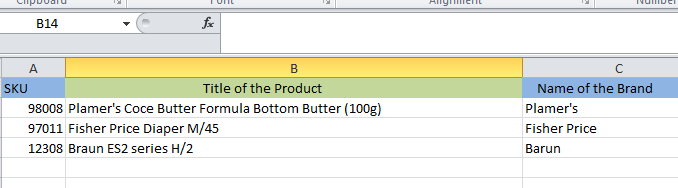
Let us consider the below-mentioned example where we need to perform deletion of the rows named Brand "Braun", which was highlighted in the below-attached screenshots for reference only.
And to delete the excel rows with the help of the keyboard shortcut, one needs to follow the below-mentioned steps effectively.
Step 1: First, we need to select the row cells that have been efficiently highlighted in the Maroon color, as depicted in the screenshot below.
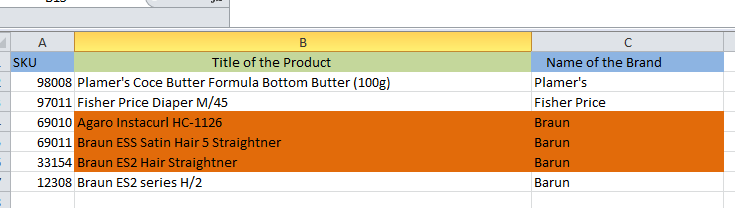
Step 2: After that, we need to press the CTRL key and hold it effectively. With help having the CTRL keys from the Keyboard, press the minus sign "-".
Step 3: Once we press the CTRL key from the Keyboard and that key one at a time, the selected row will get deleted, as shown in the screenshot below.
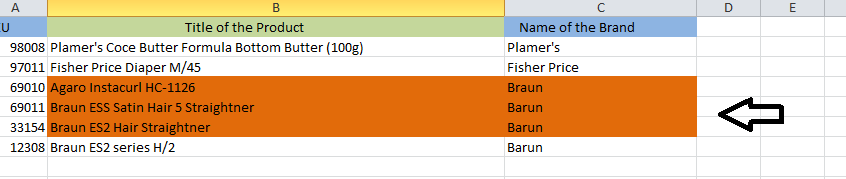
From the attached screenshot, we can clearly say that the selected row has been effectively deleted from the excel sheets.
# Example: 3 To delete the selected multiple rows in the Microsoft Excel sheet
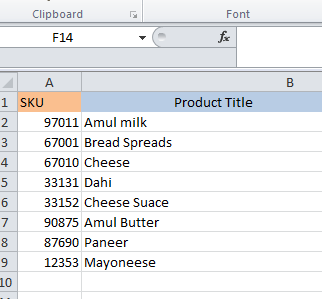
Let us consider an example with SKU number and the product title as shown in the below-attached screenshots, where we can also notice some of the unwanted use of the blank rows in the respective excel sheet that, in turn, makes the available data inappropriate.
Moreover, in this particular scenario, we will perform deletion of the unwanted blank rows at an instant of time by the effective use of the keyboard shortcut key or with the help of the delete cells menu, respectively.
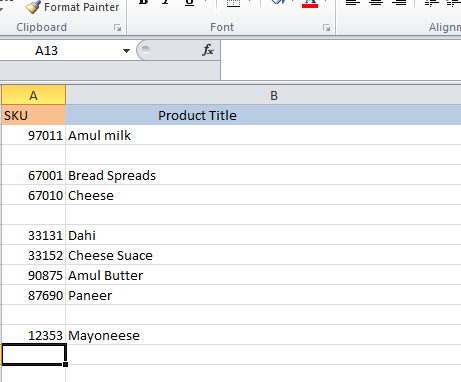
As seen in the above screenshot, there are three blank or unwanted rows in the excel sheets that we need to delete to make the excel sheet quite clear and understandable to the various users.
Besides all these, to delete the multiple rows at a particular instant time, we need to follow the steps mentioned below very carefully.
Step 1: First, we need to hold the CTRL key respectively before moving on to the further steps.
Step 2: After holding the CTRL key, we need to select the entire blank rows or the unwanted rows in the excel sheet by holding the CTRL key from the Keyboard. As depicted in the below-attached screenshot.
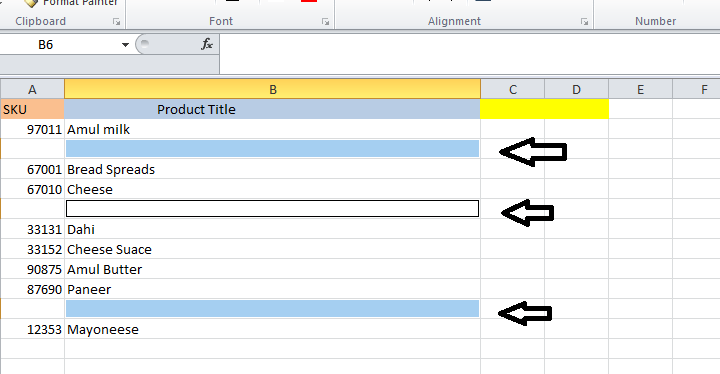
Step 3: We can easily see in the above-attached screenshot that the selected unwanted rows are depicted in the sky blue color.
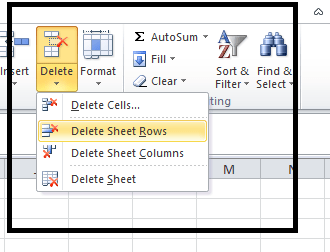
Step 4: Now, after that, move to the delete cells option, and in that, various drop-down list gets appears in which we need to select the option that is "delete sheet rows." As shown in the below-attached screenshot.
Step 5: Once we click on the option "delete sheet rows" option within fractions of seconds, the blank rows will be deleted. As depicted in the below-attached screenshot.
From the above screenshot, we can conclude that after removing the blank or unwanted rows from the respective excel sheets, the sheets look much more straightforward and better compared to previous data with the availability of empty or unwanted rows.
Things to Remember
The things that need to be kept in mind by an individual while operating, which is the deletion of the particular row from the Microsoft Excel sheets area follows:
- While deleting the data in the excel sheets, an individual must ensure that the deleted data will not be required.
- However, an individual can smoothly recover the deleted row with the help of the "undo" functions available in Microsoft Excel.