
CSS Flex-Box
Introduction
The flex-box property of CSS stands for Flexible Box Layout Module. It is specifically used to design a flexible responsive layout.
Flex-box is a one dimensional layout model, i.e. it works either with a row or with a column. This module provides an effective way to use the space among the items of a container, even when the size is variable or unknown.
The primary aim of flex-box is to allow the container to change the width or height of its items and to accommodate the available space (according to different devices and screen sizes).
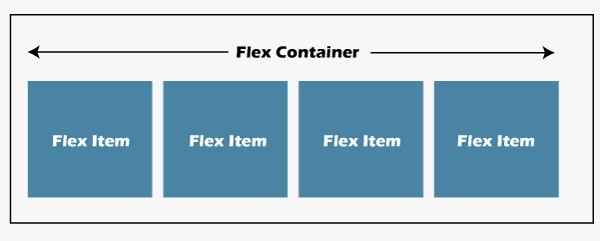
There are two main components of flex-box:
Flex container: It is an area of a document laid out using flex-box. The flex container is created by assigning the values flex or inline-flex to the display property. This component acts as a parent element of the flex-box.
Flex items: The flex item is the direct child of the flex container (parent element). The amount of flex items may be one or more than one.
The Main Axis:
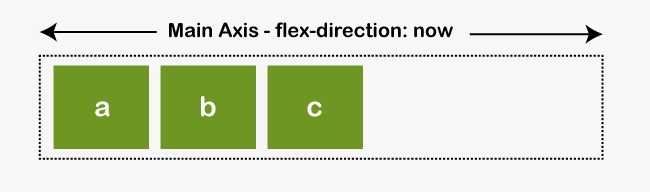
The flex-direction property defines the main axis. It has four property values.
- row
- row-reverse
- column
- column-reverse
When you select row or row-reverse, the main-axis will move along the row in inline direction.
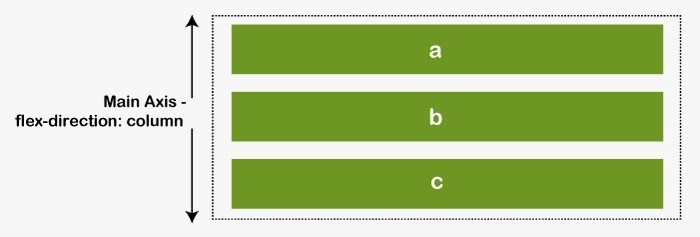
When you select column or column-reverse, the main-axis will move from top to the bottom of page, in block direction.
The Cross Axis:
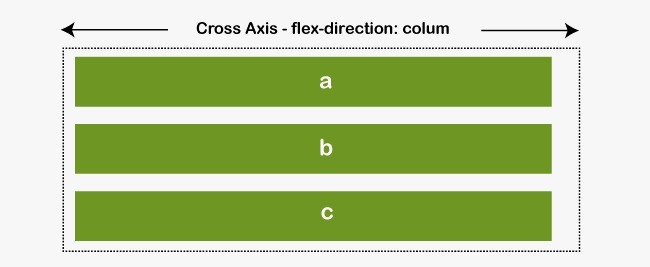
When the flex-directionor the main axis is assigned the values, row or row-reverse, cross axis moves down the columns. Thus, the cross axis runs perpendicular to main axis.

When the flex-directionor is assigned the values column or column-reverse, cross axis moves along the rows.
Consider the example:
<!DOCTYPE html>
<html>
<head>
<style>
.flex-container {
    display: -webkit-flex;
    display: flex;
    width: 300px;
    height: 150px;
    background-color: skyblue;
}
.flex-item {
    background-color: white;
    margin: 10px;
    padding: 20px;
    height: 80px;
}
</style>
</head>
<body>
<h3>CSS Flex Box</h3>
<div class="flex-container">
<div class="flex-item">Flex Item 1</div>
<div class="flex-item">Flex Item 2</div>
<div class="flex-item">Flex Item 3</div>
</div>
</body>
</html>
Output:
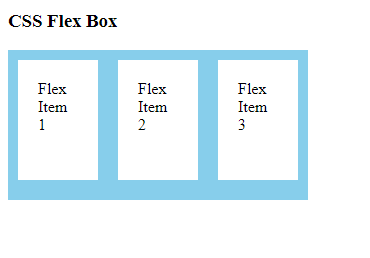
Here, the output displays three flex items in a flex container. horizontal flex line is the default value of flex items.
Consider another example, here we use the direction property, and it is set to rtl (right to left).
<!DOCTYPE html>
<html>
<head>
<style>
.flex-container {
    display: -webkit-flex;
    display: flex;
    width: 300px;
    height: 150px;
    background-color: skyblue;
}
.flex-item {
    background-color: white;
    margin: 10px;
    padding: 20px;
    height: 80px;
}
body{
  direction: rtl;
}
</style>
</head>
<body>
<h3>CSS Flex Box</h3>
<div class="flex-container">
<div class="flex-item">Flex Item 1</div>
<div class="flex-item">Flex Item 2</div>
<div class="flex-item">Flex Item 3</div>
</div>
</body>
</html>
Output:
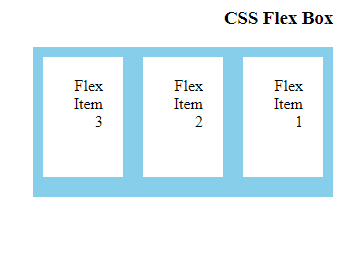
In the above output, we use the direction: rtl; property.
CSS3 Flexbox has many notable properties for both the parent (flex container) and the children (flex items):
For the parent (flex container):
-
o display:
This property is used to select the type of box. It displays a flex container, either block or inline.
Syntax:
.container{
display: flex | inline-flex | block | inline-block;}
-
flex-direction:
This property creates the main axis, and defines the direction of flex items placed in the flex container.
Syntax:
.container{
flex-direction:  row | row-reverse | column | column-reverse;          }
where,
- row: It is the default value. Forleft toright, value is ltr and for right to left, value is rtl.
- row-reverse: ltr is for right to left and rtl is for left to right.
- column: It is similar to row but the flow is top to bottom.
- column-reverse: It is similar to row-reverse but the flow is bottom to top.
-
flex-wrap:
By default, all the flex items try to fir in a single line. Flex-wrap property allows you to wrap the items if necessary.
Syntax:
.container{
flex-wrap:  nowrap | wrap | wrap-reverse;                                         }
where,
- nowrap is the default value of flex-wrap. When you use nowrap all the flex items will be in a single line.
- wrap: the flex items are wrapped onto multiple lines from top to bottom.
- wrap-reverse: the flex items are wrapped onto multiple lines from bottom to top.
-
flex-flow:
This property acts as a shorthand for flex-wrap and flex-direction properties. It defines the main axes and cross axes of flex container.
The default value of flex-flow is row nowrap.
Syntax:
.container{
flex-flow: row wrap;
}
-
justify-content:
This property specifies the alignment along the row i.e. the main axis.
It distributes the space left when all the flex items have reached the maximum size, or the items in the line are inflexible.
Syntax:
.container{
justify-content: flex-start | flex-end | center | space-between | space-around | space-evenly | start | end | left | right … + safe | unsafe;
}
- flex-start: It is the default value. It packs the items to the start of flex-direction.
- flex-end: It packs the items to the end of flex-direction.
- start: It packs the items to the start of writing-mode direction.
- end: It packs the items to the end of writing-mode direction.
- left: It packs the items to left side of the container.
- right: It packs the items to right side of the container.
- center: It places the items to the center of container.
- space-between: It distributes the items evenly in the line.
- space-around: It distributes the items evenly in the line but with equal space around them.
- space-evenly: It distributes the items such that there is equal space between two consecutive items and the edges.
-
align-items:
The property defines how the flex items are displayed along cross axis on the line.
Syntax:
.container{
align-items:  stretch | flex-start | flex-end | center | baseline | first baseline | last baseline | start | end | self-start; }
where,
- stretch: is the default value and uses to fill the container.
- flex-start / self-start / start : It places the items to the start of cross axis.
- flex-end / self-end / end: It places the items to the end of cross axis.
- center: It places the items to center of cross axis.
- baseline: It aligns the items according to the baseline.
-
align-content:
This property aligns the lines of flex container, when there is extra space in cross axis. This property is similar to justify-content where it aligns the items in the main axis.
Syntax:
.container{
align-content: flex-start | flex-end | center | space-between | space-around | space-evenly | stretch | start | end | baseline | first baseline | last baseline;
where,
- normal: is the default value where the items are packed in default position.
- flex-start/ start: It packs the items to the start of flex container.
- flex-end / end: It packs the items to the end of the container.
- center: It places the items to the center of container.
- space-between: It distributes the items evenly in the line.
- space-around: It distributes the items evenly in the line but with equal space around them.
- space-evenly: It distributes the items such that there is equal space between two consecutive items and the edges.
- stretch: the lines are stretched to cover the remaining space.
For the children (flex items):
-
order:
It controls the order of the flex items in which they are visible in the container. The default value of order property is 0.
Syntax:
.item{
order: value;
}
-
flex-grow:
This property allows the flex item to grow if required. You can set a value to the flex-grow, the value has no unit. Default value of flex-grow is 0.
Syntax:
.item{
flex-grow: value;
}
-
flex-shrink:
It allows flex items to shrink if necessary. The default of flex-shrink is 1 and negative values are invalid.
Syntax:
.item{
flex-shrink: value;
}
-
flex-basis:
The flex-basis property sets default size of an element before the remaining space is distributed.
Syntax:
.item{
flex-basis: value | auto;
}
When the flex-basis is set to 0, extra space around content is not factored in. When the value is set to auto(default value), extra space is divided according to value of flex-grow property.
-
flex:
This property is shorthand for flex-grow, flex-basis, flex-shrink together.
The last two parameters (flex-basis & flex-shrink) are optional.
Syntax:
.item{
flex: none | [ <'flex-grow'><'flex-shrink'> ? || <'flex-basis'> ]      }
It is recommended to use flex shorthand property rather than the individual properties.
-
align-self:
It allows the individual flex items to align themselves, by overriding the alignment sets by align-items property.
Syntax:
.item{
align-self: auto | flex-start | flex-end | center | baseline | stretch;}
Supporting Browsers:
| Property | ||
|---|---|---|
| Browser name | Basic support (single-line flexbox) | multi-line flexbox |
| Google Chrome | 29.0 21.0 - webkit- | 29.021.0 - webkit- |
| Internet Explorer | 11.0 | 11.0 |
| Mozilla Firefox | 22.0 18.0-moz- | 28.0 |
| Opera Browser | 12.1 - webkit- | 17.0 15.0 - webkit- 12.1 |
| Safari Browser | 6.1 - webkit- | 6.1 - webkit- |
In this way, we have learnt the Flexbox (Flexible Box Layout) Module of CSS and its various properties to create a flexible layout environment.