CSS Counters
CSS Counters: The CSS counter property is similar to the variables. CSS counters are controlled via CSS, and its values are incremented via rules of CSS to record how much they are applied.
These properties in CSS provide simple incrementing i.e., CSS based and representation of any number i.e., for various generated content.
Note: Before going to start using a counter, it should be made with the counter-reset.
Counter Properties
Some of the critical properties of the counter are listed and specified below:
counter-reset: This property is applied to reset or create a counter.
counter-increment: This attribute is applied to the counter values to increment them.
content: It is applied to add generated content.
counters() or counter() function: This property is applied to insert any counter value for an element.
Counter Example:
In the following example, we are incrementing every next element’s counter value and also make the counter to a page.
Look at the following example:
<!DOCTYPE html>
<html>
<head>
<style>
body
{
counter-reset: section;
}
h2::before
{
counter-increment: section;
content: "Section" counter(section)": ";
}
</style>
</head>
<body>
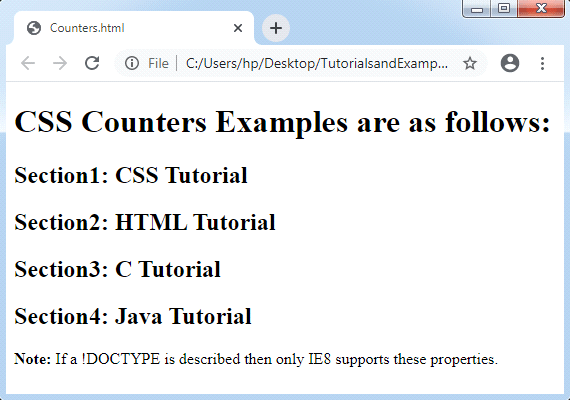
<h1> CSS Counters Examples are as follows: </h1>
<h2> CSS Tutorial </h2>
<h2> HTML Tutorial </h2>
<h2> C Tutorial </h2>
<h2> Java Tutorial </h2>
<p><strong>Note:
</strong> If a !DOCTYPE is described then only IE8 supports these properties.</p>
</body>
</html>
Explanation of above example- we can see that the counter is made for a page inside body selector. After that, it increments the value of the counter for every <h2> element and inserts “Section <value of the counter>:” for the starting of every <h2> element.
Output:
Nesting Counters
We can also make counters inside the counter, and known as counter nesting.
Look at the following example to understand the concept of nesting counter:
<!DOCTYPE html>
<html>
<head>
<style>
body
{
counter-reset: section;
}
h2
{
counter-reset: subsection;
}
h2::before
{
counter-increment: section;
content: "Section" counter(section)": ";
}
h3::before
{
counter-increment: subsection;
content: counter(section) "." counter(subsection) " ";
}
</style>
</head>
<body>
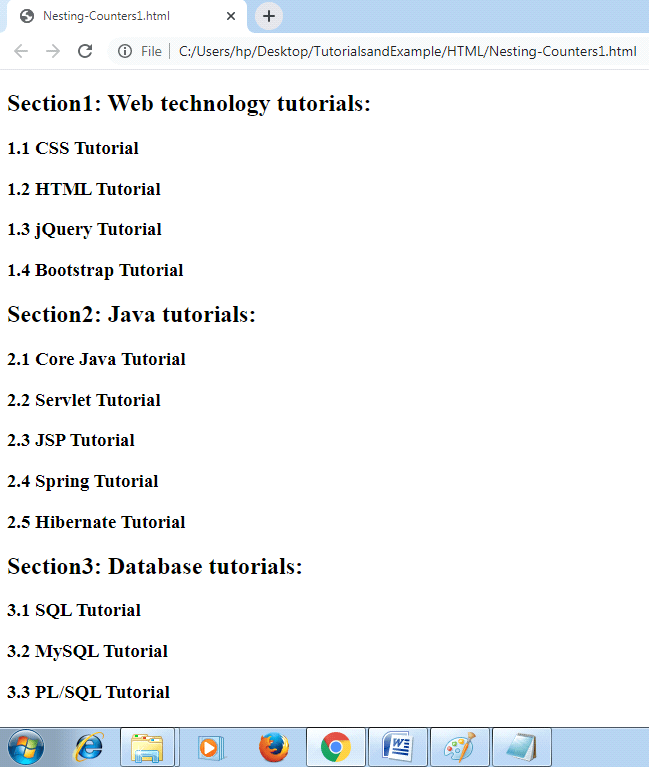
<h2> Web technology tutorials: </h2>
<h3> CSS Tutorial </h3>
<h3> HTML Tutorial </h3>
<h3> jQuery Tutorial </h3>
<h3> Bootstrap Tutorial </h3>
<h2> Java tutorials: </h2>
<h3> Core Java Tutorial </h3>
<h3> Servlet Tutorial </h3>
<h3> JSP Tutorial </h3>
<h3> Spring Tutorial </h3>
<h3> Hibernate Tutorial </h3>
<h2> Database tutorials: </h2>
<h3> SQL Tutorial </h3>
<h3> MySQL Tutorial </h3>
<h3> PL/SQL Tutorial </h3>
<h3> Oracle Tutorial </h3>
<p><strong>Note:
</strong> If a !DOCTYPE is described then only IE8 supports these properties.</p>
</body>
</html>
Explanation of above example- we can see that the counter is made for a section and other nesting counter called subsection is made inside section.
Output:
Distinct phases of a Nesting Counters
We can make an outlined list with the use of the nesting counters. The nesting counter provides us to add the string between distinct phases of the nested counters.
Look at the following example:
<!DOCTYPE html>
<html>
<head>
<style>
ol
{
    counter-reset: section;
    list-style-type: none;
}
li::before
{
    counter-increment: section;
    content: counters(section,".") " ";
}
</style>
</head>
<body>
<h2>Different Phases of the Nesting Counters</h2>
<ol>
<li>item</li>
<li>item
<ol>
<li>item</li>
<li>item</li>
<li>item
<ol>
<li>item</li>
<li>item</li>
<li>item</li>
</ol>
</li>
<li>item</li>
</ol>
</li>
<li>item</li>
<li>item</li>
</ol>
<p><b>Note:</b> If a !DOCTYPE is described then only IE8 supports these properties.</p>
</body>
</html>
Output:
