GUI Calculator in Python
Introduction
In Python, we can develop a GUI(Graphical User Interface) with multiple options. It offers us some great and commonly used methods for the development of the Graphical User Interface. Tkinter is one of them, which use widely, and it is the most usable method out of all the GUI methods.
Here, we are using the Tkinter module for developing a GUI calculator because Tkinter is platform-independent and can work with both operating systems in Windows and Linux.
What is Tkinter?
Tkinter refers to as Tk interface that is a standard Python interface to the Tk GUI toolkit. The combination of Python and Tkinter gives a faster and easier way for creating GUI applications.
Both Tkinter and Tk, are available on both operating systems on windows and Linux platforms.
We have to install the Tkinter module on our systems for executing the programs if we are using Linux/Ubuntu but we do not need to install it on Windows operating systems because it comes with the installation of Python.
The four things to be done for using the Tkinter are:
- Importing the Tkinter module.
- Creating the main windowpane for the calculator.
- Adding any number of widgets to the main window.
- Implementing the event trigger on Widgets.
Let's start with creating the Calculator Window with the following code
Here, we will create a frame for the calculator by specifying the dimensions of the frame then we will create a button by defining the dimensions and font size for the window.
Example –
from tkinter import *

win = Tk() # This is to create a basic window

win.geometry("312x324") # this indicates the size of the window

win.resizable(0, 0) # prevent window from resizing

win.title("Calculator")

def btn_click(item): #This is input field

    global expression

    expression = expression + str(item)

    input_text.set(expression)

def bt_clear(): #this is clear button

    global expression

    expression = ""

    input_text.set("")
Adding the answer/ equal button
The equal button is used for displaying the answer to the calculation. here, we will define the dimensions and size of the equal button with the following code.
def bt_equal():

    global expression

    result = str(eval(expression)) # 'eval':This function is used to evaluates the string expression directly

    input_text.set(result)

    expression = ""

expression = ""

input_text = StringVar()
Creating event triggers and input frame of the calculator
Finally, this is the main and last step of creating a calculator because event triggers are the important operation to apply to the widgets that we have designed. Every widget in the calculator has its own functionality so, whenever the user clicks any of the widgets some function will be performed.
input_frame = Frame(win, width=312, height=50, bd=0, highlightbackground="black", highlightcolor="black", highlightthickness=2)

input_frame.pack(side=TOP)

#Let us create a input field inside the 'Frame'

input_field = Entry(input_frame, font=('arial', 18, 'bold'), textvariable=input_text, width=50, bg="#eee", bd=0, justify=RIGHT)

input_field.grid(row=0, column=0)

input_field.pack(ipady=10) # 'ipady' is internal padding to increase the height of input field

btns_frame = Frame(win, width=312, height=272.5, bg="grey")

btns_frame.pack()

# first row

clear = Button(btns_frame, text = "C", fg = "black", width = 32, height = 3, bd = 0, bg = "#eee", cursor = "hand2", command = lambda: bt_clear()).grid(row = 0, column = 0, columnspan = 3, padx = 1, pady = 1)

divide = Button(btns_frame, text = "/", fg = "black", width = 10, height = 3, bd = 0, bg = "#eee", cursor = "hand2", command = lambda: btn_click("/")).grid(row = 0, column = 3, padx = 1, pady = 1)

# second row

seven = Button(btns_frame, text = "7", fg = "black", width = 10, height = 3, bd = 0, bg = "#fff", cursor = "hand2", command = lambda: btn_click(7)).grid(row = 1, column = 0, padx = 1, pady = 1)

eight = Button(btns_frame, text = "8", fg = "black", width = 10, height = 3, bd = 0, bg = "#fff", cursor = "hand2", command = lambda: btn_click(8)).grid(row = 1, column = 1, padx = 1, pady = 1)

nine = Button(btns_frame, text = "9", fg = "black", width = 10, height = 3, bd = 0, bg = "#fff", cursor = "hand2", command = lambda: btn_click(9)).grid(row = 1, column = 2, padx = 1, pady = 1)

multiply = Button(btns_frame, text = "*", fg = "black", width = 10, height = 3, bd = 0, bg = "#eee", cursor = "hand2", command = lambda: btn_click("*")).grid(row = 1, column = 3, padx = 1, pady = 1)

# third row

four = Button(btns_frame, text = "4", fg = "black", width = 10, height = 3, bd = 0, bg = "#fff", cursor = "hand2", command = lambda: btn_click(4)).grid(row = 2, column = 0, padx = 1, pady = 1)

five = Button(btns_frame, text = "5", fg = "black", width = 10, height = 3, bd = 0, bg = "#fff", cursor = "hand2", command = lambda: btn_click(5)).grid(row = 2, column = 1, padx = 1, pady = 1)

six = Button(btns_frame, text = "6", fg = "black", width = 10, height = 3, bd = 0, bg = "#fff", cursor = "hand2", command = lambda: btn_click(6)).grid(row = 2, column = 2, padx = 1, pady = 1)

minus = Button(btns_frame, text = "-", fg = "black", width = 10, height = 3, bd = 0, bg = "#eee", cursor = "hand2", command = lambda: btn_click("-")).grid(row = 2, column = 3, padx = 1, pady = 1)

# fourth row

one = Button(btns_frame, text = "1", fg = "black", width = 10, height = 3, bd = 0, bg = "#fff", cursor = "hand2", command = lambda: btn_click(1)).grid(row = 3, column = 0, padx = 1, pady = 1)

two = Button(btns_frame, text = "2", fg = "black", width = 10, height = 3, bd = 0, bg = "#fff", cursor = "hand2", command = lambda: btn_click(2)).grid(row = 3, column = 1, padx = 1, pady = 1)

three = Button(btns_frame, text = "3", fg = "black", width = 10, height = 3, bd = 0, bg = "#fff", cursor = "hand2", command = lambda: btn_click(3)).grid(row = 3, column = 2, padx = 1, pady = 1)

plus = Button(btns_frame, text = "+", fg = "black", width = 10, height = 3, bd = 0, bg = "#eee", cursor = "hand2", command = lambda: btn_click("+")).grid(row = 3, column = 3, padx = 1, pady = 1)

# fourth row

zero = Button(btns_frame, text = "0", fg = "black", width = 21, height = 3, bd = 0, bg = "#fff", cursor = "hand2", command = lambda: btn_click(0)).grid(row = 4, column = 0, columnspan = 2, padx = 1, pady = 1)

point = Button(btns_frame, text = ".", fg = "black", width = 10, height = 3, bd = 0, bg = "#eee", cursor = "hand2", command = lambda: btn_click(".")).grid(row = 4, column = 2, padx = 1, pady = 1)

equals = Button(btns_frame, text = "=", fg = "black", width = 10, height = 3, bd = 0, bg = "#eee", cursor = "hand2", command = lambda: bt_equal()).grid(row = 4, column = 3, padx = 1, pady = 1)

win.mainloop()
Output:
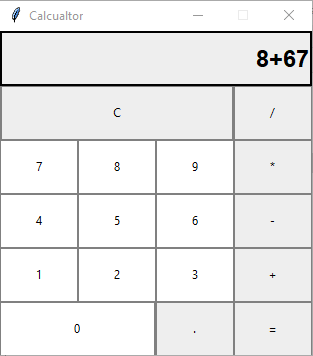
Now, we can perform any simple mathematical operation on this calculator such as,
- Multiplication
- Addition
- Subtraction
- Division
Conclusion
In the above article, we have learned how to build the GUI calculator with Tkinter in Python. Now, you have understood the use of functions and methods that was implemented in the making of the GUI calculator.