YOLO Python
YOLO means you only look once.It is a technique to perform object detection is called YOLO. It is the algorithmused by the program to identify items in the image.
Earlier detection frameworks use image classification techniques to find objects while looking at various areas of the image regularly at various scales. This technique is inaccurate and slow.
YOLO uses a completely different technique. It simply takes a single look at the full image and scans the network once to find items. Thus, it moves fast.
YOLO uses faster R-CNN and SSD for object detection frameworks.
OpenCV dnn module:
The DNN (Deep Neural Network) module was first included in the opencvcontrib repository. Users may now perform inference on pre-trained deep learning models inside of OpenCV due to its relocation to the master branch of the opencv.
In beginning only Caffe and Torch models were supported. Over the period support for different frameworks like TensorFlow is being added.
Yolo has recently been added. To identify common objects, we use the OpenCV dnn module with a pre-trained YOLO model.
Python Program
// python program
import cv2
import argparse
import numpy as a
// arguments
b = argparse.ArgumentParser()
b.add_argument('-i', '--image', required=True,
help = 'path to input image'’)
b.add_argument('-c', '--config', required=True,
help = 'pre-trained yolo approach’)
b.add_argument('-w', '--weights', required=True,
help = 'how to get to yolo trained weights’)
b.add_argument('-cl', '--classes', required=True,
help = 'path to a text file where class names are located’)
args = b.parse_args()
We require these things to execute the code:
- Python 3: If you are installed python already then run it and it verify whether it installed or not. Run python3 in command prompt.
- Numpy: pip install numpy
numpy should install pip. Make pip linked to python3. - OpenCV-python: For image processing and computer vision tasks, OpenCV is a good tool. This open-source library can be used to carry out operations including face detection, object tracking, and landmark detection.
Command Line Arguments
There are four input arguments.
- Text file containing class names.
- YOLO config file.
- Pre-trained YOLO weights.
- Input image.
Input image was our choice.
Run the program by typing.
$ python yolo_opencv.py --image dog.jpg --config yolov3.cfg --weights yolov3.weights --classes yolov3.txt
Reading input
image = cv2.imread(args.image)
Width = image.shape[1]
Height = image.shape[0]
scale = 0.00392
//class names were read from a text file
classes = None
with open(args.classes, 'r') as f:
classes = [line.strip() for line in f.readlines()]
// generate different colors for different classes
COLORS = a.random.uniform(0, 255, size=(len(classes), 3))
// read pre-trained model and configuration file
z = cv2.dnn.readz(args.weights, args.configuration)
blob = cv2.dnn.blobFromImage(image, scale, (416,416), (0,0,0), True, crop=False)
z.setInput(blob)
read the input image and get it height and width.
Extract the class names to a list from the text file that provides them in human readable form.
Create different colors for different classes.
z = cv2.dnn.readNet(args.weights, args.config)
above command reads the config file and weights.
blob = cv2.dnn.blobFromImage(image, scale, (Width,Height), (0,0,0), True, crop=False)
z.setInput(blob)
Output layer and bounding box
def get_result_layers(z):
layer_names = z.getLayerNames()
result_layers = [layer_names[i[0] - 1] for i in z.getUnconnectedOutLayers()]
return result_layers
// function to draw bounding box on the detected object with class name
def draw_bounding_box(img, class_id, confidence, i, j, i_plus_w, j_plus_h):
label = str(classes[class_id])
color = COLORS[class_id]
cv2.rectangle(img, (i,j), (i_plus_w,j_plus_h), color, 2)
cv2.putText(img, label, (x-10,y-10) cv2.FONT_HERSHEY_SIMPLEX, 0.5, color, 2)
In a sequential CNN network, the final output layer will usually be the only one. We are using the YOLO v3 architecture, which has numerous output layers that provide predictions. The names of the output layers are provided by the get output layers() method. There is no next layer connected to an output layer.
The function draw bounding box() draws a rectangle across the specified expected region and identifies the class over the box. We can also write the confidence value if necessary.
Running interface
class_ids = []
confidences = []
boxes = []
conf_threshold = 0.5
nms_threshold = 0.4
// Get the confidence, class ID, and bounding box parameters for each detection made by each output layer, and reject poor detections.
(confidence < 0.5)
for out in outs:
for detection in out:
scores = detection[5:]
class_id = a.argmax(scores)
confidence = scores[class_id]
if confidence > 0.5:
center_i = int(detection[0] * Width)
center_j = int(detection[1] * Height)
w = int(detection[2] * Width)
h = int(detection[3] * Height)
x = center_i - w / 2
y = center_j - h / 2
class_ids.append(class_id)
confidences.append(float(confidence))
boxes.append([i, j, w, h])
outs = net.forward(get_output_layers(net))
The network receives the identical feed forward as it happens above line. If we don't specify the names of the output layer, it will only deliver predictions from the last output layer by default. Any additional output layer won't be taken into account.
For each detection from each output layer, the class id, confidence, and bounding box corners must be obtained. More importantly, the weak detections must be disregarded (detections with low confidence value).
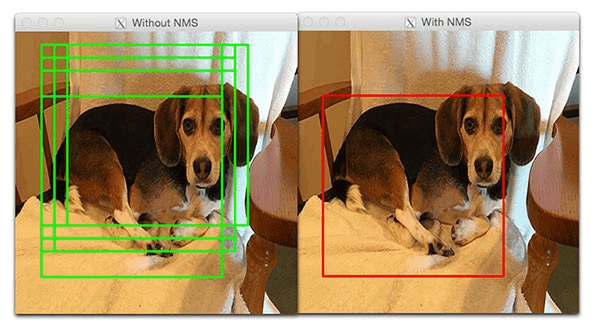
Non-max suppression
indices = cv2.dnn.NMSBoxes(boxes, confidences, conf_threshold, nms_threshold)
//after nms, go through the remaining detections and construct a bounding box.
for n in indices:
n = n[0]
box = boxes[n]
i = box[0]
j = box[1]
w = box[2]
h = box[3]
draw_bounding_box(image, class_ids[i], confidences[i], round(x), round(y), round(x+w), round(y+h))
cv2.imshow("object detection", image)
cv2.waitKey()
cv2.imwrite("object-detection.jpg", image)
cv2.destroyAllWindows()
Even though we rejected weak detections, there will be several duplicate detections with overlapping bounding boxes. Non-max suppression is used to produce high overlapping box deletion.
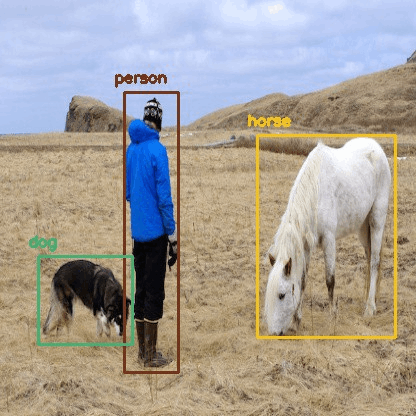
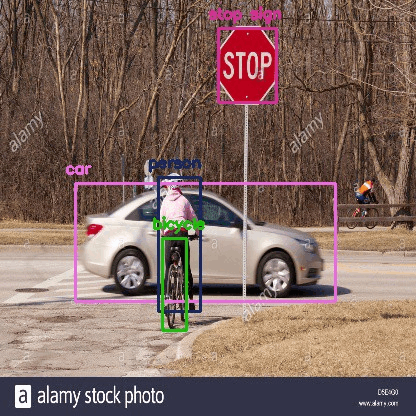
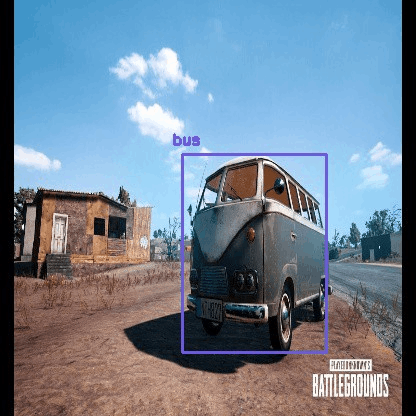
Output of the program using few images: