Socket Programming in Python
Socket Programming in Python
In this tutorial, we will discuss network programming using Python programming language. We will explore all basic concept of network with Python script.
Network Services in Python
Python has a significant role in network programming. The network protocols, encoding, and decoding of data and other concepts of networking has been supported by the standard library of Python.
Python has classified the access of network service into two broad categories – The Low-level Access and The High-level Access. We can access to the basic socket support in the primary operating system at the lower level. It allows users to implement clients and servers for both the protocols including the connectionless and connection-oriented.
At the higher level, Python provides access through its libraries to specific application-level network protocols, such as HTTP, FTP, and many more.
Socket Programming
A method in which two nodes are connected on a network to communicate with other is known as socket programming. One node (socket) listens on a specific port at an Internet Protocol (IP), whereas the other node reaches out to previous node to create a connection. When the client communicates to the server, it forms the listener node. These are the main pillars for browsing the internet. In short, there is a client and a server.
Understanding the Sockets
The endpoints of a two-directional communications channel are known as sockets. They may communicate inside a process, between processes on the same machine or between different areas, countries or continents.
Sockets can be implemented over various channels such as Unix domain sockets, UDP, TCP and many more. To handle the common transports and a generic interface to handle the rest, a specific class is provided by the socket library.
To start socket programming, we can import the socket library using the import function and create a simple socket.
import socket
s = socket.socket(socket.AF_INET, socket.SOCK_STREAM)
In the above snippet of code, we have created an instance for the socket and passed two parameters. We have taken the first parameter as AF_INET, and another one is SOCK_STREAM, respectively. The AF_INET parameter indicates the address family IPv4 whereas, the SOCK_STREAM is meant for the connection-oriented TCP protocol.
Now, we can use a socket for connecting to a server. But before we get to that, let see the socket vocabulary that we will be using through this very concept:
- Domain
- Type
- Protocol
- Hostname
- Port
Domain
Domain is the family of protocols that are used to work as the transport mechanism. The values of domain are constants such as PF_INET, AF_INET, PF_X25, PF_UNIX and many more.
Type
Type refers to the type of communications between the two sockets; in general, SOCK_DRAM is used for connectionless protocols, whereas SOCK_STREAM is used for connection-oriented protocols.
Protocol
A standard set of rules that permits electronic devices to communicate is known as the protocol. In General, it is zero; this can be used to classify a protocol's variant within a type and Domain.
Hostname
The hostname is used as the identifier of a network interface:
- An Integer can be interpreted in host byte order as a binary address.
- A string can be a hostname, an IPv6 address or a dotted-quad address in colon (and maybe dot) notation.
- A zero-length string which can specify INADDR_ANY
- A sting "<broadcast>", which can specify an INADDR_BROADCAST address.
Port
Clients calling over one or more ports are listened to by each server. A port can be a string containing a service name, a Fixnum port number, or a port number.
The socket Module
The socket.socket() function is used for creating a socket that is available in the socket module. Here's a general syntax is given below:
s = socket.socket (socket_family, socket_type, protocol=0)
In the above syntax, we have used socket_family as the domain such as AF_INET or AF_UNIX, as discussed earlier. Next, we have used socket_type that can be either SOCK_DGRAM or SOCK_STREAM. At last, we have a protocol that is usually optional and zero (0) by default.
Once we have created the socket object, we would be using some functions to create our client or server program. The list of functions we will be using is as follows:
Server socket Methods
The few server socket methods are given below.
| S. No. | Method | Description |
| 1 | s.listen() | The s.listen() method is used to set up and start TCP listener. |
| 2 | s.bind() | The s.bind() method is used to bind address (hostname, port number pair) to socket. |
| 3 | s.accept() | The s.accept() method is used to accept TCP client connection passively, that are waiting until the connection arrives (blocking). |
Client socket Methods
The f client socket methods is given below.
| S. No. | Method | Description |
| 1 | s.connect() | The s.connect() method is used to initiate the TCP server connection actively. |
General socket Methods
| S. No. | Method | Description |
| 1 | s.send() | The s.send() method is used to transmit the TCP message. |
| 2 | s.sendto() | The s.sendto() method is used to transmit the UDP message. |
| 3 | s.recv() | The s.recv() method is used to receives the TCP message. |
| 4 | s.recvfrom() | The s.recvfrom() method is used to receives the UDP message. |
| 5 | s.close() | The s.close() method is used to close the socket. |
| 6 | socket.gethostbyname() | The socket.gethostbyname() method returns the IP address of the host. |
Connecting to a Server
Before creating a simple server-client program, let's try connecting to a server. Note that we will be using a 'socket.error' so that if any error occurs during the construction of a socket, it will be thrown and will only be connected to a server with its Internet Protocol (IP).
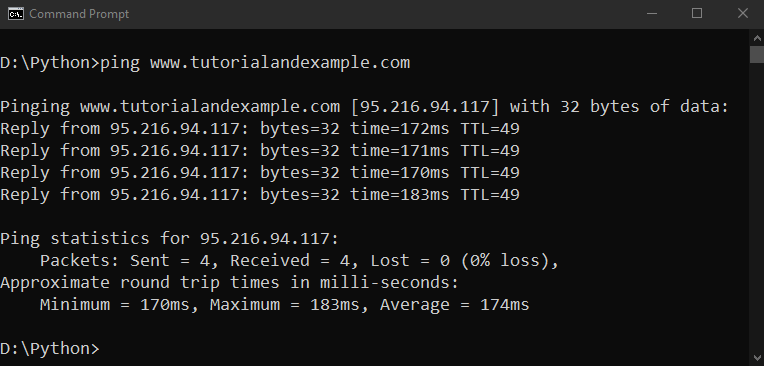
We can easily find the IP address of the server by using the ping command followed by the destination in the command prompt, as shown below:
$ ping www.tutorialandexample.com
We can also find the IP address using Python, as follow:
import socket
ip = socket.gethostbyname('www.tutorialandexample.com')
print('IP address:', ip)
The output of the above snippet of code should look as shown below:
IP address: 95.216.94.117
Now, let’s try connecting to tutorialandexample.com:
# An example script to connect to TutorialandExample.com import socket
# to import socket library  import sys
try:
s = socket.socket(socket.AF_INET, socket.SOCK_STREAM)
print("Socket successfully created!")
except socket.error as err:
print("Construction of socket is interrupted by error %s" %(err))
# the default port for socket  port = 80
try:
host_name = socket.gethostbyname('www.tutorialandexample.com')
except socket.gaierror:
# this means could not resolve the host
print("An error occurring while resolving the host")
sys.exit()

# connecting to the server
s.connect((host_name, port))

print("The connection has successfully established by socket to") print("tutorialandexample.com on port = %s" %(host_name))
The output of the above program should look as shown below:
Socket successfully created!
The connection has successfully established by socket to
tutorialandexample.com on port = 95.216.94.117
Let’s understand what happened in the above program step-by-step:
- Firstly, we have created a socket.
- Then, we have resolved the IP address of tutorialandexample.com, and at last, we have connected to the website's server.
- Now we are required to understand how we can transmit some data through a socket.
- For this, we will be using send all functions available in the socket library to send data. This function allows the user to transmit data to a connected server. We can also use this function to send data from the server to the client.
Now, let’s try making a basic server-client program.
A Basic Server-Client Program
At Server:
We will be using the bind() method to bind the server to a specific IP address and port to write Internet servers. It helps in listening to the incoming requests on that IP address and port, respectively. Then, we will use the listen() method that helps to put the server into listening mode. Thus, the server would able to listen to incoming connections. Finally, we will be using the accept() and close() method so that we can initiate the connection with the client and close it later.
Example – 1:
File: connect_server.py
# Firstly, we have to import socket library
import socket
# To create a socket object
s = socket.socket()
print("Socket successfully created!")
# reserve a port on your computer in our
# case it is 12121 however it can be anything
port = 12121
# Then we have to bind the port
s.bind(('', port))
print("The socket is bound to %s" %(port))
# put the socket into listening mode
s.listen(3)
print("The socket is ready to listen")
while True:
   # Establishing the connection with client.
   c, addr = s.accept()
   print('The connection has been established successfully with', addr)
   # sending a thank you note to the client.
   output = 'Thank you for connecting!'
   c.sendall(output.encode('utf-8'))
   # Closing the connection with the client
   c.close()
Explanation –
In the above program, we have created a server. Firstly, we have imported the socket library as it is mandatory. Then, we have created a socket object and stored a port on the system (computer). After that, we have found our server to the port specified earlier. As we can observe, we have passed an empty string that means the server can listen to other computers' incoming connections. If we pass 127.0.0.1, then the server would listen to those calls only that are made within the local system.
Later, we have switched the server to listening mode, and the '3' here represents that three connections are reserved waiting if the server is occupied, and if a fourth socket tries to establish a connection, it will decline.
Now, at last, we have created a while loop and accept all the incoming connections. After sending a 'thank you' note to all the sockets connected to the server and close them later.
At Client:
Once we have completely set up the server, we need something to easily interact with that server. To check whether the server is working or not, we can use telnet to the server. To make this, we can type the following command in the terminal:
$ python connect_server.py
Now, keeping the above terminal open, let’s move to another terminal and type the command as follows:
$ telnet localhost 12121
The above command would give us the output as follows:
Python Terminal:
Socket successfully created!
The socket is bound to 12121
The socket is ready to listen
The connection has been established successfully with ('127.0.0.1', 52309)

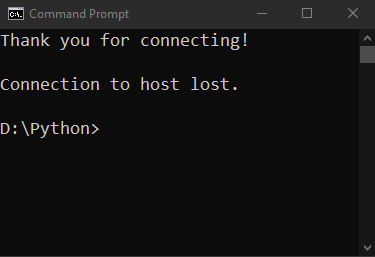
Telnet Terminal:
Thank you for connecting!
Connection to host lost.
Now, let’s write the code for a simple client.
Example -
File: connect_client.py
# Importing the socket library
import socket
# Creating a socket object
s = socket.socket()
# Defining the port for connection
port = 12121
# connecting the client to the server on local computer
s.connect(('127.0.0.1', port))
# receiving the data from the server
print(s.recv(1024))
# closing the connection
s.close()
In the above script, we have created a socket object after importing the socket library. Then, we have connected the client using the socket.connect(hostname, port) to the localhost on port 12121 (the port where the server is running), and at last, we have call recv() for receiving the data from the server and close the connection using close().
Now, let’s save the above script as connect_client.py and execute the file after executing the connect_server.py in the background.
# Executing the server file in background
$ python connect_server.py
# Executing the client file once the server is started
$ python connect_client.py
Executing both the files the way is shown above will give an output as shown below:
Server Terminal:
Socket successfully created!
The socket is bound to 12121
The socket is ready to listen
The connection has been established successfully with ('127.0.0.1', 52702)
Client Terminal:
b 'Thank you for connecting!'
Python Web modules
There are many important modules used in Python Network programming. Some of them are listed below:
| Protocol | Port Number | Python Module | Common Function |
| HTTP | 80 | httplib, xmlrpclip, urllib | Web pages |
| FTP | 20 | urllib, ftplib | File transfers |
| NNTP | 119 | nntplib | Usenet news |
| SMTP | 25 | smtplib | Sending E-mail |
| IMAP4 | 143 | imaplib | Fetching E-mail |
| POP3 | 110 | poplib | Fetching E-mail |
| Gopher | 70 | urllib, gopherlib | Document transfer |
| Telnet | 23 | telnetlib | Command lines |