Java Database Connectivity with Oracle
JDBC:
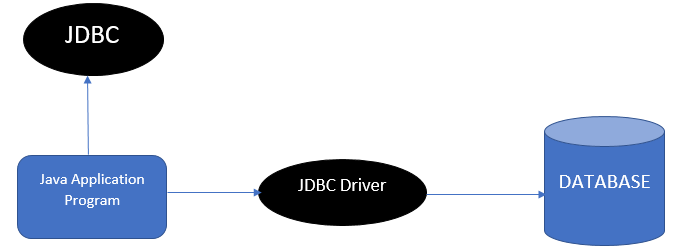
A Programmer can develop a complete application using the Java built-in API’s. So, for storing the data required for solving a real-world problem is stored into a database. To connect the database with the java program, we use JDBC. JDBC stands for Java Database Connectivity.
Out of the 4 available edition of java, JDBC is available in JavaSE (Java Standard Edition). Java Database Connectivity is an API (Application programming Interface), which uses JDBC drivers to connect with the database.
We are available with four types of JDBC drivers:
- JDBC-ODBC bridge Driver
- Native Driver
- Network protocol Driver
- Thin Driver
To connect to the database, we should follow 5 steps.
Step 1: Register the driver class.
Use forName() Method for registering the driver class.
Step 2: Creating the connection to the database.
For creating the connection, we should know the Connection URL, Username and password of the database.
Step 3: Create a Statement.
Step 4: Executing the provided queries.
Using this step, we can pass the queries to work on the database and update the information in the database.
Step 5: Close connection.
The connection which is established should be closed after working with it. This helps in clearing all buffers.
The Java Application is linked with the database by following the above 5 steps.
We are available with many different databases in the market today. Some of the databases are
- MySQL
- Oracle
- MongoDB
- PostgreSQL
JDBC Connectivity with Oracle database:
For establishing a connection of java application with Oracle database, we should follow the above prescribed steps. Considering oracle 10g version, we are looking into the following examples. Before establishing a connection with the java application, we must have the following prerequisites known, which differs for every database.
- We should know the driver class of the database which we are using. The driver class for the Oracle database is oracle.jdbc.driver.OracleDriver.
The driver class is unique for a particular database. - We should also be aware of the Connection URL of the database which we are using. For the Oracle 10G version database, the connection URL is jdbc:oracle:thin:@localhost:1521:xe . In here, the jdbc is an API, oracle is the database, thin is the JDBC driver, localhost is the local server name on which the oracle database is running. The IP address has 1521 as the port number and XE is the Oracle service name. We can get all these information regarding the database from a file named tnsnames.ora file.
- We should know the Username for the oracle database.
- We should know the corresponding password of the database also.
These are the prerequisites which are mandatory for developing a connection with the oracle database.
Database Operations:
We can perform many operations on the database. All the DML (Data manipulation Language) keywords are used to manipulate the data which is stored in the database.
In the database the data is stored in the tabular form. All the properties of the data are allotted as the columns for the table. And rows are added into the database by defining all the columns for a particular row. So, performing operations on the database means that performing operations on various tables present in the database.
Some of the operations which are performed on the database are:
- Creating a table - This operation is done using the create keyword.
- Inserting the rows – This operation is done using the insert keyword.
- Updating the row values – This operation is performed using the update keyword.
- Deleting the rows in the table – This operation is done by using the delete Keyword.
- Altering the columns – This operation is performed using the Alter keyword.
- Removing the table – This operation can be performed using the Truncate keyword.
- Print the data – This operation can be performed using the select keyword.
So, the oracle database queries using these keywords are passed into the java program as the parameters into the executeQuery Method.
Let’s look at a small example java application program which connects to the oracle database.
import java. io. *;
class DatabaseConnectionDemo
{
public static void main (String args[])
{
try
{
//Step 1: Register the driver class
Class.forName (“ oracle.jdbc.driver.OracleDriver “);


//Step 2: Establish the connection.
Connection conn = DriverManager.getConnection (“jdbc: oracle: thin: @localhost: 1521: xe “, “scott”, “tiger”);


//Step 3: Create the statement.


Statement st = conn.createStatement();


//Step 4: Perform operations on the database in the form of queries.


ResultSet rst = st.executeQuery( “ select * from STUDENT “);
// Printing the student ID, student Name, Student Location of all the students from the students table
While (rst.next())
{
System.out.println(rst.getInt(1) + “ “ + rst.getString(2) + “ “ + rs.getString(3));
 }


//Step 5: Close the connection.


conn.close();
}
catch (Exception e)
{
System.out.println( “Exception caught” +e);
}
} //main
} //DatabaseConnectionDemo
OUTPUT:
1011 Akshara Hyderabad
1012 Aarush Warangal
1013 Srihitha Hyderabad.
NOTE:
For connecting the java application with the database, a file should be loaded which is ojdbc14.jar file.
For loading this jar file, there are two possibilities.
1.Set classpath
This includes setting the path for the file. So, this can be done in two ways.
- Temporary path
- Permanent path
Temporary path setting:
At first, search where the ojdbc14.jar file is located. Then open the command prompt and write the following in the command prompt.
C:>set classpath = c:\folder\ojdbc14.jar;.;
folder resembles the folder in which the ojdbc14.jar file is located.
Permanent path setting:
To set a permanent path, the following steps are to be followed.
- Go to the environment variable.
- Click on the new tab.
- Write the classpath in the variable name.
- Paste the path to ojdbc14.jar file by adding ojdbc14.jar;.; in the variable value.
2. Paste the ojdbc14.jar file in JRE / lib / ext folder.
Follow the below steps to load the jar file by pasting the file in the JRE.
- Search the ojdbc14.jar file location.
- Then go to the JRE folder having lib. Then enter the ext file which is present in the lib folder.
- Now paste the jar file here.