How to enable or disable DHCP in Windows?
DHCP stands for Dynamic Host Configuration Protocol. A network protocol enables network devices, such as computers, smartphones, and printers, to dynamically obtain IP addresses and other network configuration parameters. DHCP servers provide IP addresses to network devices automatically, eliminating the need for manual IP configuration.
DHCP allows network administrators to manage and allocate IP addresses more efficiently, reducing conflicts and making adding new devices to the network easier. When a piece of equipment joins a network, The DHCP server receives a request from the client and assigns an IP address and other configuration options, including the subnet mask, default gateway, and DNS servers.
DHCP can be used in various network environments, including small home networks, large corporate networks, and internet service providers (ISPs). It is also widely used in deploying Internet of Things (IoT) devices, which require dynamic IP address allocation to function efficiently.
Why enable or disable DHCP?
Enabling or disabling DHCP depends on the network requirements and the specific scenario.
DHCP is typically enabled in networks where many devices need to be connected, and manually configuring IP addresses for each device would be time-consuming and error-prone. DHCP can automatically allocate IP addresses and other necessary network configuration parameters, making managing the network easier and reducing the possibility of conflicts.
On the other hand, DHCP can be disabled in some cases, such as when a device requires a fixed IP address or when network administrators want to control and manage the IP addresses and other network settings manually. In such cases, a static IP address can be configured on the device to ensure it always has the same IP address, subnet mask, and other network configuration parameters.
How can DHCP be turned on or off in Windows 8 and 10?
To enable or disable DHCP in Windows 8 and 10, you can follow these steps:
- Open the Control Panel by clicking the Start menu and typing "Control Panel" in the search box.
- Click on "Network and Sharing Center."
- Click on "Change adapter settings" in the left-hand menu.
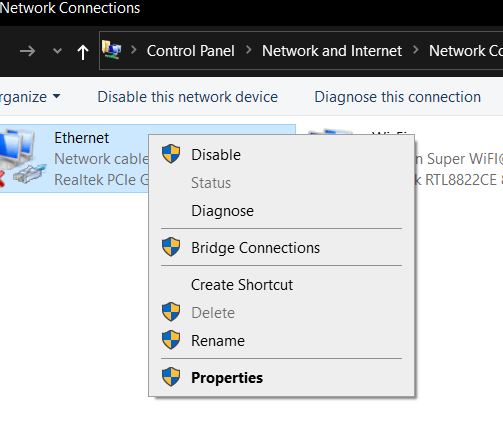
- Right-click on the network connection you want to configure (e.g., Ethernet or Wi-Fi) and select "Properties."
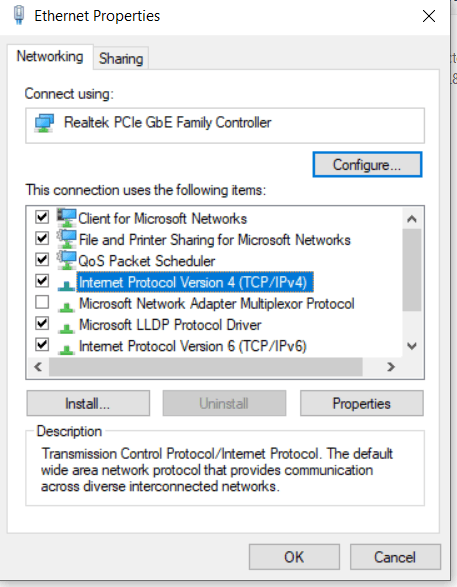
- Internet Protocol Version 4 (TCP/IPv4) should be selected, and the "Properties" button should be clicked.
- In the General tab, select "Obtain an IP address automatically" to enable DHCP or "Use the following IP address" to disable DHCP and enter a static IP address.
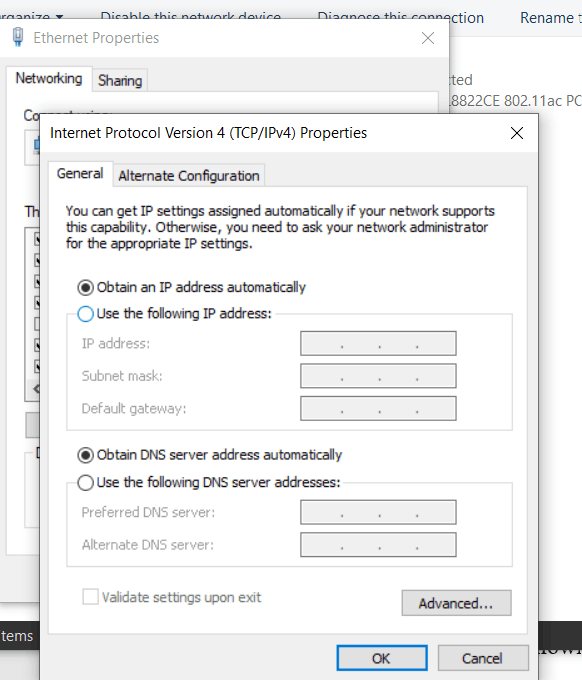
- Given by your network administrator or ISP if you chose to "Use the following IP address" in the field provided.
- Click "OK" to save the changes and close the Properties window.
If you disable DHCP and enter a static IP address, you must manually enter the DNS server addresses in the "Use the following DNS server addresses" section.
How do enabling or disabling DHCP in Windows Vista and Windows 7?
To enable or disable DHCP in Windows Vista and Windows 7, you can follow these steps:
- On the Start button, select "Control Panel."
- Click on "Network and Sharing Center."
- Click on "Change adapter settings" in the left-hand menu.
- Right-click on the network connection you want to configure (e.g., Ethernet or Wi-Fi) and select "Properties."
- Internet Protocol Version 4 (TCP/IPv4)" from the list, then click on the "Properties" button.
- In the General tab, select "Obtain an IP address automatically" to enable DHCP or "Use the following IP address" to disable DHCP and enter a static IP address.
- If you selected "Use the following IP address," type your IP address, followed by your subnet mask and default gateway provided by your network administrator or ISP.
- Click "OK" to save the changes and close the Properties window.
If you disable DHCP and enter a static IP address, you must manually enter the DNS server addresses in the "Use the following DNS server addresses" section.
How can DHCP enable or disable in Windows XP and previous versions?
To enable or disable DHCP in Windows XP and earlier versions, you can follow these steps:
- "Open the Control Panel," which can be found by selecting the Start button.
- Double-click on "Network Connections."
- Right-click on the network connection you want to configure (e.g., Local Area Connection) and select "Properties."
- Select "Internet Protocol (TCP/IP)" and click on the "Properties" button.
- In the General tab, select "Obtain an IP address automatically" to enable DHCP or "Use the following IP address" to disable DHCP and enter a static IP address.
- If you selected "Use the following IP address," key in your IP address, subnet mask, and default gateway provided by your network administrator or ISP.
- Click "OK" to save the changes and close the Properties window.
If you disable DHCP and enter a static IP address, you must manually enter the DNS server addresses in the "Use the following DNS server addresses" section.
Troubleshooting tips:
Here are some general troubleshooting tips that may help you solve common problems:
Check your connections: Ensure all cables and wires are connected securely and correctly. Check that your device is properly plugged in and turned on.
Restart your device: Sometimes, a simple restart can fix many problems. Try restarting your device and see if the issue persists.
Check for software updates: Make sure your software is current. Many problems can be resolved by installing the latest updates. If you think your device may be infected with a virus or malware, do a virus scan, run a virus scan using reputable antivirus software.
Check for conflicting software: Sometimes, two or more software programs may conflict, causing problems. Check for conflicting software and uninstall any that are not needed.
Reset your device to factory settings: If all else fails, try resetting it to its factory settings. All data on the device will be deleted as a result, so be sure to back up any important data before doing so.
Seek help from technical support: If none of the above troubleshooting steps work, seek help from technical support. Many manufacturers have dedicated technical support teams that can assist you with troubleshooting and solving problems.
Advantages of DHCP in Windows:
Dynamic Host Configuration Protocol (DHCP) has several advantages in Windows environments, including:
- Automatic IP address assignment: DHCP automatically assigns By assigning IP addresses to networked devices, manual configuration is no longer necessary. This speeds up the process and lowers the possibility of an IP address configuration error in the IP address configuration.
- Centralized management: DHCP servers can centrally manage IP addresses and other network settings, making it easier to maintain and troubleshoot the network.
- Efficient use of IP addresses: DHCP can reuse IP addresses that are no longer in use, which helps conserve IP addresses and reduces the need for manual IP address management.
- Flexibility: DHCP can assign different IP addresses and network settings to different devices based on their needs and requirements.
- Quick and easy configuration: DHCP allows for quick and easy configuration of network settings, especially in larger networks with many devices.
- Remote administration: DHCP can be administered remotely, which allows for easier management of distributed networks and remote offices.
- Reduces human error: DHCP reduces the likelihood of human error in IP address configuration, which can cause network problems and downtime.
Overall, DHCP simplifies network administration, reduces errors, and makes managing IP addresses and network settings in Windows environments easier.
Disadvantages of DHCP in Windows:
While DHCP has several advantages, there are also some potential disadvantages in Windows environments, including:
- Single point of failure: If the DHCP server fails, devices on the network may not be able to obtain IP addresses or connect to the network.
- Security risks: DHCP can be vulnerable to security risks, such as rogue DHCP servers or unauthorized devices connecting to the network.
- Limited control over IP address allocation: With DHCP, the IP addresses are assigned dynamically, which can limit control over IP address allocation, leading to conflicts or IP address exhaustion.
- Slow boot process: During the boot process, devices must obtain an IP address from the DHCP server before connecting to the network. Whenever the DHCP server is sluggish, this can cause a delay in the boot process.
- Network complexity: DHCP adds complexity to the network infrastructure, making it more difficult to troubleshoot problems and perform maintenance.
- DNS and DHCP integration: DNS and DHCP are often integrated to simplify network administration. However, this integration can also create problems if misconfigured, leading to issues with name resolution or IP address allocation.