How to View or Change the Screen Resolution of a Monitor?
The images you see on your computer screen are made up of "pixels," millions of minimal components. These pixels produce the colors, patterns, and videos you see on your monitor. The number of pixels in a grid, both horizontally and vertically counted, is used to determine the resolution of these pixels. With more pixels in the grid, your resolution becomes clearer or of higher quality.
For many computer-related activities, especially those requiring fine detail, screen resolution is crucial. For instance, when editing images, even the smallest changes are necessary. The screen will need to be adjusted to adequately display intricate details that only the most advanced screen resolution can offer, such as changing a line here or a color there.
Viewing or changing display resolution in Windows 11
- Type “Settings” in the Windows search bar
- If it is not already chosen, select the System option from the left navigation menu in the Settings box.
- Choose the Display option from the Settings window's right side.
- The current screen resolution is listed under Display resolution in the Scale & layout section.
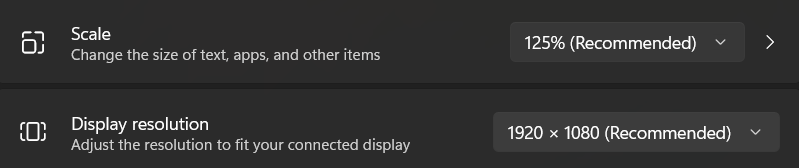
- Click the down arrow next to the Display resolution box and choose a new choice from the drop-down menu to alter the display resolution.
The resolution in the drop-down menu that has (Recommended) next to it is the native resolution of your display.
The maximal resolution your monitor can display is indicated by the dimensions at the top of the menu.
Note: Each monitor that is connected to your computer is displayed next to the "Detect" and "Identify" buttons if you have more than one monitor there.
The size of the entire image decreases when the resolution is increased. However, when more pixels are visible on the screen, the image quality improves. On a 4K panel, for instance, a resolution of 3840 x 2160 provides better image quality and appears smaller than a resolution of 1920 x 1080.
Viewing or changing display resolution in Windows 10
- Type Settings into the Windows key search and then press Enter.
- Select the System tab.
- If it isn't already selected, click the Display option in the System section of the Settings window's left side.
- The current screen resolution is listed under Display resolution in the Scale & layout section.
- Click the down arrow next to the Display resolution box and choose a new choice from the drop-down menu to alter the display resolution.
Viewing or changing display resolution in Windows Vista, 7 and 8
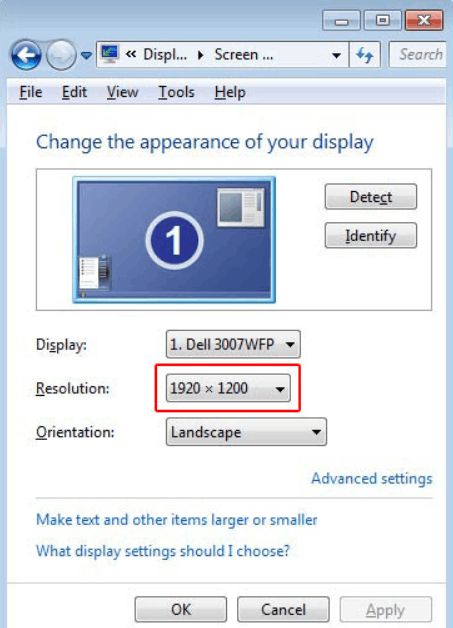
- Open the Control Panel in Windows Vista or Windows 7, then select the Adjust Screen Resolution option under Appearance and Personalization.
- Right-click a blank space on the desktop in Windows 8 and choose Screen Resolution from the pop-up menu.
- The current display resolution is displayed in the box next to Resolution in the Screen Resolution window that pops up.
Setting the video resolution in Windows 95, 98, ME, 2000, and XP
- The First step is to open the Control panel.
- Choose the Display option.
- The dimensions behind the slider in the Screen area section show the current screen resolution.
- Move the slider to the left or right, click Apply, and then click OK to alter the display resolution.
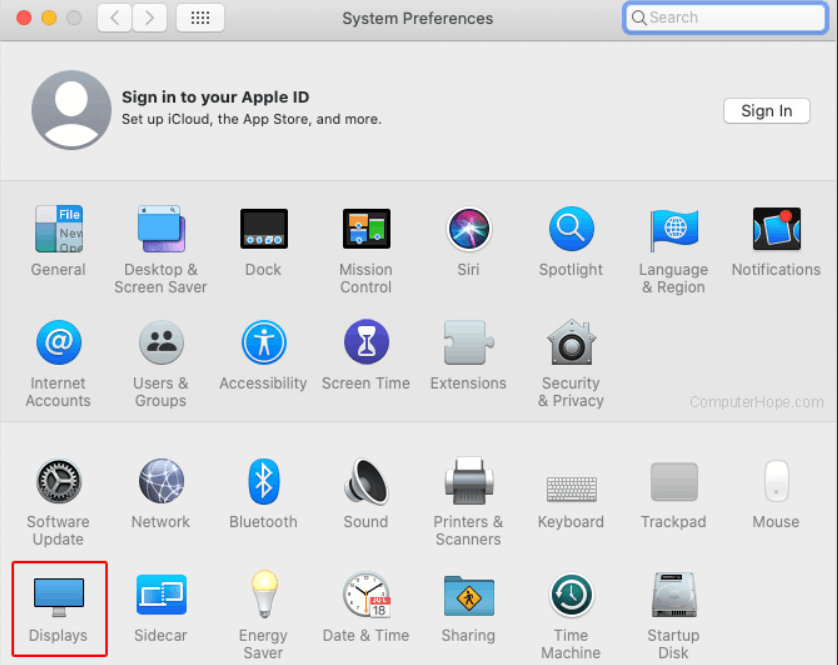
Viewing or changing the screen resolution in macOS
The steps listed below can be used to check or alter the screen resolution on your iMac or MacBook.
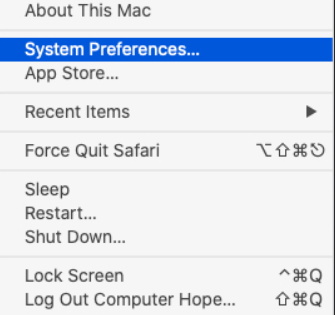
- To access the Apple menu, click the Apple icon in the menu bar.
- Go to System Preferences under the Apple menu.
- Select Displays from the list of options in the System Preferences window.
- Make sure the Display tab is chosen at the top of the following window. Then click the button next to Scaled while continuing to hold down the option key.
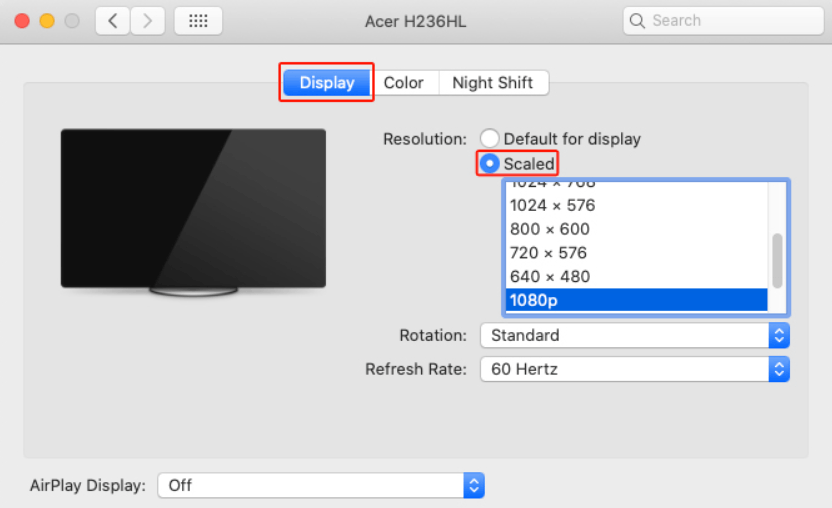
- The screen's current resolution is indicated by the number that is highlighted in blue when you first expand the Scaled menu.
Tip
By selecting the desired choice from the Rotation drop-down menu, you may also alter the orientation of the screen display or return it to its default position.
Viewing or changing display resolution in Chrome OS
The steps listed below can be used to view or modify the screen resolution in Chrome OS on a Chromebook.
- Click the rectangle box with the time, Wi-Fi, and battery icons at the bottom-right corner of the Chromebook's display.
- Click the Settings option in the supplementary menu window that displays.
- Enter "display" in the Search Settings text box, then select the Displays option under the Devices header.
- To raise or lower the screen resolution, adjust the slider for the Resolution setting to the right or left.