How to Reset CMOS or BIOS Settings?
If the system is having issues booting, experiencing errors during boot, or having other anomalous issues that cannot be fixed. You will need to access the BIOS setup utility on your computer to reset CMOS or BIOS settings. This can typically be done by pressing a key (such as F2 or Del) during the boot process. Once in the BIOS setup utility, navigate to the option to reset the CMOS or BIOS settings. This may be labeled as "Restore defaults," "Factory reset," or something similar. Confirm the reset and save the changes before exiting the BIOS setup utility. Restart your computer for the changes to take effect. Try resetting the CMOS settings to the default values as described below.
Methods to Reset CMOS or BIOS Settings
- Using the BIOS Setup Utility
- Using the CMOS Jumper
- Using the CMOS Reset Button
- Using Windows Command Prompt
- Using Windows System Recovery
1) Using the BIOS Setup Utility
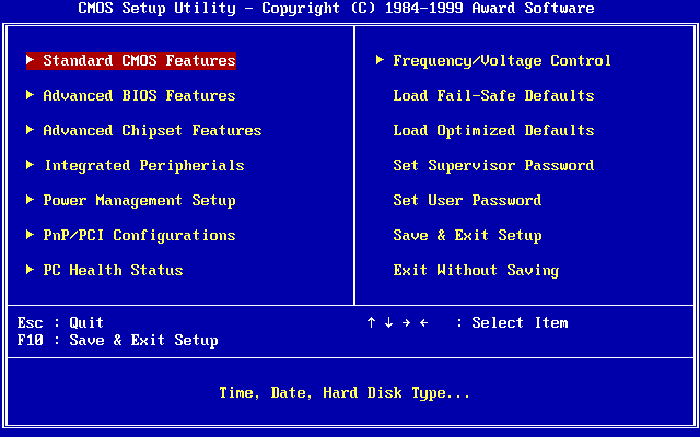
The BIOS (Basic Input/Output System) is a firmware program that controls the basic functions of your computer, such as booting up and managing system hardware. The BIOS Setup Utility is a program that allows you to configure and manage the BIOS settings on your computer. By accessing the BIOS Setup Utility, you can reset the CMOS or BIOS settings to their default values.
Here is a step-by-step guide on how to use the BIOS Setup Utility to reset CMOS or BIOS settings:
- Turn off your computer and unplug the power cord from the power outlet.
- Press the appropriate key to enter the BIOS setup utility during the boot process. This key may be labeled as "Delete," "F2," "F12," or "Esc," depending on the motherboard manufacturer and model. The key to enter the BIOS setup utility will be displayed on the screen during the boot process, usually at the bottom or top of the screen.
- Once you enter the BIOS setup utility, use the keyboard arrow keys to navigate through the options. Look for the option to restore the default settings or factory reset. This option may be labeled as "Load Defaults," "Load Optimized Defaults," "Factory Defaults," or something similar.
- Press the Enter key to select the option to restore the default settings or factory reset. A confirmation message may appear, asking you to confirm the reset.
- Press the Enter key again to confirm the reset. This will restore the CMOS or BIOS settings to their default values.
- Once the reset is complete, navigate to the "Save & Exit" or "Exit" option, and press the Enter key.
- A message may appear asking you if you want to save the changes. Press the Enter key to save the changes.
- The computer will then restart, and the new settings will take effect.
It is important to note that resetting the CMOS or BIOS settings may erase all custom settings and configurations, and will cause all the password or security settings to be deleted, so make sure that you have backup all the important information before proceeding.
Also, the process may vary depending on the motherboard model and manufacturer. Always check the motherboard manual for specific instructions, or consult with the manufacturer's website for more information.
2) Using the CMOS Jumper
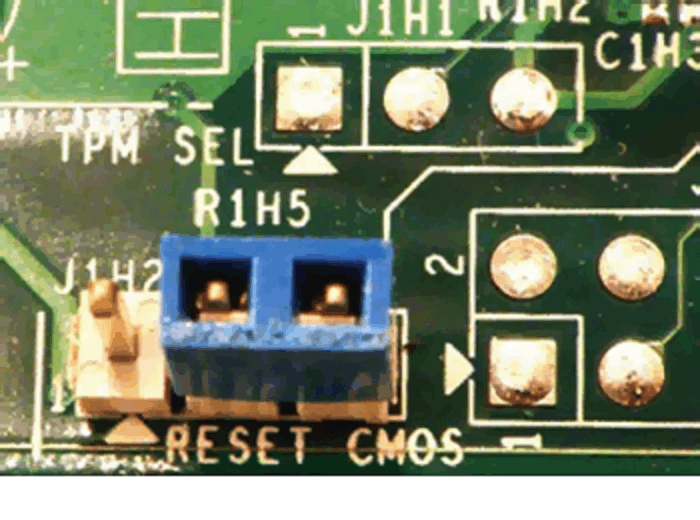
The CMOS (Complementary Metal-Oxide-Semiconductor) jumper, also known as the NVRAM (Non-Volatile Random Access Memory) jumper, is a small switch or set of pins located on the motherboard of a computer. It is used to clear or reset the CMOS memory, which stores the system's BIOS (Basic Input/Output System) settings.
Here are the detailed steps to reset the CMOS or BIOS settings using the CMOS jumper:
- Locate the CMOS jumper: The location of the CMOS jumper can vary depending on the motherboard. It is usually located near the battery. You can consult the motherboard manual or the manufacturer's website for specific instructions on where to find the jumper.
- Power off the computer and unplug it from the wall: Before working on any internal component of the computer, it is important to power it off and unplug it from the wall to avoid any electrical hazards.
- Remove the computer's cover: Carefully remove the cover of the computer to access the internal components.
- Locate the CMOS jumper: Carefully locate the CMOS jumper on the motherboard. It should be labeled as "CMOS" or "NVRAM"
- Move the jumper to the "clear" or "reset" position: The clear or reset position of the jumper can vary depending on the motherboard, consult the manual or the website of the manufacturer. Once you have determined the position, move the jumper from its current position to the "clear" or "reset" position.
- Wait for a few seconds: Leave the jumper in the clear or reset position for a few seconds.
- Move the jumper back to its original position: After a few seconds, move the jumper back to its original position.
- Replace the computer's cover and reconnect power: Replace the cover of the computer and reconnect the power cable.
- Turn on the computer: Turn on the computer and go through the process of re-entering the system date and time, and any other custom settings you may have made before.
Note: Before doing any reset, it is recommended to backup any important data or settings you have made in your system.
3) Using the CMOS Reset Button
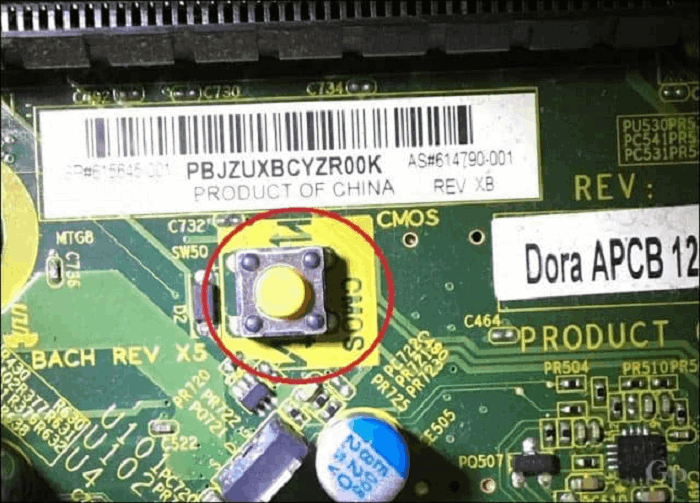
The CMOS (Complementary Metal-Oxide-Semiconductor) reset button, also known as the BIOS (Basic Input/Output System) reset button, is a small button located on the motherboard of a computer. It is used to clear or reset the CMOS memory, which stores the system's BIOS settings.
Here are the detailed steps to reset the CMOS or BIOS settings using the CMOS reset button:
- Locate the CMOS reset button: The location of the CMOS reset button can vary depending on the motherboard. It is usually located near the battery. You can consult the motherboard manual or the manufacturer's website for specific instructions on where to find the button.
- Power off the computer and unplug it from the wall: Before working on any internal component of the computer, it is important to power it off and unplug it from the wall to avoid any electrical hazards.
- Remove the computer's cover: Carefully remove the cover of the computer to access the internal components.
- Locate the CMOS reset button: Carefully locate the CMOS reset button on the motherboard. It should be labeled as "CMOS" or "BIOS"
- Press and hold the CMOS reset button: Press and hold the CMOS reset button for a few seconds.
- Release the button: Release the button.
- Replace the computer's cover and reconnect power: Replace the cover of the computer and reconnect the power cable.
- Turn on the computer: Turn on the computer and go through the process of re-entering the system date and time, and any other custom settings you may have made before.
Note: Before doing any reset, it is recommended to backup any important data or settings you have made in your system. Also, not all motherboards have this button. It is important to check the manual or the website of the manufacturer to confirm whether this feature is available on your motherboard.
4) Using Windows Command Prompt
It is possible to reset the CMOS or BIOS settings using the Windows Command Prompt, but please be aware that this method is not recommended, and it should be used with caution, as it may cause damage to the system if not done correctly.
Here are the steps to reset the CMOS or BIOS settings using the Windows Command Prompt:
- Open the Command Prompt: Press the Windows key + X, and then select Command Prompt (Admin)
- Type the following command: "Shutdown /r /o" and press Enter. This command will restart the computer and take it to the Windows Advanced startup options.
- Select Troubleshoot: Select Troubleshoot on the Windows Advanced startup options menu.
- Select Advanced options: Select Advanced options from the Troubleshoot menu.
- Select UEFI Firmware Settings: Select UEFI Firmware Settings from the Advanced options menu
- Restart the computer: Select Restart to restart the computer and enter the UEFI firmware settings.
- Locate the option to reset the BIOS settings: In the UEFI firmware settings, locate the option to reset the BIOS settings to default. This option can vary depending on the manufacturer. It could be under the "Maintenance" or "Advanced" section.
- Confirm the action: Confirm the action to reset the BIOS settings to default.
- Save changes and exit: Save the changes and exit the UEFI firmware settings.
- Complete the setup: Follow the on-screen instructions to complete the setup. You will be prompted to set the date and time and any other custom settings you may have made before.
It is most important to note that before doing any reset, it is recommended to backup any important data or settings you have made in your system. Also, not all motherboards have this option in the UEFI firmware settings. It is important to check the manual or the website of the manufacturer to confirm whether this feature is available on your motherboard.
5) Using Windows System Recovery
It is possible to reset the CMOS or BIOS settings using Windows System Recovery. Still, be aware this method is not recommended, and it should be used with caution, as it may erase all personal data and installed programs on the system if not done correctly.
Here are the detailed steps to reset the CMOS or BIOS settings using the Windows System Recovery:
- Insert the Windows Installation Media: Insert the Windows installation media (e.g., DVD or USB drive) into the computer and restart it.
- Press the appropriate key to enter the boot menu: Press the appropriate key to enter the boot menu. This key can vary depending on the computer. It is usually F12 or Esc.
- Select the Windows installation media: Select the Windows installation media from the boot menu.
- Press any key to boot from the installation media: Press any key to boot from the installation media.
- Select your language: Select your language and other preferences, then click Next.
- Click on "Repair your computer": Click on "Repair your computer" in the bottom left corner of the screen.
- Select "Troubleshoot": Select "Troubleshoot"
- Select "Reset this PC": Select "Reset this PC"
- Select "Remove Everything": Select "Remove Everything"
- Choose the option to reset the PC: Choose the option to reset the PC and follow the on-screen instructions.
- Confirm the action: Confirm the action to reset the PC
- Wait for the process to complete: Wait for the process to complete. This may take some time.
- Complete the setup: Follow the on-screen instructions to complete the setup. You will be prompted to set the date and time and any other custom settings you may have made before.
Note: All these above methods may vary depending on the motherboard model and manufacturer. Always check the motherboard manual for specific instructions.
Here the some default settings as explained below:
1. Load or Reset defaults
The steps provided are correct for resetting the CMOS or BIOS settings to their default values.
Here is a summary of the steps:
- Enter CMOS setup: This is typically done by pressing a key during the boot process (usually Del, F1, F2, F10, or Esc) to enter the BIOS setup utility.
- Look for an option to reset the CMOS values: In the CMOS setup, look for an option to reset the CMOS values to the default setting or an option to load the fail-safe defaults. This option may be a function key (e.g. F5, F6, F9, F11, or F12) or listed as an option that can be arrowed over to using the arrow keys.
- Confirm the action: When prompted, confirm that you want to load the defaults by pressing Y for yes or selecting the yes option.
- Save and Exit: Once the default values are set, make sure to save the changes and exit the CMOS setup.
Note: Loading or resetting the defaults will erase all custom settings and restore the BIOS or CMOS settings to their original factory settings, so it's important to backup any important data or settings before proceeding. Also, the key to enter the CMOS setup may vary depending on the motherboard manufacturer, so it's important to check the manual or the website of the manufacturer to confirm the key.
2. Reset configuration data
Resetting configuration data refers to the process of returning a device or system to its original factory settings. This means that all of the custom settings, configurations, and personal data that have been added to the device since it was first purchased will be removed.
The steps to reset configuration data can vary depending on the device or system you are using. Here are general steps that can be used as a guide:
- Backup of all important data: Before resetting the configuration data, it's important to backup all your important files, documents, photos, and any other data you want to keep. This is because all the data on the device will be erased during the reset process.
- Locate the reset option: Depending on the device, you may find the reset option in different places. On a smartphone, it's usually found in the settings menu. On a laptop or desktop computer, it's usually found in the recovery or system options.
- Initiate the reset process: Once you have located the reset option, select it and follow the prompts to initiate the reset process. Be sure to read any warning messages carefully before proceeding.
- Wait for the reset to complete: The reset process may take a few minutes or longer, depending on the device and the amount of data on it.
- Restore your data: After the reset is complete, you can restore the data that you have created back up before.
3. Hard reset the CMOS

A Hard reset of the CMOS (Complementary Metal-Oxide-Semiconductor) refers to the process of clearing the stored settings of the computer's BIOS (Basic Input/Output System) and returning it to the default factory settings. This can help to resolve issues such as a malfunctioning system, incorrect settings, or a forgotten BIOS password.
Here are the general steps to perform a hard reset of the CMOS:
- Shut down the computer: Before starting the process, make sure to shut down the computer and unplug it from the power source.
- Locate the CMOS battery: The CMOS battery is usually located on the motherboard of the computer, near the BIOS chip. It's a small, circular battery, similar in appearance to a watch battery.
- Remove the CMOS battery: Carefully remove the CMOS battery by gently pressing down on the locking tab and then pulling the battery out. This will disconnect power from the BIOS, allowing you to reset it.
- Wait for a few minutes: Leave the battery out for about 5-10 minutes to ensure that the power is completely drained from the BIOS.
- Replace the CMOS battery: Replace the CMOS battery in its original location, making sure that it is properly seated and locked in place.
- Plug in the computer: Plug in the computer and turn it on. The BIOS will automatically reset to its default settings.
- Configure the BIOS settings: After the computer has rebooted, you'll need to reconfigure the BIOS settings to match your hardware and preferences.
Note: A hard reset of the CMOS will erase all custom settings and configurations that have been made to the BIOS, such as date and time, boot order, and system passwords. Make sure to backup all the important data before performing these step.