How to install a Hard Drive or SSD?
Installing a hard drive or SSD is a relatively simple process that can significantly increase the storage capacity and performance of your computer. Whether you are looking to add a new drive or replace an existing one, this guide will provide step-by-step instructions to help you get started.
Before you begin, it is essential to have the necessary tools and equipment. You will need a screwdriver, a compatible hard drive or SSD, and the appropriate cables (SATA or IDE). If you are not sure which type of cable you need, refer to your computer's manual or consult a professional.
Step 1: Power off your computer
Before you start working on your computer, shut it down properly and unplug it from the power source. This will ensure your safety and prevent damage to your computer or the hard drive.
Step 2: Open the computer case
Next, you must open the computer case to access the hard drive bay. The location of the hard drive bay may vary depending on your computer's model and make. Refer to your computer's manual or consult a professional if unsure.
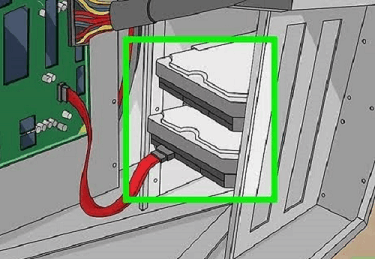
Step 3: Locate the hard drive bay
Once you have opened the computer case, locate the hard drive bay where you will install the new drive. The hard drive bay is usually a metal frame that holds the hard drive in place.
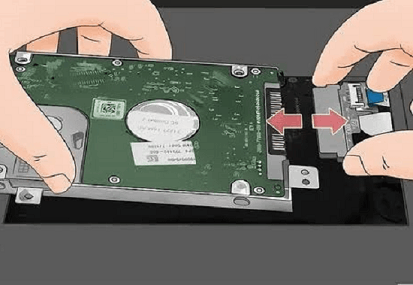
Step 4: Mount the hard drive
To install the hard drive, slide it into the hard drive bay and align the screw holes with the holes on the metal frame. Use screws to secure the hard drive in place. Make sure the hard drive is firmly attached to the frame to prevent any movement or vibrations.
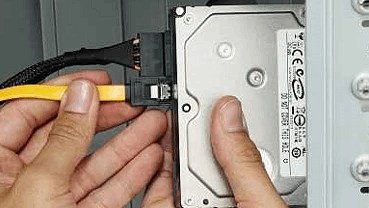
Step 5: Connect the cables
The next step is to connect the SATA or IDE cables to the hard drive and the motherboard. The SATA cable is a thin, flat cable that connects to the SATA port on the motherboard and the SATA port on the hard drive. The IDE cable is a wider cable that connects to the IDE port on the motherboard and the IDE port on the hard drive.
Step 6: Connect the power cable
Finally, connect the power cable to the hard drive. The power cable is a wide, four-pin connector that connects to the power supply unit (PSU) and the hard drive. Ensure the power cable is securely attached to the hard drive for a stable connection.
Step 7: Close the computer case
Once you have connected all the cables, close the computer case and secure it with screws. Make sure all the cables are neatly arranged and not obstructing any other components.
Step 8: Power on your computer
After you have installed the new hard drive or SSD, it's time to power on your computer and check if everything is working correctly. If the hard drive is not detected, make sure all the cables are securely connected and check the BIOS settings.
In conclusion, installing a hard drive or SSD is a straightforward process that can significantly improve your computer's performance and storage capacity. Just follow these simple steps, and you will have your new drive up and running quickly.
Different ways of Installing
There are several different ways to install a hard drive or SSD, depending on your specific needs and preferences. Here are some of the most common methods:
Replacing an existing hard drive: If you are replacing an existing hard drive or SSD, the process is relatively simple. You will need to remove the old drive and install the new one in its place. This typically involves disconnecting the cables, removing the screws that hold the drive in place, and sliding the drive out of the bay. Then, you can install the new drive using the same method, connecting the cables securely.
Adding a second hard drive: If you want to add a second hard drive or SSD to your computer, you will need to locate an available hard drive bay or install an additional bay. This may involve removing other components or rearranging the existing components to create space for the new drive. Once you have installed the new bay, you can install the drive in the same way as described above.
Installing a hard drive in an external enclosure: If you want to use a hard drive or SSD as an external drive, you can purchase an external enclosure and install the drive inside. This involves connecting the drive to the enclosure using the appropriate cables and securing it with screws or clips. Then, you can connect the enclosure to your computer using a USB or Thunderbolt cable.
Using a docking station: A docking station is a device that allows you to connect a hard drive or SSD to your computer without installing it inside the computer. This is useful if you want to access data from a different hard drive or SSD without installing it permanently. To use a docking station, you simply insert the drive into it and connect it to your computer using a USB or Thunderbolt cable.
Installing a hard drive in a RAID array: If you want to set up a RAID array to improve performance or create redundancy, you must install multiple hard drives or SSDs in your computer. The process of installing the drives will depend on the type of RAID array you are using and the specific requirements of your computer. You may need to configure the RAID settings in your BIOS or use special software to set up the array.
Overall, installing a hard drive or SSD will vary depending on your specific needs and the type of installation you are performing. However, the basic steps involve connecting the drive to your computer, securing it in place, and connecting the appropriate cables. With a little patience and the right tools, you can install a new hard drive or SSD and enjoy improved performance and storage capacity quickly.
Tips for installing Hard Drive or SSD
Installing a hard drive or SSD can be a relatively simple process, but there are some important tips to keep in mind to ensure a successful installation. Here are some tips to help you install a hard drive or SSD:
- Check compatibility: Before purchasing a hard drive or SSD, ensure it is compatible with your computer's motherboard, BIOS, and operating system. Check the specifications of your computer and the hard drive or SSD to ensure they are compatible.
- Choose the right size: Make sure the hard drive or SSD fits in the available hard drive bay or external enclosure. Check the size of the bay or enclosure and the dimensions of the hard drive or SSD before making a purchase.
- Handle the drive carefully: Hard drives and SSDs are delicate electronic devices easily damaged by static electricity, physical shock, or other factors. Handle the drive carefully and avoid touching the electronic components.
- Secure the drive properly: Ensure the hard drive or SSD is securely installed in the bay or enclosure and firmly attached with screws or clips. This will prevent it from moving or vibrating while in use.
- Connect the cables properly: Ensure that all cables are properly connected to the hard drive or SSD, the motherboard, and the power supply unit. Make sure the cables are not obstructing any other components and that they are securely attached.
- Configure the BIOS settings: If you install a new hard drive or SSD, you may need to configure the BIOS settings to detect the new drive. Refer to your computer's manual for instructions on how to do this.
- Test the drive: After installing the hard drive or SSD, test it to ensure it works properly. Check for any errors or issues and make any necessary adjustments.
By following these tips, you can ensure a successful installation of your new hard drive or SSD and enjoy improved performance and storage capacity for your computer.
Advantages of installing Hard Drive and SSD
Installing a hard drive or SSD can provide several advantages for your computer. Here are some of the main advantages:
Increased storage capacity: Installing a hard drive or SSD can increase the storage capacity of your computer, allowing you to store more files, documents, photos, and videos.
Improved performance: SSDs are faster than traditional hard drives, which can lead to improved performance in your computer. Applications and files can load faster, and your computer may boot up faster.
Reduced boot and load times: Because SSDs have no moving parts, they can boot up and load files much faster than traditional hard drives. This means you can wait less for your computer to start or for files to load.
Enhanced durability: SSDs have no moving parts, which makes them more durable and less prone to physical damage than traditional hard drives. This means they can be a good choice for laptops or other portable devices that are frequently moved or jostled.
Lower power consumption: SSDs require less power to operate than traditional hard drives, which can lead to longer battery life in laptops and other portable devices.
Quieter operation: Because SSDs have no moving parts, they operate more quietly than traditional hard drives, which can reduce noise levels in your workspace or home.
Overall, installing a hard drive or SSD can provide several benefits for your computer, including increased storage capacity, improved performance, faster boot and load times, enhanced durability, lower power consumption, and quieter operation.
Important point about installing Hard Drive or SSD
Check the warranty: Check the warranty information for the hard drive or SSD you are installing. Some manufacturers may require professional installation to maintain the warranty.
Consider an external enclosure: If you are installing a hard drive or SSD as an external storage device, consider purchasing an external enclosure to protect the drive and make it portable.
Consider upgrading your RAM: Installing a hard drive or SSD can improve your computer's performance, but upgrading your RAM can also have a significant impact on performance.
Check the drive's speed: When purchasing an SSD, pay attention to the drive's speed, which is measured in megabytes per second (MB/s) for read and write operations. Higher speeds can provide better performance.
Consider a RAID configuration: If you require additional storage capacity or data redundancy, consider setting up a RAID configuration using multiple hard drives or SSDs.
Follow safety precautions: Before installing a hard drive or SSD, make sure to follow proper safety precautions, such as disconnecting the power supply and wearing an anti-static wristband.
Consider professional installation: If you are uncomfortable installing a hard drive or SSD, consider seeking professional installation from a computer repair service.
By considering these, you can ensure a successful installation of your hard drive or SSD and optimize your computer's performance and storage capacity.
How to install a Hard drive in RAID Array
Installing a hard drive in a RAID array can provide additional storage capacity and data redundancy for your computer. Here's how to install a hard drive in a RAID array:
Choose the right RAID configuration: There are several RAID configurations to choose from, each with its own advantages and disadvantages. Decide on the RAID configuration that best suits your needs.
Install the RAID controller: If your computer does not have a built-in RAID controller, you will need to install one. Follow the manufacturer's instructions for installing the controller.
Install the hard drive: Install the hard drive in the available hard drive bay or external enclosure, following the same steps as for a standard hard drive installation.
Configure the RAID controller: Enter the RAID controller setup menu and configure the RAID array according to the manufacturer's instructions. Select the newly installed hard drive as part of the RAID array.
Initialize the RAID array: After configuring the RAID array, initialize it using the RAID controller software. This process will erase all data on the hard drives in the RAID array, so make sure to back up any important data before initializing the array.
Test the RAID array: After initializing the RAID array, test it to ensure that it is working properly. Check for any errors or issues and make any necessary adjustments.
Monitor the RAID array: Once the RAID array is set up and functioning properly, monitor it regularly to ensure that all hard drives are functioning properly and that data is being stored correctly.
By following these steps, you can successfully install a hard drive in a RAID array and enjoy additional storage capacity and data redundancy for your computer.
Summary
In summary, installing a hard drive or SSD can provide significant benefits for your computer, including increased storage capacity, improved performance, and faster boot times. It's important to choose the right type of drive, handle it carefully, secure it properly, and connect the cables correctly. Additionally, you should consider backing up your data, cloning your existing drive, and checking the warranty information. If you're installing a hard drive in a RAID array, you'll need to choose the right RAID configuration, install a RAID controller if necessary, configure the RAID controller, initialize the RAID array, test it, and monitor it regularly. By following these steps and best practices, you can successfully install a hard drive or SSD and optimize your computer's performance and storage capacity.