How to erase my hard drive and start over
The computer is set to default settings with the help of system restore disc. The reset or format in a computer eliminates the issues related to the software installed into a computer, including the corrupted files due to many possibilities, and also eliminates virus infections.
One important thing to remember is that the restore erases the whole data that the hard drive contains and makes it empty. When the user wants to keep the important files' data, the best choice is to back up the data before the restore.
Erase the hard drive and reinstall the windows
There are many windows versions and their erasing and reinstalling are different as follows:
Windows 11
The steps for uninstalling and reinstalling windows 11.
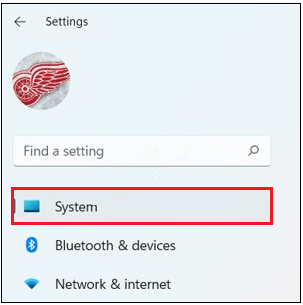
- Click on the start menu.
- Click on the settings from the menu.
- Choose the system option from the settings window.
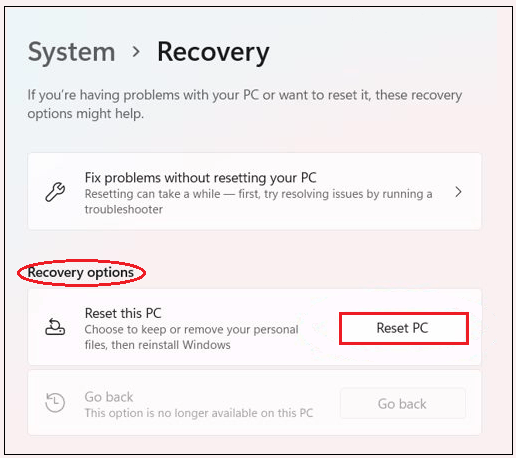
- Click on the Recovery option from the right side of the window.
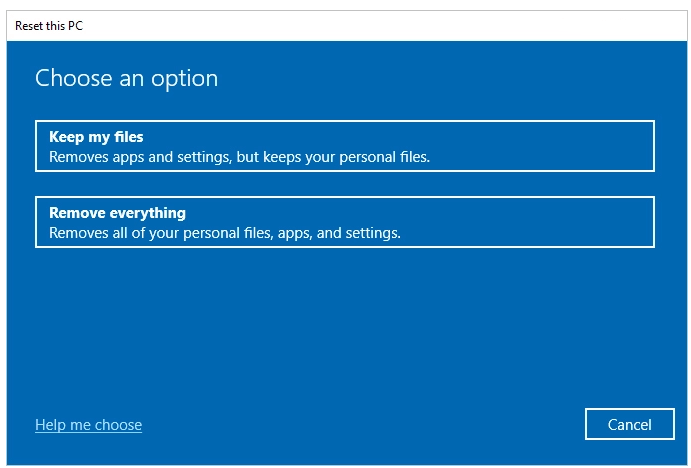
- Click on the Reset PC option under Recovery options.
- Select the “Keep my files” or “Remove everything” option, depending on the user's demand.
- Go along with the prompt windows that pop up to begin the recovery. Then the resetting of windows is done, keeping the files or deleting them based on the option you chose.
Windows 10
The steps for uninstalling and reinstalling windows 10.
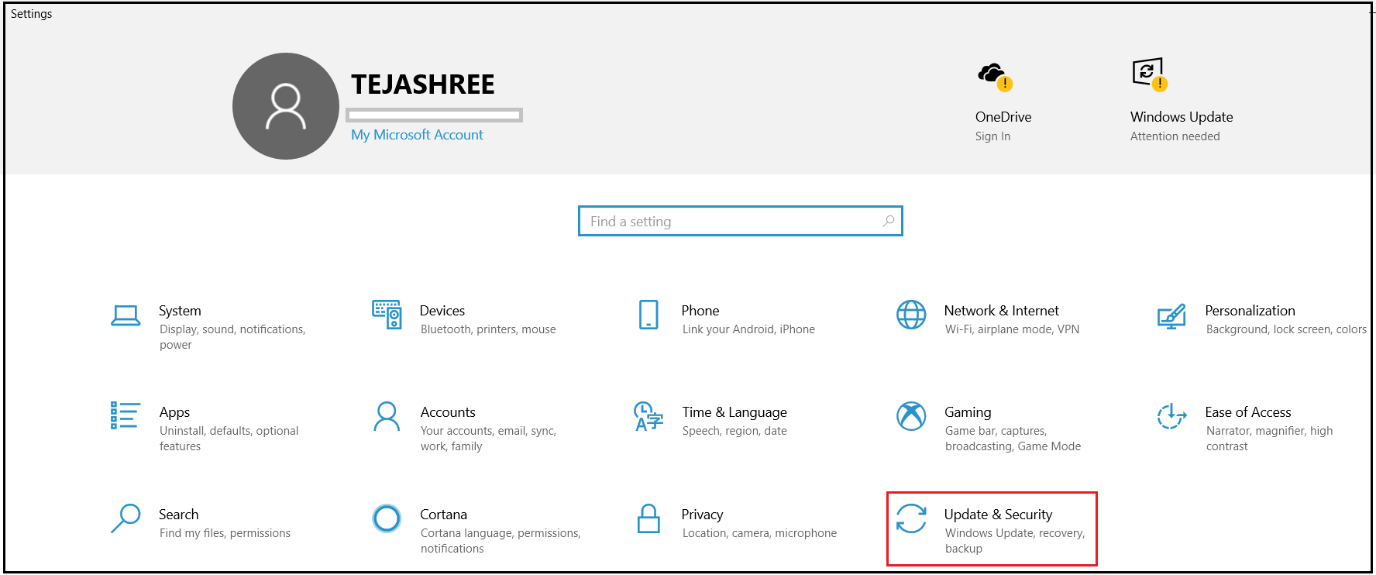
- Select the start, then click on the Settings menu.
- From the settings window, click on Update & Security.
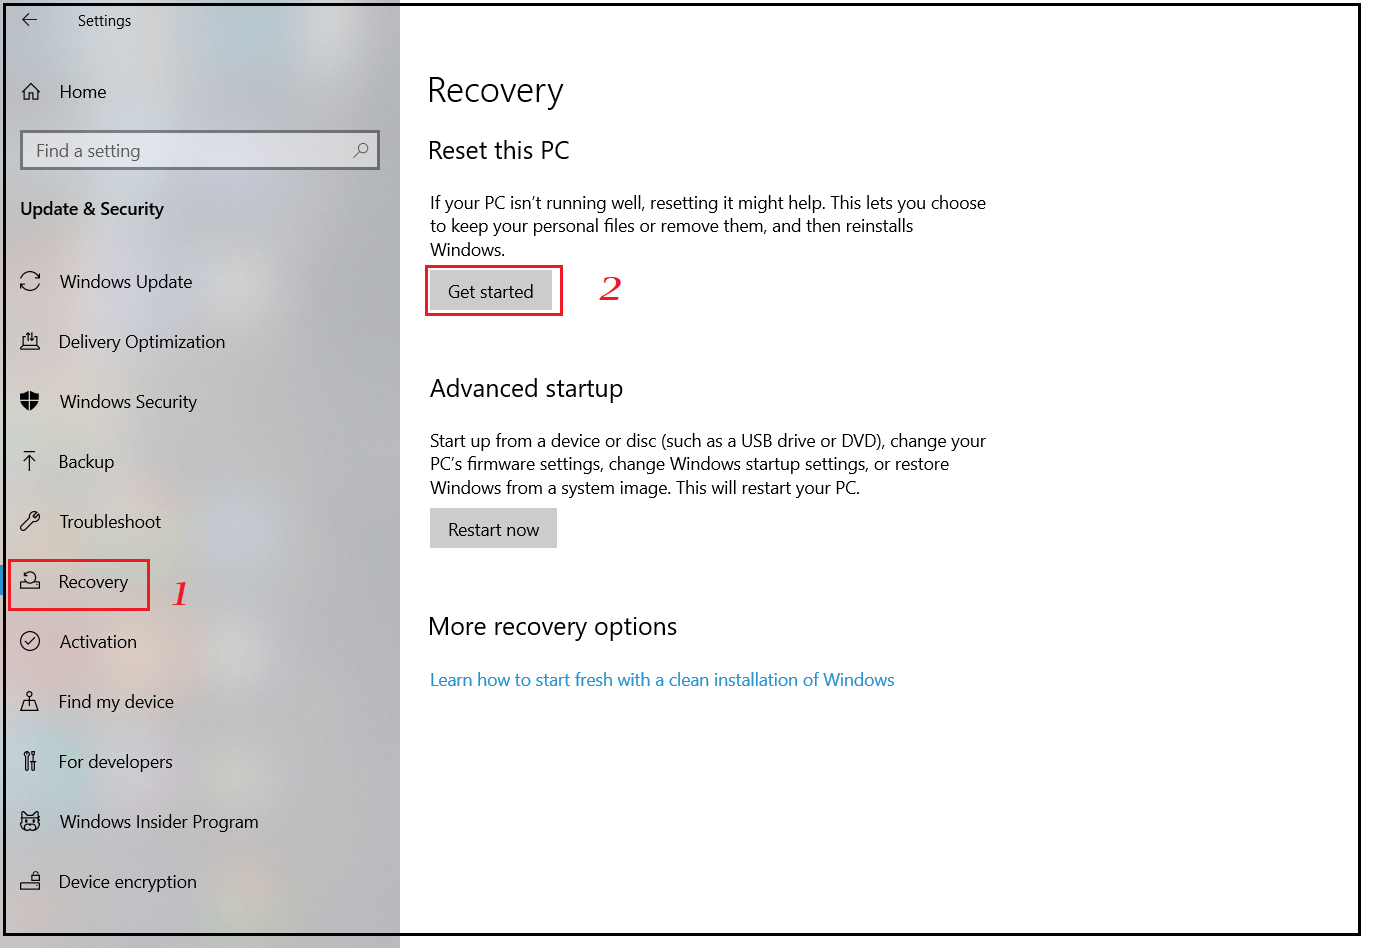
- Click on the “Recovery” in the left window and select the Get started button.
- Select the “Keep my files” or “Remove everything” option according to the user’s demand.
- Go along with the prompts to do the recovery process. When the recovery process is completed, windows are reset accordingly.
Windows 8
The steps for uninstalling and reinstalling windows 8.
- Open the Charms menu for this press the Windows + C keys on the keyboard.
- Click on the search option in the window. In the Search text field, write “reinstall”.
- Click on the Settings option.
- On the left navigation pane, click on Remove everything and reinstall Windows.
- Select “next” option on the Reset your PC screen.
- Click on the Do you want to clean your drive screen fully, then, based on the user's choice, select remove my files for quick deletion. Else, click Fully clean the drive to erase the files in full.
- Finally, click Reset on the Ready to reset your PC.
Depending on the selected option by the user, files will be deleted from the hard drive when windows 8 is installed.
Windows 7 and Vista
A set of the restore disks must be there for the computer to restore the windows 7 or Vista computer hardware.
Users can also contact the manufacturer to order the restore disks when they do not have them in hand.
| From the CD-ROM drive, the user must set the computer to boot in beforehand while following the steps to erase the hard drive. |
- Reboot the computer after placing the Windows 7 or Vista installation CD into the CD-ROM drive.
- The note is "Press any key to boot from CD," then select any key on the keyboard.
- Windows Setup welcome screen is seen. In that, press enter.
- Press any key on the keyboard when the process is completed.
- Next, the "Install Windows screen" is seen in that choose the preferred language along with other preferences and click Next.
- Then accept the conditions on the License Agreement screen, and select Next.
- Select the “Custom” option on the screen.
- Choose the Drive Options(advanced).
- Should delete all partitions for Disk 0. Then after the deletion, "Unallocated space," a single-entry name, should be seen.
- Select Disk 0, and click Next.
Now the windows installation begins and the formatting deletes the hard drive content.
Windows XP and 2000
Windows 7 and Windows XP should also have a set of restore discs for the computer, or else the user must have an original installation disc of windows XP or 2000.
If the user does not have a set of the discs mentioned above, get them from the computer manufacturer.
| From the CD-ROM drive, the user must set the computer to boot in beforehand while following the steps to erase the hard drive. |
- Reboot the computer after placing the Windows XP/2000 installation CD into the CD-ROM drive.
- The note is "Press any key to boot from CD," then select any key on the keyboard.
- Windows XP Setup welcome screen is seen in that select enter. Select the F8 key on the keyboard which accepts the Terms and Agreements.
- Go along with the instructions on the screen to choose a hard drive partition for formatting and installing Windows XP.
- When the hard drive is being formatted, it erases all the data and then follows the steps for reinstalling Windows.
Windows and DOS's earlier versions
For erasing and reinstalling MS-DOS 5.0+, Windows ME, 3. x, 95, 98, or NT 4.0. Follow the steps given below.
Drive Formatting
- Reboot the computer to get the DOS prompt after placing the bootable disc inside the computer. Users can boot the computer either with the CD-ROM or by pressing a key to boot the system from the disk.
- Type "format c: /s" in the MS-DOS prompt, and press enter on the keyboard. When the format c: /s command does not work, into the boot disk download format.com file.
- A prompt is opened, questioning the user, "Are you sure you want to erase everything on the drive c:?" When the user wants to go with erasing, type "Y" for the yes choice and press Enter.
- Now the computer starts the formatting. No errors should come while formatting the computer.
- When the MS-DOS prompt formatting is completed, type "fdisk/mbr" and click enter. After the process, it should return the page to MS-DOS prompt without giving the message.
- When the user is returned to the MS-DOS prompt, try to reboot the computer by inserting the boot disk intact.
- For reinstallation of windows on the hard drive, follow the below procedure.
Windows NT 4.0
Users can install Windows NT in many ways, but the best way is as follows.
Users first must use the /b switch. By this, the users will benefit from not installing the diskettes. But installing the emergency recoverable diskettes is suggested if the users do not have the diskettes while or after installation of Windows NT.
Windows NT can run faster by running “smartdrv” before installing Windows NT.
- Insert the CD into the CD drive of the computer.
- Type X: (X represents CD-ROM drive).
- Then at the relevant drive, write "cd WinNT" and press on the enter key, which redirects to the Windows 95 directory.
- Type “wintt /b” in the X:\WINTT> prompt.
- To complete the installation process, go with the instructions given on the screen.
Windows 95 with a backup CD
- Insert the CD into the CD drive of the computer.
- Type X: (X represents CD-ROM drive).
- Then at the relevant drive, write "cd win95" and press on the enter key, which redirects to the Windows 95 directory.
- Type “setup” in the X:\WIN95> prompt.
- To complete the installation process, go with the instructions given on the screen.
Sometimes the user may face some issues. Then the user can use the Windows 95 setup switches page and add them to the setup command line.
Windows 95 with floppy diskettes
- Place the first Windows 95 disc into the computer.
- Type “setup” in the A:\> prompt, and press the "enter" key n to start the installation process.
- To finish the installation process, go with the commands raised on the screen.
Windows 3. x
- Insert the first Windows 3. x diskette into the computer.
- Type "setup" in the A:\> prompt, and press the "enter" key n to start the installation process.
- To finish the installation process, go with the commands raised on the screen.
MS-DOS
- Insert the first diskette of MS-DOS into the computer.
- Type "setup" in the A:\> prompt, and press the "enter" key n to start the installation process.
- To finish the installation process, go with the commands raised on the screen.