How to Open Safe Mode?
The Safe mode is a diagnostic mode in Windows that starts the operating system with a minimal set of drivers and files. It is designed to help troubleshoot and fix issues with the system. By starting in this mode, you can determine if a problem is caused by default settings or basic device drivers and narrow down the source of the issue.
A safe mode is a troubleshooting option for computers that allows them to start with minimal system files and drivers. There are two types of safe modes: regular safe mode and safe mode with networking. Regular safe mode only loads the essential drivers and files necessary for the system to function. At the same time, safe mode with networking also includes the network drivers and services necessary to connect to the internet and other computers on the network. This allows for further troubleshooting and the ability to download and install updates or drivers to fix the issue.
To initiate safe mode on a PC, there are several methods that can be used. One way is through the Settings app, another is through the sign-in screen, and the third is through a black or blank screen. The steps for each method may differ, so it is recommended to refer to official resources such as Microsoft's documentation for specific instructions on how to start your PC in the safe mode.
From Settings
Starting your PC in safe mode can be done through the following steps:
- Press the Windows logo key + I on your keyboard to open the Settings app. If that doesn't work, select the Start button and then select Settings.
- Navigate to Update & Security > Recovery in the Settings app.
- Under Advanced startup, select Restart now.
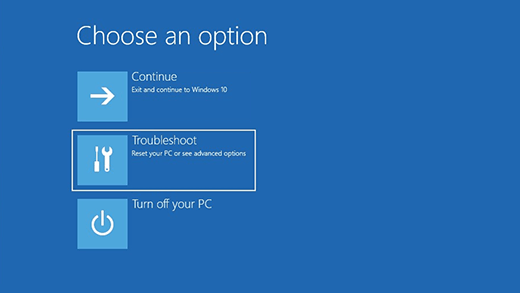
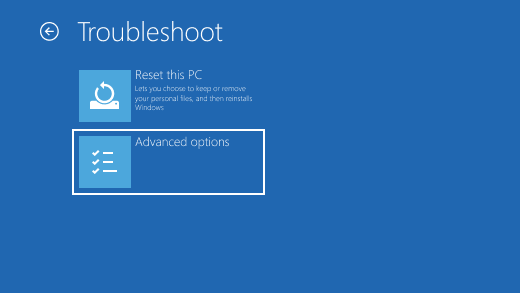
- After your PC restarts, you will be taken to the Choose an option screen. From here, select Troubleshoot > Advanced options > Startup Settings > Restart. You may be prompted to enter your BitLocker recovery key.


- After your PC restarts again, you will see a list of options. To start your PC in safe mode, select 4 or press F4. To start in the safe mode with the networking, select 5 or press F5.
Note: These steps may vary depending on your specific operating system and device. You can refer to the official documentation or consult your device's manual for more information on how to start your PC in the safe mode.
From the Sing Screen
To open Safe Mode in Windows on The Sing Screen, follow these steps:
- Press the power button on the device to turn it on.
- Press and hold the "Shift" key while clicking on the "Restart" button in the Start menu.
- Select "Troubleshoot" from the options displayed.
- Select "Advanced options" and then "Startup Settings".
- Press the number 4 or the F4 key to start your PC in Safe Mode.
- Your computer will now boot into Safe Mode and you will see "Safe Mode" written in the corners of the screen.
Note: In Safe Mode, only the basic drivers and services will be loaded and any third-party apps will be disabled. To exit Safe Mode, simply restart the device and choose to start windows normally.
From a Black and Blank Screen
To open safe mode in Windows from a black and blank screen, follow these steps:
- Press and hold the power button on your computer to force a shut down if the computer is unresponsive.
- Turn your computer back on and repeatedly press the F8 key as soon as the computer starts up. This will bring up the Advanced Boot Options screen.
- Use the arrow keys to navigate to "Safe Mode" and press Enter.
- Windows will now start in Safe Mode and you will see "Safe Mode" written in the corners of the screen.
Alternatively, you can also open safe mode in windows by:
- Press and hold the power button to force shut down if the computer is unresponsive.
- Press and hold the Shift key and click on the restart button on the login screen.
- Select troubleshoot then advanced options, then select Startup Settings, and click on Restart.
- Press F4 or 4 to start Windows in safe mode.
Note: In Safe Mode, only the default apps and settings will be available and any third-party apps will be disabled. To exit Safe Mode, simply restart the device.
How To Get Back in Safe Mode
You can restart your device to exit safe mode and return to normal mode. However, if your device continues to boot into safe mode on its own, you can try the following steps:
- Press the Windows logo key + R.
- Type "MSConfig" in the Open box and then select OK.
- Select the Boot tab.
- Under Boot options, clear the checkbox for "Safe boot".
By clearing the "Safe boot" checkbox, you will disable the option for your device to start in safe mode on its own.
However, it is important to note that disabling safe mode may cause any issues that were previously fixed by starting in safe mode to reoccur. Also, these steps may vary depending on your specific operating system and device.
You can refer to the official Microsoft documentation or consult your device's manual for more information on how to exit safe mode and return to normal mode on your device.
In Mac OS
Safe mode in Mac OS is a diagnostic feature that starts the operating system with a minimal set of drivers and files. Its purpose is to help troubleshoot and fix issues with the system. When you start up in safe mode, your Mac prevents some software such as startup items, from loading and it performs a check of your startup disk. This check may cause your Mac to take longer to start up, but it can help you resolve or isolate problems that you are experiencing with your Mac. When in safe mode the system only loads essential kernel extensions, fonts, and startup items. This helps in identifying any software or driver that could be causing problems with the system. Additionally, in safe mode, the system performs a disk verification and repair, which helps fix any disk-related issues.
Before You Being
Before beginning safe mode on Mac OS, there are a few things to keep in mind:
- Make sure you have saved any important work and closed all open applications.
- Understand that safe mode may take longer to start up than normal, as the system performs a check of your startup disk.
- Keep in mind that not all software and startup items will be available while in safe mode, as some are prevented from loading during this process.
- Be aware that any issues that were resolved while in safe mode may return once you exit safe mode, so it's important to address those issues before exiting.
- If you are unable to start your Mac in normal mode, try starting in safe mode, and see if the problem persists. It may help you troubleshoot the issue.
By keeping these things in mind, you can ensure a smooth and successful safe mode experience on your Mac OS.
Start Up Your Mac with Apple Silicon in Safe Mode
To start up your Mac with Apple silicon in safe mode, follow these steps:
- Shut down your Mac.
- Press and hold the power button on your Mac.
- Press and hold the Shift key as soon as you see the power-on indicator light.
- Continue holding the Shift key until you see the Apple logo and progress bar.
- Release the Shift key and wait for your Mac to start up in safe mode.
- Once your Mac has started up, you'll see "Safe Boot" in the login window and in the top-right corner of the screen.
- Log in to your account as usual.
Note: While in safe mode, some features may be disabled and some apps may not work, but it can help you troubleshoot and fix issues with your Mac. To exit safe mode, restart your Mac normally.
Start-Up an Intel-Based Mac in Safe Mode
To start up an Intel-based Mac in safe mode, you need to:
- Turn on your Mac or restart it.
- Once you hear the startup chime, press and hold the Shift key.
- Keep holding the Shift key until you see the login window.
- Log in to your Mac account.
- You may be prompted to log in again, and on either the first or second login window, you should see “Safe Boot” in the menu bar. This indicates that your Mac is running in safe mode.
Note: Safe mode starts your Mac with a minimal set of drivers and files. It’s useful to troubleshoot and fix issues with the system. Keep in mind that some features may be disabled, and some apps may not work while in safe mode. To exit safe mode, restart your Mac normally.
Verify Your Mac Started Up in Safe Mode
To verify that your Mac has started up in safe mode, you can look for the following indications:
- The Apple logo and progress bar will appear on the screen when you boot into safe mode.
- "Safe Boot" will be displayed in the login window and in the top-right corner of the screen when you log in to your account.
- The login window may take longer to appear than usual, as the system performs a check of your startup disk.
- Some of the third-party apps and extensions may be disabled, and you may see a message indicating that they are not available in safe mode.
- Your Mac may run slower than normal while in safe mode, as it uses a minimal set of drivers and files.
If you see any of these indications, then your Mac has started up in safe mode. If you're still unsure, you can try running a software troubleshooter, for example, disk utility. If it runs fine, then your Mac is in safe mode.
Exit The Safe Mode in Mac Os
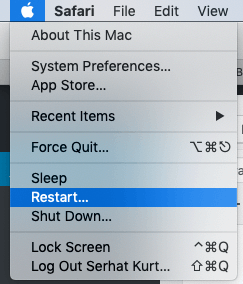
To exit Safe Mode on a Mac, follow these steps:
- Restart your Mac by clicking on the Apple menu in the top-left corner of the screen and then selecting "Restart."
- Press and hold the Shift key on your keyboard as your Mac restarts. Keep holding the Shift key until the Apple logo appears on the screen.
- Release the Shift key once the Apple logo appears. Your Mac should now boot up normally, and you should be out of Safe Mode.
Alternatively
- Shut down your Mac.
- Press the power button to start your Mac.
- As soon as you hear the startup sound, press and hold the Shift key. The Apple logo appears on your screen.
- Release the Shift key when you see the login window.
If you are still not in safe mode after following the steps, it is best to contact Apple support for further assistance.
Safe Mode In Linux
The process of entering safe mode in Linux operating systems can vary depending on the specific distribution and version you are using. However, here are a few common methods to enter safe mode in Linux:
- During boot-up, press and hold the Shift key. This will bring up the Grub menu, where you can select "Advanced options" and then "Recovery mode" or "Safe mode" to enter safe mode.
- Press and hold the Ctrl key during boot-up. This will bring up the Grub menu, where you can select "Advanced options" and then "Recovery mode" or "Safe mode" to enter safe mode.
- Press and hold the Esc key during boot-up. This will bring up the Grub menu, where you can select "Advanced options" and then "Recovery mode" or "Safe mode" to enter safe mode.
- If you are already logged into the system, you can open a terminal window and type "systemctl reboot --force --firmware-setup" to enter firmware setup mode.
Note: The safe mode in Linux is also called as recovery mode. This mode will allow you to boot with minimal services and drivers, and it may also provide a root shell so you can troubleshoot and repair your system.
Exit the Safe Mode in Linus Operating System
To exit Safe mode in the Linux operating system, you can follow these steps:
- Open the terminal by searching for it on the search bar or by using the keyboard shortcut (CTRL+ALT+T)
- Type "su admin" and then enter the admin password to gain root access
- Type "/etc/init.d/nisetbootmode default && reboot" to change the boot mode to default and reboot the system.
Note: The command might be different depending on the Linux distribution you are using, so please make sure to check the documentation of your Linux distribution for the correct command. Keep in mind that after exiting safe mode, the system will restart, and the changes that have been made during safe mode may not be saved, so it's important to save any important work before exiting safe mode.
Why do we need to Safe Mode?
The Safe mode is a diagnostic mode of a computer operating system (OS) that starts the system with a minimal set of drives and services. It is typically used to troubleshoot and fix issues that may prevent the computer from starting normally.
There are a few reasons why you may need to use safe mode:
Troubleshoot software issues: Sometimes, a program or driver that is installed on your computer may cause issues that prevent the computer from starting normally. By starting in safe mode, you can identify and remove the problematic software.
Remove malware: Malware, such as viruses and spyware, can cause a wide range of issues on a computer, including preventing it from starting normally. By starting in safe mode, you can use antivirus software to scan your system and remove any malware that is present.
Fix system errors: System errors, such as corrupted files or a damaged boot sector, can prevent the computer from starting normally. By starting in safe mode, you can use built-in tools, such as the System File Checker or Startup Repair, to fix these errors.
Remove third-party drivers: Sometimes, third-party drivers, such as those for graphics cards or other hardware, may cause issues on a computer. By starting in safe mode, you can remove these drivers and see if that resolves the issue.
Update or change the configuration of the system: In safe mode, you can update the system, change the configuration of the system or perform some other activities that are not possible in normal mode.
Note: While safe mode can be a useful tool for troubleshooting and fixing issues, it should not be used as a permanent solution. Any issues that are identified and fixed in safe mode should also be addressed in normal mode to ensure that they do not recur.