What is Autofill?
Autofill is a feature that some computer programs or applications have that automatically fills out fields in forms, saving users time. Autofill is a software function that automatically adds previously recorded information into a data field (such as a user's name or address) (as in a spreadsheet or web page). The autofill function of a web browser is used to fill out forms with data that has already been entered or with a predetermined value. Login information is frequently filled out using this feature.
Autofill is a feature frequently found in web browsers like Chrome, Opera, and Firefox that allows the browser to remember the common information entered by the user and use it to automatically fill in the fields that need that information, possibly on a different website. When a user enters their name into the top-most field on most websites that request user information, the browser saves all the information associated with that specific information. It fills out the other forms with that information. The autocomplete feature should be distinct from Autofill because it only applies to the field now in focus.

Although online browsers and spreadsheet programs support Autofill, their functionalities differ. The operation of Autofill in each kind of application is described below.
Autofill on a web browser
You complete a form every time you enter information on a website. There are just two fields on some forms, such as login forms (for a username and password). Others require you to fill out several fields before submitting the form.
For certain websites, most browsers securely save usernames and passwords. After saving your login information, you may use Autofill to quickly fill in the username and password boxes. Other forms of data, like credit card numbers and internet logins, can also be saved by Autofill.
Note: Contrary to popular belief, Autofill is not the same as autocomplete, a browser function that suggests words as you type them in address bars and search boxes.
Methods to enable and disable Autofill in a web browser
Let's see ways to enable or disable the autofill feature in some of the web browsers:
Chrome:
The autofill feature in Google Chrome can fill three forms or fields: passwords, credit card details, and addresses. Let's look at how to use Autofill in Chrome and how to make it enable or disable it:
- Open the Chrome browser.
- Click the Chrome settings icon of the browser window.
- On the left side of the screen, select Autofill by clicking.
- The Autofill portion on the screen offers three options: passwords, payment methods, addresses, and more.
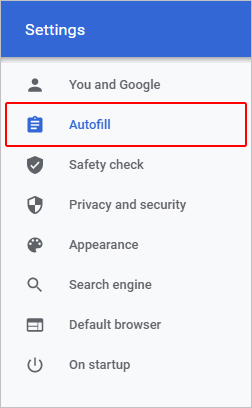
- Locate the corresponding section to activate or disable an autofill item, then follow the instructions.
Firefox:
The autofill function in Firefox works with logins, passwords, and addresses. You can enable and disable them as follows:
- Launch the Firefox web browser.
- Open Firefox and select the Menu button. Button in the browser window's upper-right corner.
- The drop-down option, and then choose Settings.
- In the left navigation pane, click the Privacy & Security option.
- Check the box next to Autofill in the Logins and Passwords section to automatically fill user name and password fields.(A)
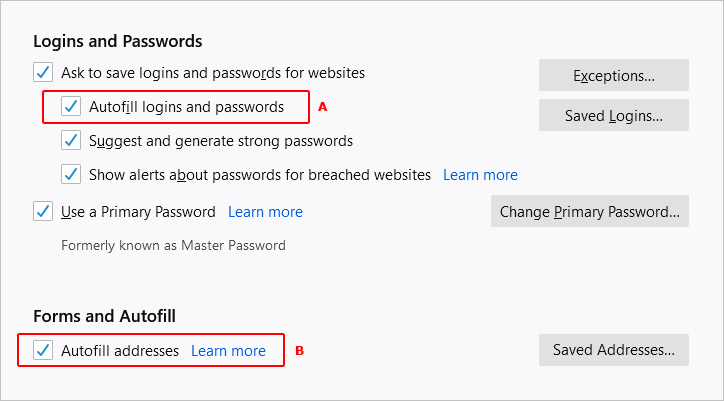
- Check the option next to Autofill addresses in the Forms and Autofill section to have address fields automatically filled in.(B)
- When you complete a form, the data is kept for the subsequent time you enter an address or sign in to an account.
Microsoft Edge:
Passwords, credit card information and addresses can all be filled into forms or fields using Microsoft Edge's autofill capability. Let's examine how Autofill works in Microsoft Edge and how to enable or stop it:
- Launch Microsoft Edge on your computer.
- Choose the More option from the Microsoft Edge Settings icon of the browser window.
- Select Settings from the drop-down menu that appears towards the bottom.
- From the Settings menu, choose the "Profiles" option. Under the Your profile part in the page's middle, you may access Passwords, Payments, Addresses, and more.
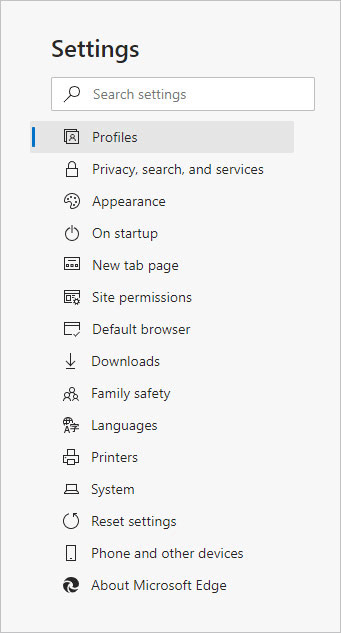
- Find the autofill item in the sections below and follow the instructions when you are confident of whether you want to enable or disable it.
Opera:
Open the Opera browser. The autofill feature in Opera can also fill three forms or fields: passwords, credit card details, and addresses. Let's look at how to use Autofill in Opera and how to make it enable or disable it:
- Open the Opera browser.
- Click the Opera menu button in the top-left corner of the screen.
- In the drop-down option that appears on the screen, select Settings.
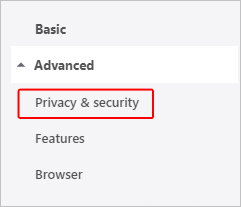
- By selecting the Opera Advanced button in the Settings window, choose Privacy & security.
- In the Privacy and Security section, scroll down to the Autofill section. There, you'll see three choices: Passwords, Payment methods, Addresses, and more.
- Locate the corresponding section to activate or disable an autofill item, then follow the instructions.
Third-party autofill tools:
It might be advantageous to utilize a third-party solution to autofill data across all of your devices and browsers if you use a variety of them. Dash lane and RoboForm, accessible on PC, Mac, iPhone, iPad, and Android devices, are our two favorite autofill tools.
Spreadsheet Autofill
The autofill feature in spreadsheet programs like Microsoft Excel makes it simple to fill in blank cells. When making new spreadsheets, Autofill can quickly identify patterns, and both rows (horizontally) and columns can employ Autofill (vertically).
Autofill in Excel:
A fill handle is a crucial component of Excel's AutoFill feature. The fill handle transforms from a square to a black plus sign when the mouse is moved or hovered over it. It should be noted that only one direction can be selected at a time while dragging the fill handle. The fill handle also cannot be moved diagonally.
Let's look at a few instances to understand better how Excel's AutoFill feature functions:
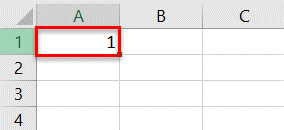
In the figure below, cell A1 contains a number.
Let's perform the given two tasks
- Use Excel's AutoFill feature to copy the value from cell A1 to the range A2:A7.
- Display and describe the many options available in the AutoFill options box.
The following is a list of the actions required to complete the tasks:
Task 1:
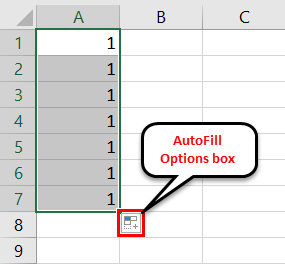
- Choose cell A1. Move the mouse pointer over cell A1's lower-right corner. It appears as a black plus sign, as seen in the figure below. The fill handle changes into this plus sign (shown within the red circle) when the cursor is placed over it.
- Till cell A7, drag the fill handle. The number 1 fills the entire range A2:A7.
Task 2:
As soon as the fill handle is pulled up to the last cell, the AutoFill choices box is visible underneath that cell. The AutoFill options box should be clicked. Various choices are presented. When the fill handle is pulled to a range, these choices offer suggestions for how the range will be filled.
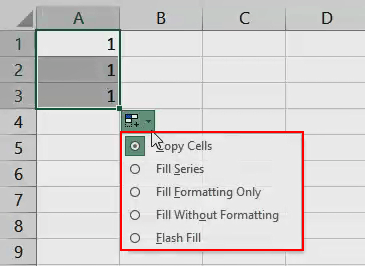
- Choosing "copy cells" as the first option. The value of the initially chosen cell is copied to the full range by using this option.
- The second option is "Fill series." This option allows the use of numerical values or the mixing of numerical and textual data.
- "Fill formatting only," is the next selection. The formatting of the first chosen cell is transferred to the selected range when this option is used.
- "Fill without formatting" is the fourth selection. The value of the first chosen cell is copied to the chosen range when this option is used.
- "Flash fill" is the fifth choice. This option automatically fills the chosen range. In most cases, it is used to aggregate or extract values from one or more data cells.