How to use a computer keyboard
Alphanumeric, function, control, and arrow keys are on the keyboard. The left hand holds the "asdf" keys, while the right-hand holds the "jkl;" keys. To advance or switch between boxes, press Shift+Tab. I can navigate to an error and fix it using the arrow keys.
Every kind of computer uses a keyboard as an input device. Even more recent gadgets like smartphones and tablets continue to have an on-screen keyboard. New computer users can utilize the information on this page to get more comfortable and proficient with the keyboard. We advise new users to read through each area below and apply each technique.
Connecting the keyboard
The keyboard must be correctly connected to the computer before you can use it. See our instructions on connecting and installing a keyboard if you have a new computer and need assistance connecting the keyboard, or the keyboard is not working.
How to turn on the keyboard
All keyboards that have a connection securing them to the computer come on automatically when the computer does. If you have a wireless keyboard, you can switch it on and off to save battery life. To use these keyboards, turn the keyboard over and look at the back. A switch near the bottom or top of the keyboard should allow you to turn it on or off.
Tip
By hitting the Caps Lock, Scroll Lock, or Num Lock keys, you can check to see if the computer is on and then look for an indicator light. A light should be turned on or off when these keys are pressed. If there are no lights, then the keyboard is broken.
Familiarizing yourself with the keyboard
An overview of a desktop computer keyboard may be found below. The keyboard's main components are seen in this image. Below, each section is detailed in more depth.
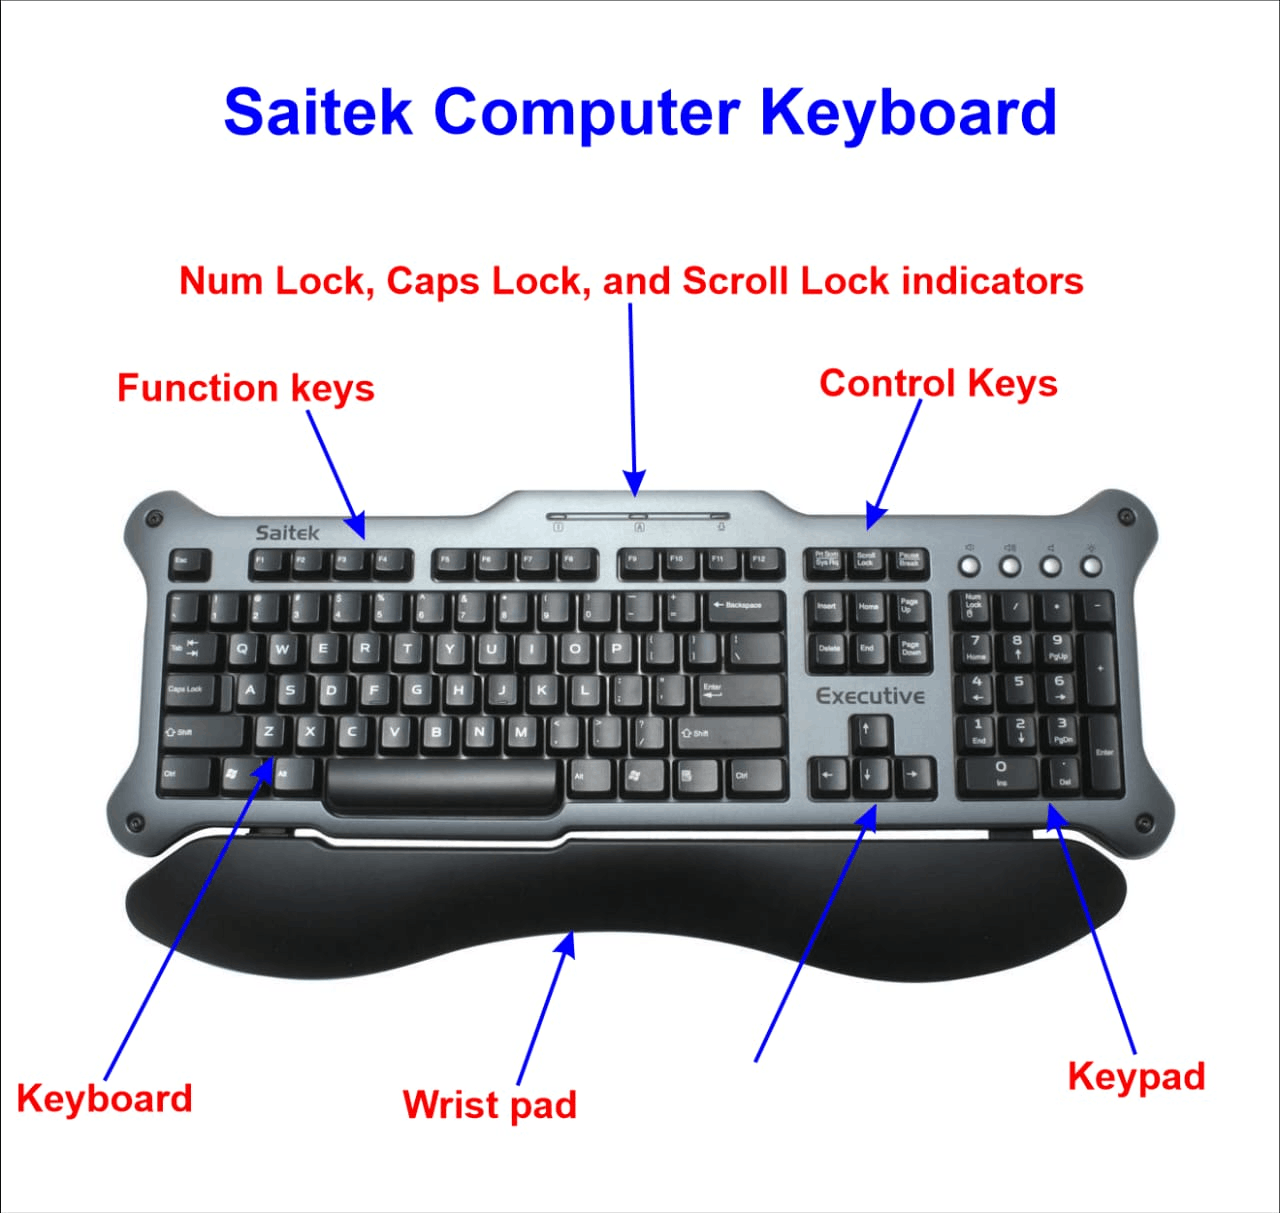
Overview of each section of the keyboard
Alphanumeric keyboard
Most of the keyboard, which includes letters, numbers, punctuation, and certain symbol keys, is alphanumeric. If the first six letters of your keyboard spell out "QWERTY," you are using a QWERTY keyboard. The illustrations depict the QWERTY keyboards that the majority of users use today.
There are rows of keys for each group of alphanumeric keys. Typically, a keyboard has six rows of keys, with the home row where your fingers rest. The function key row, number key row, top row, bottom row, and spacebar row are additional keyboard rows.
Function keys
Programs employ the function keys, sometimes known as the F1 through F12 or F19 keys, as shortcuts for frequently used actions. By using the F1 key, you may access online assistance for most programs.
The function keys on some keyboards can be used to launch extra computer features. The function keys can be used in conjunction with the Fn key to doing additional tasks, such as adjusting the screen's brightness, gaining access to media controls, or shutting down the computer.
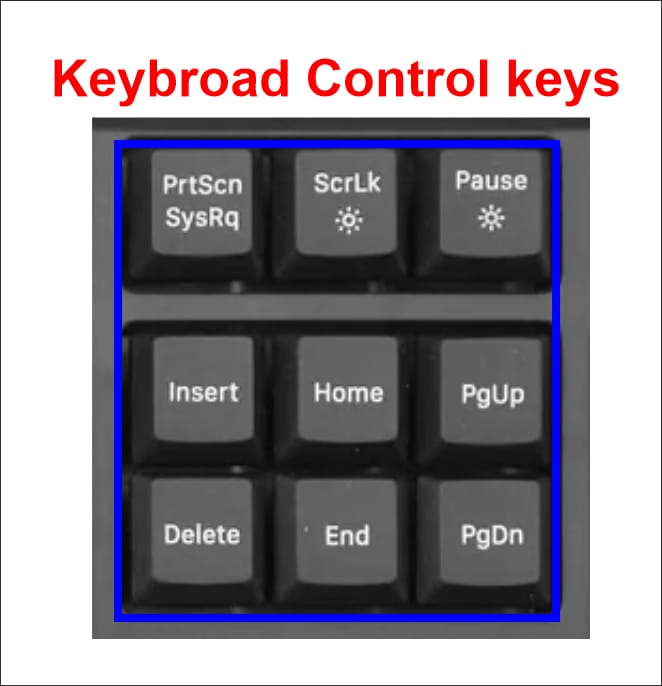
Control and toggle keys
The user has more cursor and text manipulation control thanks to the control and toggles keys. In many programs, they can also be used as shortcut keys. See our definition of control keys for more details and examples.
Tip
Ctrl keys are distinct from control keys.
Keypad
The keypad allows the user easy access to numbers and mathematical operations like plus, divide, times, and subtract, despite not being included on all
computer keyboards, particularly laptops. Visit the numeric keypad page for further details, images, and relevant links.
Wrist pad
The Saitek keyboard in our illustration contains a wrist pad to assist the user's wrists. Hundreds of different wrist pads are available at a computer store or online, even though many keyboards do not come with one.
Warning: Wrist pads are debatable, and many ergonomic experts claim using one could increase stress and contribute to carpal tunnel syndrome.
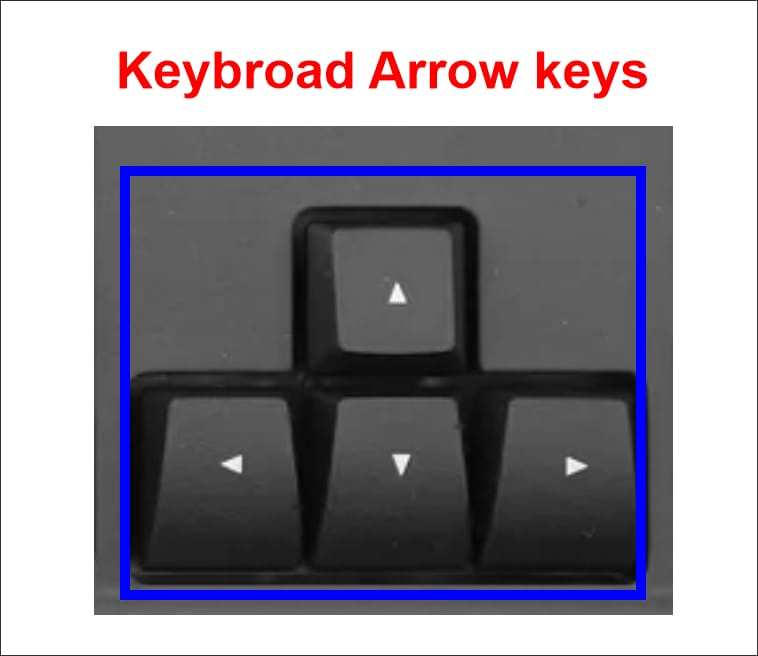
Arrow keys
The cursor can be moved, or a highlighted selection can be changed using the four arrow keys. Visit our arrow keys page for further details.
Special keys or media keys on a multimedia keyboard
Additional buttons on multimedia keyboards are absent from standard keyboards. Information on our special keys can be found there.
Start typing and how to position hands
Put your hands in the right position and the home row keys with your fingertips before you start typing. Check your fingers while you type to ensure they are all pressing the right keys.
Tip
The "F" and "J" keys include tiny bumps (homing bars) that make it easier to locate the correct location without having to glance at the keyboard. You ought to be able to feel these lumps with your index fingers on both hands.
The home row keys and where each finger should be placed. The A, S, D, and F keys should be covered by your left hand, while the J, K, L, and; keys should be covered by your right hand. Additionally, each color serves to show which fingers control which key.
You are strongly encouraged to practice using the correct approach on this page if you have never learned how to type properly and now hunt-and-peck. This not only increases your typing speed but also eases any strain that comes from having to glance down at the keyboard.
Practice typing the line below, each letter of the alphabet, after your hands are in the correct position.
Correcting errors
As you type, mistakes are unavoidable, but the backspace and delete keys allow you to fix them. Backspace and delete will remove a character to the left or right of the cursor, respectively.
Note: Two delete keys are included on Apple keyboards. The keyboard's other delete key and the large delete key have the same functionality. Delete, or backspace can be used repeatedly to remove several characters.
Using the arrow keys to move around
Avoiding the usage of the mouse whenever feasible is one of the finest ways to increase your keyboard proficiency. It takes a lot of time to transfer your hand from the keyboard to the mouse and back to the keyboard. The arrow keys can move the cursor instead of the mouse, which is one way to avoid using it.
Move the pointer to the proper spot in the practice area below using the arrow keys to change or add new text.
Tip
To make the text cursor jump into the text field below, press Tab on your keyboard. A web page's pointer or selection is moved to the following Using the "Tab" key, go to an interactive element such as a button, text box, or hyperlink.
Text is being wiped one letter and one word at a time
Removing multiple letters, or even an entire word, is also essential at once. To remove all the text from a line, use the procedure below.
Uppercase, lowercase, and all caps
Your computer always types lowercase letters unless you activate the Caps Lock key. Hold down the Shift key on the keyboard while pressing the letter you wish to capitalize on, making the initial letter of a sentence or word uppercase.
The LED light should turn on to show that the Caps Lock is enabled if you wish all words to be capitalized. When activated, everything stays capitalized unless you press the Caps Lock key again or continue to hold down the Shift key.
Use the practice of typing uppercase and lowercase letters provided below.
Getting to the start and finish of a line
To jump to the line's beginning, you can alternatively utilize the Home and End keys. To navigate to the beginning and end of a line of text, use the method below.
Highlighting text using the keyboard
Using the Shift key on the keyboard, you can also highlight text. To highlight specific words in the statement below, follow the guidelines below.
Tip
When text has been highlighted, you can either start typing to replace the highlighted content or use the Del key to remove all highlighted text.
Typing numbers and symbols above numbers
There are two places on the keyboard where numerals can be typed. The numerals and symbols that appear above the numbers at the top of the keyboard are covered in this section. We'll explain how to use the 10-key keypad later.
The top row of the keyboard's numerals 1 through 0 serve both the number and the symbol purposes. If you press the number key while holding down Shift, the symbol for the number is input as well. For instance, pushing the number 2 key displays "2" on display. The at sign (@) is entered by pressing 2 while holding down Shift.
Using the keyboard, copy and paste text
Every person who uses a computer will occasionally copy and paste the text. Learning how to use the keyboard to copy and paste text can be quite time-efficient.
Keyboard Ergonomics and Setup
Many issues can result from poor keyboard use, from short-term difficulties like aching wrists to long-term issues like Carpal Tunnel Syndrome. These conditions can take years to develop and, once established, are difficult, if not impossible, to reverse. That is why, even if you are not currently experiencing discomfort, it is critical to position and operate your keyboard correctly to avoid future difficulties.
1. If you don't currently use an adjustable keyboard/mouse tray, consider attaching one to your surface.
This provides a significantly broader range of adjustments and aids in the maintenance of a correct ergonomic configuration. Choose a system that allows you to modify the height of the keyboard, tilt it away from you slightly for better posture (negative tilt), and operate the mouse with your upper arms relaxed and as near to the body as feasible.
2. Make sure the height of your keyboard allows you to keep an "open angle" with your arms.
The keyboard should be situated just above the level of your lap in the right position. (If you don't have an adjustable keyboard tray, you may need to modify your chair height.) this is lower than most people put their keyboard, but it allows your arms to dip downward when typing, leaving your elbows at a comfortable "open" posture.
3. If your keyboard is lower than the desk surface, tilt the back edge of the keyboard slightly down (known as "negative keyboard tilt").
Try to prevent positive keyboard tilt (i.e., where the top row of keys is noticeably higher than the bottom row of keys). Using a little negative keyboard tilt can assist you in keeping your wrists in the right (neutral) posture. Also, ensure that any "legs" attached to the bottom front of your keyboard are not stretched.
4. If you use a keyboard tray, ensure enough room for your mouse.
Keep your mouse close to your keyboard so you don't have to reach far to get it.
5. If you have a broad chest, consider a "split" keyboard.
A split keyboard divides the keyboard into two halves, each of which points slightly outwards. The outward angle lets your wrists and forearms point inward without requiring your elbows to come in as far, better conforming to the contours of your body. Conversely, thinner people may find a traditional "straight" keyboard more comfortable.
Tips for healthy keyboard usage
1. When typing, use a soft touch (do not smash on the keyboard!).
Try to depress the keys with as little force as possible. Because the tendons from your fingers join near your elbow, hitting the keys excessively hard might cause problems that you may not identify with your keyboard, such as discomfort and inflammation in your elbows (Epicondylitis).
2. Maintain a neutral (straight) wrist posture, not bent up or down.
When you're typing, your forearms slump as your arms weary, causing your wrists to extend even further—yet another reason to take frequent stretches or rest breaks! Extending and flexing your wrists repeatedly compresses tissues inside the wrist's carpal tunnel. This can result in discomfort and ailments such as carpal tunnel syndrome.
3. Maintain an open elbow angle of 90 degrees or better.
Keeping your elbows bent less than 90 degrees can result in nerve compression, resulting in aching wrists and arms. To attain a comfortable position, adjust the height of your chair or keyboard tray.
4. Maintain a comfortable posture with your shoulders relaxed and your elbows at your sides.
Your forearms should be parallel to the ground. If your chair has armrests, they should support your elbows pleasantly during rest intervals. It would be best if you didn't have to elevate your shoulders to reach the keyboard; instead, consider elevating your chair.
5. Use wrist and arm supports exclusively when resting, not while typing.
If your workplace has wrist or armrests, utilize them while taking breaks. When typing, never use your wrist or armrests. A wrist rest should be utilized to support the heel of your palm, not your entire wrist.