How to install a computer processor
Installing a CPU is much simpler than many other steps in the PC-building process. There is no need to worry that you will make a mistake because we will walk you through every step.
The CPU, or processor, controls the computer's instructions and processing power. Your computer can perform tasks more quickly with the more capable and modern processor it has. Make your computer work and think more quickly by upgrading its CPU.
Steps to install computer processor
1. Keep your CPU where it is
Hold your position firmly. Take your CPU out of the box only after doing so.
2. Ready your motherboard
The easiest method would be to install your new CPU in a new motherboard; however, we will not assume such is the case.
A new motherboard may have a plastic cover over the CPU socket. If you install a new CPU, the CPU cooler and the old CPU on the motherboard will be in the way.
Remove whatever is blocking the CPU socket in either scenario. You can feel how much pressure is needed to press down. This is also a good opportunity to become acquainted with the retention arm that holds the CPU in place after installation and the metal bracket on an Intel socket.
Maintain an open and elevated retention arm. Once your CPU socket is open, you're ready to go.
Note: When holding your computer, it is best to contact the sides. Touching the bottom of the metal lid may leave undesired residue behind, which may affect performance.
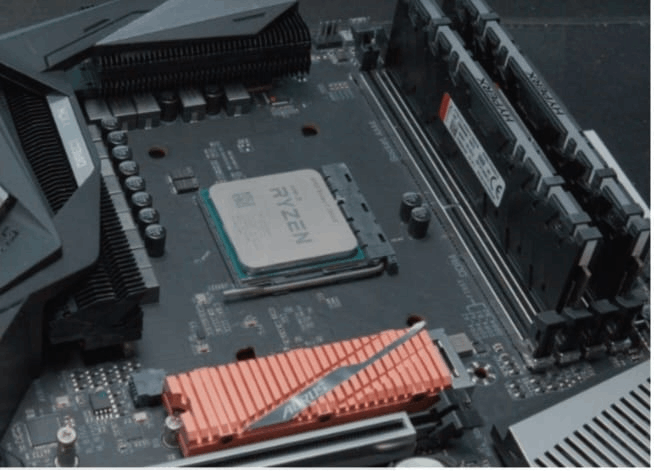
The motherboard's CPU socket must receive your CPU with the proper side up. Thankfully, you can always find markers on the CPU and socket to aid in proper alignment.
Look for a corresponding indicator on the sockets and in the corner of your CPU. It will resemble a little triangle. Consult your motherboard and CPU documentation if you need to notice any indicators.
4. Set the CPU into its socket
It should spring into place if you align your CPU properly with the socket. If anything appears to be out of position, you may need to gently, and we mean softly, shift it around. For example, aligning AMD CPU pins with the socket holes can be a little tougher.
5. Close the retention arm
Once your CPU is safely fitted in the socket, the retaining arm should be simple to push down (if it's an Intel CPU, lower the bracket first). If you try to force it, you risk hurting your CPU (we've bent CPU pins this way, and it's not fun trying to bend them back). Instead, gently push the retention arm shut with your pinky finger. Check the CPU's placement in the socket again if it feels like the retention arm is resisting you.
Note: If you're also setting the rest of your computer, be sure the CPU power socket on your motherboard is linked to your power supply. It is unique from the primary power connection for the other motherboard components.
How to install a CPU on the motherboard
You just purchased a new CPU and a gleaming new motherboard, and you were also fortunate enough to obtain a new graphics card in 2021, despite what is certain to be the biggest GPU scarcity in history. Great! What comes next? Taking all of the new components and assembling them to create a new computer. To get your PC up and running, you must first install the CPU on the motherboard. Installing a CPU is analogous to installing the brains of your machine. Fortunately, it's a straightforward process, so there's no need to worry.
Everything you need is a prerequisite.
If you've decided to start building your PC, chances are you've already gathered all of the necessary components. If not, now is the time to start. You just need the CPU and motherboard to complete the stages in this tutorial, but we'll look at many other things you might wish to have before starting this phase of PC building:
Thermal Paste: You'll need thermal paste after installing the CPU, but it's good to have it on hand during the procedure.
CPU Cooler: A CPU cooler is required to ensure that the thermal output of the CPU is maintained. This is true independent of the CPU's manufacturer, performance, or generation. This is not optional; you must use a CPU cooler, either a fan cooler or a liquid cooler. A CPU will not function without a cooler, and owing to the excessive heat output, and it will almost immediately fail.
A compatible motherboard: Not all CPUs are compatible with all motherboards on the market. Many CPUs are installed in various CPU sockets on the board, requiring specialized and suitable chipsets to function. For example, AMD Ryzen 5000 series CPUs require an AM4 CPU socket and can only be used with the X570, B550, B450 chipsets, and so on. For example, the Intel Core i5-12600K will only operate with one of the available Z690 motherboards. These Z690 motherboards have the new LGA 1700 CPU socket and the new Z690 chipset.
That's all there is to the prerequisites. Because installing the CPU is a toolless operation, you can wait to get any tools.
Note: Installing a CPU on the motherboard is much easier if you do it outside the PC casing. This provides you more room to operate instead of being constrained by the limited space within the chassis. If you're replacing a CPU in an existing setup, we recommend removing the motherboard first.
Precaution should be taken while installing the computer processor
The most important precaution when installing a CPU is to take anti-static measures by placing your feet on any grounded equipment. It is generally advisable to handle the components by holding them horizontally instead of directly touching the connections.
1. Turn off and unplug the computer before attempting to disassemble the tower.
2. Remove any jewellery made of metal from your fingers, arms, or wrists, such as bracelets, rings, or watches. Your device may still have some electric charge even if it is disconnected.
3. Ensure that your hands are completely dry to prevent electrocution and damage to any mechanical components.
4. For the same reason as in number 3, it is best to work in a cool environment to prevent perspiration.
5. Rub your hands against another metal surface (such as the computer casing) before contacting any tower portion to dissipate static charge, which might harm delicate gadgets.
6. Set up a location to store any screws you might remove. To prevent confusion between the similar-looking screws, a container or sheet of paper with labelling for each component (casing, motherboard, CD drive, etc.) is perfect.
7. Handle each component carefully. Carefully place each piece you remove on a firm surface.
8. Avoid removing a component by force if it is difficult to remove. Alternatively, be certain that you are removing it properly and that no cables or other things are in the way.
9. Use caution when handling the motherboard because its underside is quite pointy and dangerous.
10. The power source, a box attached to the side or bottom of the device to which all cables are connected, should always be retained.
11. To prevent a wire from breaking, grasp it at the base or head when removing cables, wires, or ribbons.
12. Avoid dropping small parts—especially screws—into hard-to-reach places like the disc drive or computer fan.
13. Keep in mind that dust, shock (electrical or from being dropped), and moisture (sweat or drinking water) are the three things that can harm a computer the most (any debris from household dust to bits of food).