How to fix a CMOS checksum error?
A CMOS checksum error is a conflict between the CMOS and BIOS, which can occur when the computer is booting up. The CMOS is a chip on the motherboard that stores system configuration data, such as the date and time, system hardware settings, and system security settings. The BIOS, on the other hand, is a firmware that controls the basic input/output functions of the computer, including the start-up process.
The CMOS checksum error occurs when the data stored in the CMOS does not match the data that the BIOS uses to start up the computer. This can happen if the CMOS battery is low or failing, the BIOS is corrupted or outdated, or if there is a virus or malware infection. As a result, the system may not function correctly or may not start up at all.
The error message that appears on the screen when the error occurs typically appears on the screen when the computer is first turned on before the operating system starts to load.
The troubleshooting for the CMOS checksum error involves:
- Reseating The Battery
- Clearing The CMOS
- Updating The BIOS
- Checking For Virus
- Hardware Failure Check
- Enable Halt on No Errors
As mentioned earlier, some steps may require technical knowledge and you should be careful while doing so. If in doubt, it's always better to refer to the user manual or seek professional help.
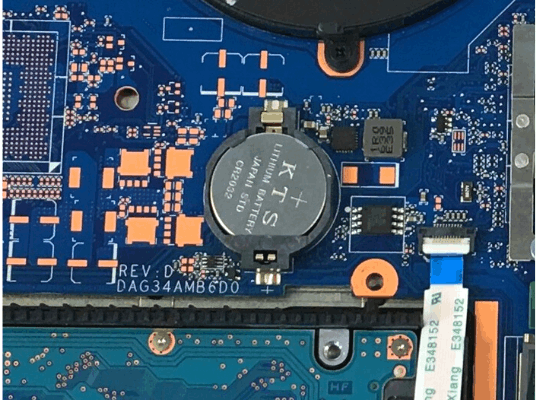
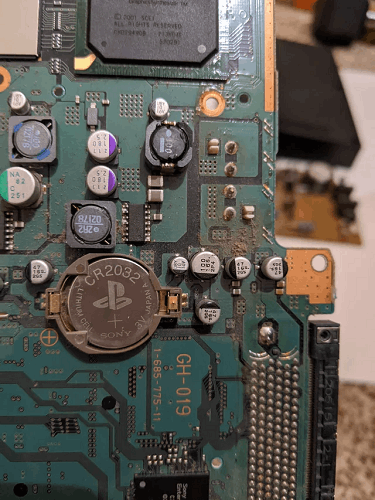
1. Reseating The Battery
Reseating the CMOS battery is one of the first troubleshooting steps you can try when encountering a CMOS checksum error. The CMOS battery is a small, circular battery that is located on the motherboard, usually near the CMOS chip. This battery is used to provide power to the CMOS chip so that it can retain system configuration data, even when the computer is powered off.
Here are the steps on how to resets the CMOS battery:
- Power off the computer and unplug it from the wall.
- Open the computer case.
- Locate the CMOS battery. It will typically be a small, circular battery, similar in size to a coin.
- Carefully remove the CMOS battery from its socket by gently pushing down on the battery release clip, or by using a small flat-head screwdriver.
- Wait for a few minutes to allow any residual power to dissipate.
- Carefully reinsert the CMOS battery into the socket, making sure that the battery is oriented correctly and is securely seated.
- Close the computer case, plug the computer back in, and power it on.
If reseating the CMOS battery solves the problem, the CMOS checksum error should disappear, and the computer should start up normally. If the error persists, it's possible that the battery is defective and needs to be replaced. Also, try the other troubleshooting steps that I mentioned earlier.
2. Clearing The CMOS
Clearing the CMOS is another troubleshooting step that can be tried when encountering a CMOS checksum error. Clearing the CMOS will reset the BIOS settings to their default values and will erase any custom settings that have been configured.
Here is the step on how to clear the CMOS:
- Power off the computer and unplug it from the wall.
- Open the computer case.
- Locate the CMOS jumper on the motherboard. The CMOS jumper is typically a small, three-pin connector that is labeled as "CMOS" or "CLR CMOS."
- Move the CMOS jumper to the "clear" position. This will be the position where the pins are shorted together. Refer to the motherboard manual for the specific location of the jumper and its default position.
- Wait for a few seconds to allow the CMOS to be cleared.
- Move the CMOS jumper back to its original position.
- Close the computer case, plug the computer back in, and power it on.
After clearing the CMOS, the computer should start up normally, and the CMOS checksum error should be resolved. However, any custom settings that were configured in the BIOS will be lost, and you will need to reconfigure the system settings.
Note: clearing the CMOS will not fix the problem if it's caused by a hardware failure like a bad battery or a faulty chip. Also, before doing this, it's important to have a backup of the system configuration and bios settings, as clearing the CMOS will wipe all previous settings.
3. Updating The BIOS
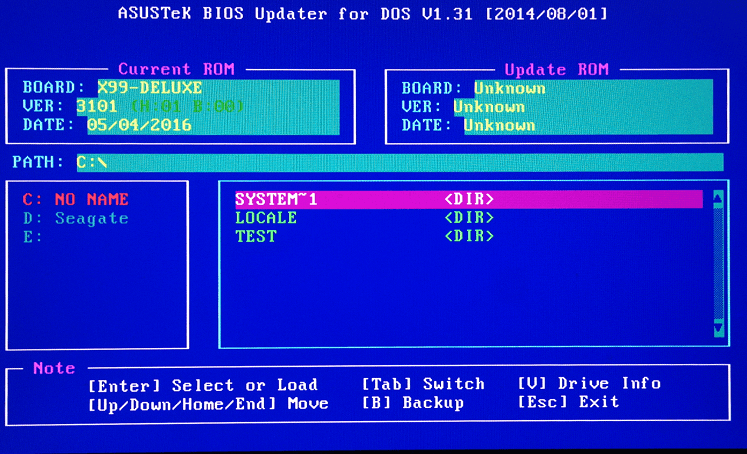
Updating the BIOS, or Basic Input/Output System, can also help to fix a CMOS checksum error, as well as other issues with the system's stability or compatibility. Here are the general steps for updating the BIOS:
- Download the latest BIOS update from the manufacturer's website.
- Create a bootable USB drive with the BIOS update file on it.
- Restart your computer and press the key to enter the BIOS setup during the start-up process. The key to enter BIOS may vary depending on the manufacturer of your computer, but it is usually one of the F keys or the Del key.
- Locate the BIOS update option in the BIOS setup, often found in the "Advanced" or "Utilities" menu.
- Follow the instructions on the screen to complete the BIOS update, which may involve selecting the USB drive that you created in step 2, and Confirm and proceed to update BIOS.
- Once the update is finished, restart your computer and check if the issue has been resolved.
Note: It's always a good practice to back up your important data and look for the instructions for your specific mother board, some motherboards have a different method of updating the BIOS, check with the manufacturer for instructions if you need clarification.
4. Checking for Virus
Checking for viruses is an important step in troubleshooting and maintaining the health of your computer. Viruses can cause a wide range of problems, including slow performance, crashes, and even data loss.
Here are some general steps you can take to check for viruses on your computer:
- Update your anti-virus software: Make sure you have the latest version of your anti-virus software installed and it is up-to-date with the latest virus definitions.
- Run a full scan: Use your anti-virus software to perform a full scan of your entire system. This will check all files and folders on your computer for viruses.
- Check for other types of malwares: In addition to viruses, there are many other types of malwares, such as spyware, adware, and trojans. Make sure to run a full scan for these types of malware as well.
- Check for rootkits: Rootkits are a special type of malware that can hide deep within the operating system, making them difficult to detect. Some anti-virus software includes a specialized tool to detect and remove rootkits.
- Check for unwanted programs: Unwanted programs such as adware, browser hijackers, and other potentially unwanted programs can also cause issues on your computer, check for this type of software in the program folder or in the control panel.
5. Hardware Failure check
Hardware failure can cause a wide range of issues on your computer, including crashes, blue screens, and boot failures.
Here are some steps you can follow to check for hardware failure:
- Check the power supply: Make sure that the power supply is providing the correct voltage to the various components in your system. Test the power supply using a multimeter or by replacing it with a known working power supply.
- Check the cooling system: Ensure that the fans and heatsinks on your system are functioning properly. Overheating can cause a variety of issues, such as stability problems and even permanent damage to components.
- Check for loose connections: Make sure that all connections to the motherboard and components are secure, such as the RAM, GPU, and storage devices. Loose connections can cause stability issues and even prevent the system from booting.
- Check for dust: Dust and debris can accumulate inside your computer and can cause overheating. Clean out the dust and debris, especially the air vents, fans, and heatsinks.
- Check the components: If all of the above steps check out, you may have a hardware failure. Test each component individually, such as RAM, storage, and GPU. If the problem persists, try replacing the component with a known working one to verify if it's the cause of the issue.
- Run hardware diagnostic tools: Some motherboards come with in-built diagnostic tools to help identify any hardware failure, check the motherboard manual or visit the manufacturer’s website for more information.
6. Enable Halt on No Errors
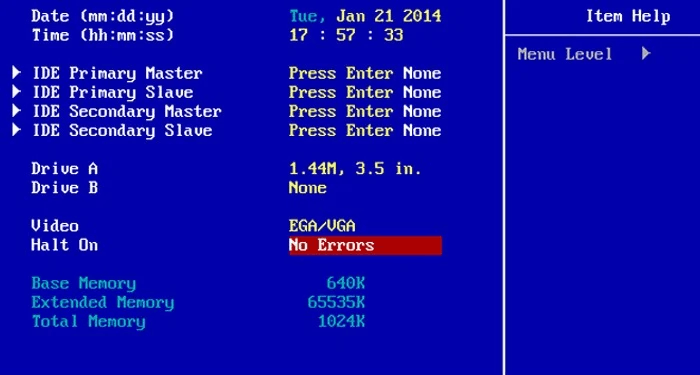
In the BIOS, the "Halt On" setting determines what types of errors will cause the Power On Self-Test (POST) to stop and prevent the system from booting. The different options available in the BIOS, such as "No Errors", "All Errors", "All But Keyboard", and "All But Diskette/Floppy," control which errors will cause the system to halt during the POST.
If you select "Halt On" as "No Errors", the system will ignore all POST error messages and continue with the boot process. However, this is not recommended as it could potentially cause more serious issues down the line if there are underlying hardware problems that are not being addressed.
Causes of CMOS Checksum Errors
CMOS (Complementary Metal-Oxide-Semiconductor) checksum errors are a common problem that can occur in computers. The CMOS is a small battery-powered chip that stores important system settings and configuration information, such as the system time and date, hard drive and boot order settings, and other vital system parameters. When a CMOS checksum error occurs, it means that the information stored in the CMOS has become corrupt or has been altered in some way.
There are several possible causes of CMOS checksum errors, including:
Power Surge: A power surge can cause a CMOS checksum error by corrupting the information stored in the CMOS. This can happen if there is a sudden power outage or if the power supply to the computer is unstable.
Dead or Failing CMOS Battery: The CMOS battery is responsible for keeping the information stored in the CMOS alive even when the computer is powered off. If the battery is dead or failing, the information stored in the CMOS will be lost or corrupted.
Overheating: A computer that is overheating can cause a CMOS checksum error. This is because the high temperatures can cause the CMOS chip to malfunction or become damaged.
Malware or Virus: Malware or viruses can cause a CMOS checksum error by corrupting or altering the information stored in the CMOS. This can happen if the computer is infected with a virus that is specifically designed to attack the CMOS.
Hardware Failure: Hardware failure can also cause a CMOS checksum error. This can happen if a component on the motherboard or in the computer is malfunctioning or has failed.
Human Error: Sometimes, CMOS checksum errors can be caused by human error. This can happen if someone accidentally changes the settings in the CMOS or if someone accidentally removes the CMOS battery.
To fix a CMOS checksum error, the first step is to determine the cause of the problem. If the cause is a power surge or a dead or failing CMOS battery, then the solution may be as simple as replacing the battery or stabilizing the power supply. If the cause is overheating, then the solution may be as simple as cleaning the computer's cooling system or making sure that there is adequate ventilation. If the cause is malware or a virus, then the solution may be to run a full system scan and remove any malicious software.
If the cause is hardware failure, then the solution may be to replace the malfunctioning component. If the cause is human error, then the solution may be to restore the original settings in the CMOS. In any case, it is always best to consult a professional or the manufacturer's documentation for the specific steps to take in resolving the issue.
Conclusion
In conclusion, CMOS checksum errors can be caused by a variety of factors, including power surges, dead or failing CMOS batteries, overheating, malware or viruses, hardware failure, and human error. To fix a CMOS checksum error, it is important to determine the cause of the problem and take the appropriate steps to resolve the issue. It is always best to consult a professional or the manufacturer's documentation for specific guidance.